Border OptionsHugging border, circle, square, or rectangle — with a 3mm satin stitch.
Backing OptionsAvailable with iron-on, sew-on, or velcro backing.
Fast ShippingShipped quickly from the USA.
Free Online Tools
Powerful embroidery utilities that save time and prevent costly mistakes.
Stitch AssistantRECOMMENDED
Get the exact stabilizer, machine settings, needle, and thread color sequence for every embroidery design you purchase — based on that design's stitch density, dimensions, and color count.
Create charming hanging ornaments with applique techniques. These vibrant designs feature a variety of shapes perfect for adding a touch of color to any space. Step-by-step instructions are included.
These projects use the Flower, Butterfly and Berry coasters in the
Summer Fun Coaster collection and the Floral Heart Coaster from the
Spring Coaster collection from A Bit of Stitch designs. However, any
appropriate appliqué design with a clean finished edge can be used for
this fun project.
Before beginning, preshrink all project fabrics
and back them with fusible webbing such as WonderUnder. For this project
you will need to use the same color and type of thread in your bobbin
as the top thread for each different thread color in the design.
Step 1:
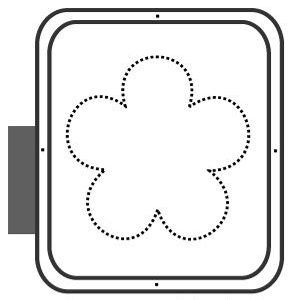
Hoop a piece of Ultra-Firm cut-away stabilizer.
Step 2:
(Click Image to Enlarge)
Stitch the first outline stitching (commonly called “Applique Material”)
for the portion of the design that will be the outside edge. For
instance, the petal outline of this flower will be the outside edge.
Step 3:
Remove the hoop from the machine. Place a piece of fusible web backed
fabric over the outline stitching on both the front and the back of the
hoop. Be sure both pieces of fabric cover all of the outline stitching.
Use a light coating of temporary spray adhesive to help hold the fabric
in place.
Step 4:
Put the hoop back in the machine and stitch the second outline stitching
for the same portion of the design. This stitch sequence will be the
tack down (commonly called “Applique Position”) stitching which sews the
fabric into position.
Step 5:
Remove the hoop from the machine and trim away the excess fabric around
the tack down stitching on both the front and back of the hoop. Trim as
close as possible to the stitching line without cutting through it.
Using very sharp, small scissors with curved blades is helpful.
Step 6:
Place the hoop on a flat, hard, heat protected surface and fuse the
applique material to the cut-away using a mini-iron. Fuse only the
front. (Unless you can support the hooped cut-away from beneath, fusing
the back at this time may accidentally dislodge the cut-away from the
hoop.)
Step 7:
Put the hoop back in the machine and stitch the final satin stitch
edging covering the tack down outline stitching. Remember to use the
same color of thread in your bobbin.
Step 8:
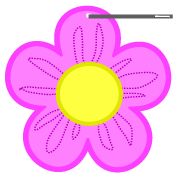
Now it is time to fill in any detailing or additional appliques in the
center of your design. The sample flower design shown has an applique
center and petal detail stitching. In this case, the petal detail
stitching should be sewn next, once again matching the bobbin thread
color to the top thread color. Then the previous steps would be repeated
to complete the flower center applique.
Step 9:
To assemble the hanging charm ornament, you will need a pair of needle
nose pliers, wire cutters, some pretty glass beads, a lobster clasp and
two crimping beads. The needle nose pliers will be used to flatten the
crimping beads tightly on the beading wire.
Step 10:
Carefully cut out the design, trimming away the excess cut-away
stabilizer. Cut as close as you can to the satin stitch edging without
clipping any stitches. If you do, mend them with a bit of seam sealant.
Step 11:
Iron the ornament from the back and then again from the front to
complete the fusing. Protect the embroidery stitches with a press cloth
while ironing.
Step 12:
If you wish, cover up any cut-away that may still be exposed around the
edges of the charm by coloring it with permanent fabric markers. Match
the color to the satin stitching.
Step 13:
(Click Image to Enlarge)
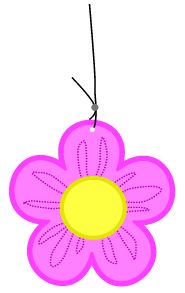
Using a large needle, push a hole slightly under the satin stitch edging
through all layers of the ornament. This is where the beaded hanging
wire is placed, so consider how the ornament will hang before placing
the hole.
Step 14:
(Click Image to Enlarge)
Cut a 12” piece of beading wire. Thread a crimping bead over the wire
before you poke it through the hole, then loop the wire back through the
crimping bead again forming a loop around the edge of the ornament.
Pull one end of the wire down so that you have a 1” tail above the
crimping bead, leaving the other end of the wire long. Crimp the bead
firmly, securing the loop. The crimping bead should be sitting just
slightly above the satin stitched edge of the ornament.
Step 15:
(Click Image to Enlarge)
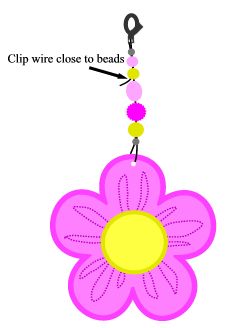
Thread pretty glass beads in a pleasing arrangement onto the wire,
enclosing the 1” tail under some of the beads. When you have a desired
length finished, poke the end of the wire through another crimping bead,
through the hole in the end of a lobster clasp and back through the
crimping bead again. Before tightening, push the wire down through two
or three beads. Holding the lobster clasp, pull the wire so that the
excess is removed and the loop through the lobster clasp is snug.
The loop should not be so tight that the wire
cannot swing, but also should not be large and sloppy. Holding the tail
end of the excess wire close to the beads, crimp the crimping bead. Clip
the excess wire away as close to the beads as possible. If you have a
tiny piece sticking out, use a pin to poke it into the beads below.
Step 16:
(Click Image to Enlarge)
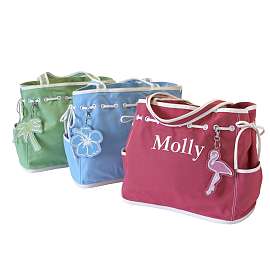
Hook your new hanging ornament on a purse, the belt loops of your jeans,
a favorite hat band, the chain pull of your fan, your backpack or
whatever you may find suitable and enjoy!
Evy Hawkins has been sewing since childhood and has over 20 years experience in the industry. She is the owner of A Bit of Stitch, featuring her own line of embroidery designs. She teaches in South Carolina, Georgia and North Carolina and attends various embroidery and sewing conferences in the US. Evy has written project articles for Designs in Machine Embroidery Magazine and Embroidery Journal, and her projects and designs have been featured in Sew News and Creative Embroidery magazine.