Border OptionsHugging border, circle, square, or rectangle — with a 3mm satin stitch.
Backing OptionsAvailable with iron-on, sew-on, or velcro backing.
Fast ShippingShipped quickly from the USA.
Free Online Tools
Powerful embroidery utilities that save time and prevent costly mistakes.
Stitch AssistantRECOMMENDED
Get the exact stabilizer, machine settings, needle, and thread color sequence for every embroidery design you purchase — based on that design's stitch density, dimensions, and color count.
Facial Structure: Bringing a face to life is no small challenge, even for the most experienced puncher
NOTE: 3D Stitch Imaging was used to create graphic versions of the stitch files in this article in order to provide more detail to the textured areas of the face. However, 3D stitch imaging sometimes distorts smaller details such as the eyelashes.
Figure 1 – Courtesy of Marion Cornett, M.C. Designs, Fowlerville, MI
Digitizing a face is no small feat. Bringing it to life is a challenge for even the most experienced puncher. It’s an exciting project, but it takes patience, persistence and attention to detail.
The face is the sum of all of its parts. To understand the face, you must first look at it as a whole image, then break it down into its individual components. Referencing Figure 1, you can see a design that was digitized by Marion Cornett, M.C. Designs, Fowlerville, MI, USA.
After a thorough examination, you can break it down into the following components: face structure, mouth, nose, ears, eyes, mouth and hair. Now let’s look at how each was created.
Face Structure
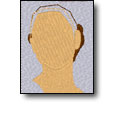
Figure 2
This is perhaps the most challenging aspect of the face. In this case, the upper torso, neck, and face were initially created using fill stitch segments, as shown in Figure 2. Notice that the angle and fill pattern of the face are different from that of the neck. This provides a subtle, yet significant separation of the two regions. Also note that the ears were created at the same time as the face and that the portion of the hair that is “behind” each ear was added prior to the ears being created.
Figure 3
Figure 3 shows the addition of the facial features. The digitizer chose to go with a subtle, tone-on-tone approach. The features of the neck and torso were done using multiple satin segments of varying density, while the forehead and nose region were created using a contrasting fill pattern. Notice once again, that the stitch angle of the forehead fill segment is slightly different than that of the facial fill below it. This provides feature separation using stitch characteristics rather than color. All of the overlapping satin segments are also at angles to the underlying fill. This ensures that they don’t “sink” into the fill segments below.
The Nose
The nose is a prominent feature of any face. For this application, the nose was created using a fill stitch pattern that extends from the bottom of the forehead region. For this application, it is very effective. In some cases it’s more desirable to use the addition of running stitches in a different color to outline and detail the nose. However, care must be taken not to over-accent the nose, which would be distracting visually.
Award-winning author and international speaker Jimmy Lamb has over 15 years of embroidery experience as well as 10 years of professional digitizing experience (as a business owner). Currently, he is the Director of Training and Education for Hirsch International Corp., where he has been instrumental in developing their educational seminars.