Border OptionsHugging border, circle, square, or rectangle — with a 3mm satin stitch.
Backing OptionsAvailable with iron-on, sew-on, or velcro backing.
Fast ShippingShipped quickly from the USA.
Free Online Tools
Powerful embroidery utilities that save time and prevent costly mistakes.
Stitch AssistantRECOMMENDED
Get the exact stabilizer, machine settings, needle, and thread color sequence for every embroidery design you purchase — based on that design's stitch density, dimensions, and color count.
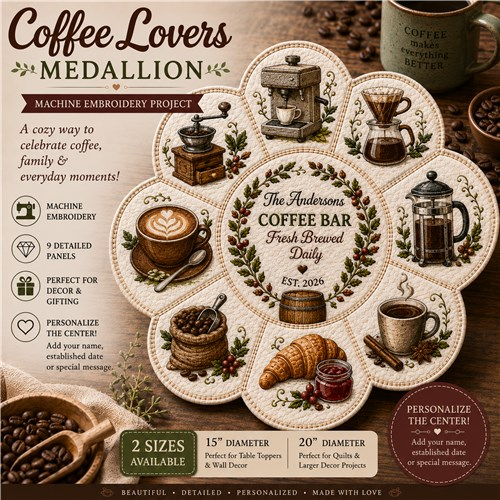
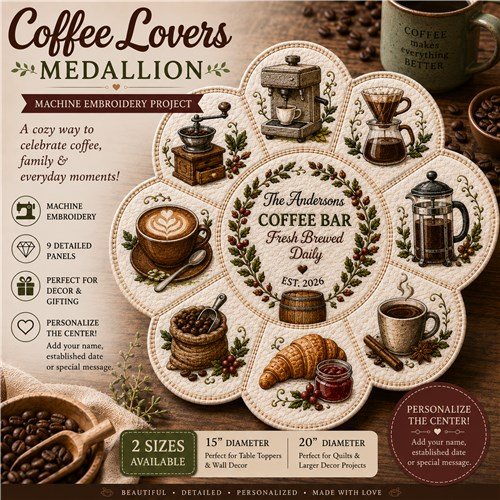
Celebrate your love for coffee with this charming quilt medallion, featuring detailed coffee-themed imagery. Ideal for decor and gifting, this piece can be personalized for a special touch. Step-by-step instructions are included.
Quilting cotton or other preferred fabric - 5/8 yard total
Medium cutaway stabilizer
Batting
Water-soluble pen or other marking tool
Pins
Embroidery machine
Sewing machine
Thread
Binding clips (optional)
Spray adhesive to hold quilt pieces together (optional)
Designs used in this project:
Center Circle
Espresso Machine
Pour Over
French Press
Cup of Coffee
Croissant
Roasted Coffee Beans
Cappuccino
Hand Grinding Coffee Mill
Final Product: What You Will Create
Step 1:
Cutting and Fabric Preparation
• For the small medallion, cut the center piece to 7 in x 7 in.
• For the medium medallion, cut the center piece to 9 in x 9 in.
• For the small medallion, cut 8 pieces that are 7 in x 6 in.
• For the medium medallion, cut 8 pieces that are 9 in x 8 in.
Step 2:
Hoop the stabilizer
Place medium cutaway stabilizer in the hoop. Keep the stabilizer smooth and secure before stitching.
Step 3:
Stitch the embroidery designs
Stitch the center circle design and all eight wedge designs. Set the stitched pieces aside and do not trim them yet.
Step 4:
Trace and cut the wedge panels
• Using the curved template provided, trace around each wedge design, making sure the design is centered toward the top of the wedge.
• There will be extra fabric on the bottom of the wedge; that is fine.
• Add 1/4 in to the straight stitching lines on each side of the wedge. Do not add extra to the curved edge.
• Cut out each wedge using the added 1/4 in on the sides. Trim extra stabilizer away from the design if desired.
Step 5:
Trace and cut the center circle
• Trace the center circle around the center design, making sure the design looks centered in the circle.
• Cut out the center circle. There is no need to cut extra fabric around this piece.
• Trim the stabilizer if desired, then set the center circle aside.
Step 6:
Lay out and join wedge pairs
• Lay out the wedge pieces in the order you want them to appear in the finished medallion.
• Place two wedges right sides together and stitch them together along one straight side.
• Repeat until you have 4 sets of 2 wedges stitched together.
Step 7:
Join the wedge sections
• Take two sets of stitched wedges and stitch them together.
• Repeat until you have 2 sets of 4 panels.
• Lay the two panels right sides together and stitch the two opposite sides together to close the circle. You will have a hole in the center, and that is fine.
Step 8:
Press and position the center circle
• Press the seams open. Adjust seams as needed so the medallion lays flat.
• With the right side of the wedges facing up, place the center circle over the center of the medallion.
• Center it as best you can. Trace around the center circle on the outer piece with a water-soluble marker, or use pins to mark where it should go.
• Remove the center circle and finish its edge using one of the options below.
Step 9:
Finish and attach the center circle
• Option A: Bind the center circle, then stitch it to the outer circle using a small zigzag, blanket stitch, or straight stitch.
• Option B: Zigzag around the center circle to attach it to the outer circle, then satin stitch or use another decorative stitch to cover the previous stitching.
• Option C: With the right side of the center design facing up, place interfacing over the piece. Stitch around the circle 1/4 in from the edge, cut a small slit in the interfacing, turn right side out, push out the curves, and press well.
• If using fusible interfacing for Option C, place the fusible side toward the right side of the design. After turning, the fusible side will face out, so do not iron until you are ready to fuse the circle in place.
Step 10:
Finishing Technique Option 1 - turn and quilt
• Create a quilt sandwich by laying down batting large enough to cover the piece, placing the completed Dresden medallion right side up, then adding backing fabric right side facing the embroidery designs.
• Stitch all around the edge, leaving part of 1 wedge open.
• Trim around the shape, leaving a bit more fabric at the opening. Pinking shears can help the curves lay nicely but are not required.
• Turn right side out and push out all curves. Press well.
• Stitch the opening shut and quilt as needed. Stitch in the ditch if you want to secure the batting and backing together.
Step 11:
Finishing Technique Option 2 - quilt and bind
• Create a quilt sandwich with the embroidery pieces on top, batting in the middle, and backing fabric with wrong side facing the batting.
• Pin the layers together or use spray adhesive to hold them together while quilting.
• Quilt as desired, such as stitch in the ditch, stipple, or echo quilting.
• Trim around the curves.
• Bind as you would a regular quilted item.
Step 12:
Final touch
Press gently, check stitches, trim any excess stabilizer or threads, and display or gift the finished coffee medallion.