Border OptionsHugging border, circle, square, or rectangle — with a 3mm satin stitch.
Backing OptionsAvailable with iron-on, sew-on, or velcro backing.
Fast ShippingShipped quickly from the USA.
Free Online Tools
Powerful embroidery utilities that save time and prevent costly mistakes.
Stitch AssistantRECOMMENDED
Get the exact stabilizer, machine settings, needle, and thread color sequence for every embroidery design you purchase — based on that design's stitch density, dimensions, and color count.
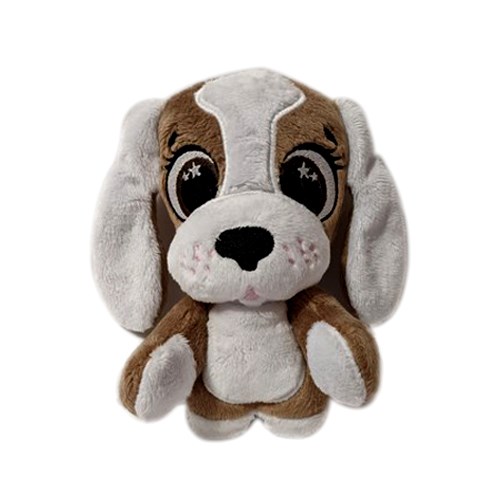
Craft a cuddly companion with this In-The-Hoop design of a charming toy dog. Perfect for both playtime and decor, this adorable creation adds warmth to any space. Step-by-step instructions are included.
This is a collaboration between ITH Boutique and Broderie Dzhiboux.
Step 1:
(Click Image to Enlarge)
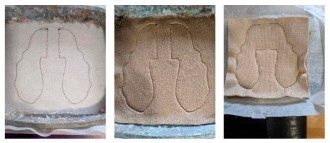
THE EARS
STEP 1:
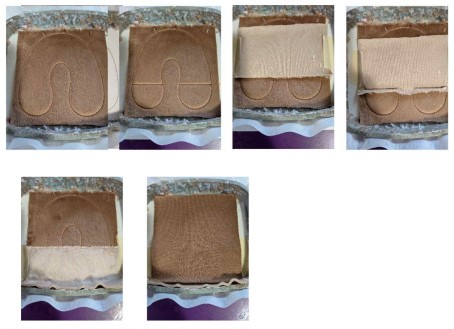
I start by making the ears and I always work out of frame, you can take the temporary glue to help you put your support in your frame 10x10cm. Follow the steps.
Stop 1: the first seam must be made on the support to tell you where to put your fabric, be careful to hide this seam with your fabric.
Stop 2: The second seam is done on your fabric, this seam fixes your fabric on the support, you can put temporary glue before doing this step. Before moving on to the next step, put your 2nd piece of fabric, place against place on your fabric that is in your frame.
Stop 3 : Sewing to bind your 2 pieces of fabric together, It remains only to get gut of the frame, remove the excess tissue and return to the place, set aside until at the time of making the head.
Step 2:
(Click Image to Enlarge)
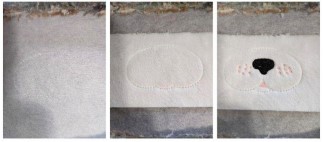
THE MUZZLE
STEP 2:
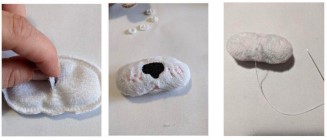
Stop 1: The first seam must be made on the support to tell you where to put your fabric, be careful to hide this seam with your fabric.
Stop 2: The second seam is done on your fabric, this seam fixes your fabric on the support, you can put temporary glue before doing this step. Put on your water-soluble support before making the embroidery stitches
Stop 3 to 5: Embroidery stitches, take your 2nd piece of fabric, place against place on your main fabric
Stop 6: Sewing to bind your 2 pieces of fabric together, Attention here there is no opening to turn the muzzle, you will see the method & little later.It remains only to get out of the frame, remove the excess tissue Set aside time to make your head.
Step 3:
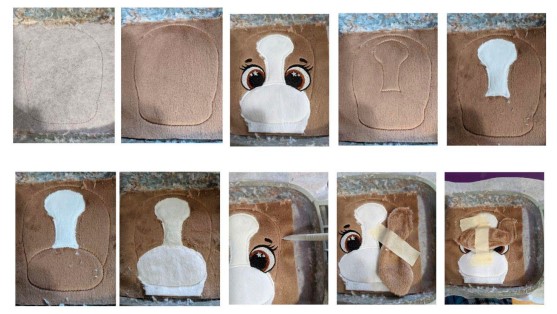
THE HEAD
STEP 3:
Stop 1: contour of the head, this seam is done on your support to tell you where to put your fabric.Once this seam is finished, put your fabric to cover the entire seam.
Stop 2: sewing your fabric on the support. Before doing the embroidery put your water-soluble support, here I had made the patches of white fabric before doing the embroidery but I changed the file because it is necessary to do the embroidery of the eyes before making the patches.
Stop from 3 to 5: follow the colors for embroidery.
Stop 6: sewing to tell you where to put your white patch in the top of the face, put your piece of fabric to hide the seam well.
Stop 7: Seam of the white patch.
Stop 8: sewing to tell you where to put your white patch in the lower face, put your piece of fabric to hide the seam well.
(Click Image to Enlarge)
Step 4:
THE ARMS
STEP 4:
Stop 1: this seam is done on your support to tell you where to put your fabric, you must cover the seam with the fabric, put your fabric on your support.
Stop 2: Sewing on your fabric to join it to your support.
Stop 3: Sewing to tell you where to put your fabric for the next step, put your fabric place against place on the main fabric, you have to put the fabric on the edge of the seam (see photo)
Stop 4: Sew your fabric paler for the tips of the arms, once this seam is finished, take your fabric and put it. down to have the place of the fabric towards you. Take your 2nd piece of fabric for the arms, put place against place on your main fabric and do the next step.
Stop 5: Seam to join the front and back of the arms.
Step 5:
(Click Image to Enlarge)
THE ASSEMBLY
STEP 5:
All you have to do is do the assembly. For the head, put your stuff, once well filled make an invisible seam to close.
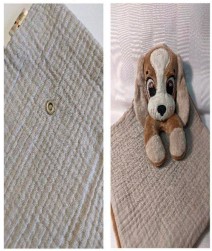
Before closing the arms, find the center and put a press button to attach with the small blanket.
Subsequently put the stuff and close with an invisible seam For the muzzle, make a small notch on the back of the muzzle, turn in the place, put the stuff and sew your small notch. The muzzle lands once your head is sewn onto the arms.
Position your head on your arms, I put a little fabric glue to hold my head in place before sewing.
Once your glue is dry and your head is in place, sew it with an invisible seam. When your head is well sewn on the arms, take your muzzle and put a little fabric glue to position it on your face, once dry, make your seam invisible.
Step 6:
(Click Image to Enlarge)
Take your blanket and decide where you are going to put your dog, put your push button and join the dog on your small blanket. ...The End...