Border OptionsHugging border, circle, square, or rectangle — with a 3mm satin stitch.
Backing OptionsAvailable with iron-on, sew-on, or velcro backing.
Fast ShippingShipped quickly from the USA.
Free Online Tools
Powerful embroidery utilities that save time and prevent costly mistakes.
Stitch AssistantRECOMMENDED
Get the exact stabilizer, machine settings, needle, and thread color sequence for every embroidery design you purchase — based on that design's stitch density, dimensions, and color count.
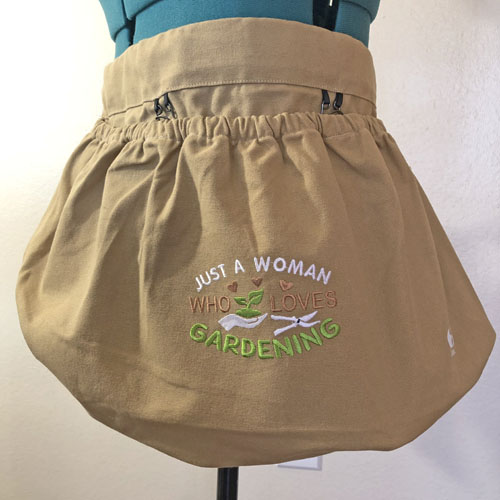
Learn how to enhance a purchased apron with tubular stitching using a multi-needle machine. Perfect for garden enthusiasts who want a personalized touch. Step-by-step instructions are included.
This is a Harvest apron purchased on Amazon. To me, it was unique in its design as I had never seen an apron with this huge pocket to make it so much easier to collect the produce from your garden. This huge pocket also provided a great deal of blank space which just begged to be embroidered. This project is to show how easy it is to use the tubular sewing capabilities of your multi-needle machine. Any of the designs shown related to this project would be good on this apron. If you would rather make your own apron see our project Sassy Garden Apron. It is a different type of apron, but any of these designs would be appropriate for it and it is quick to make.
(Click Image to Enlarge)
Step 2:
Print out your purchased designs or stitch out samples and lay out on the apron to see which you like best.
(Click Image to Enlarge)
Step 3:
(Click Image to Enlarge)
Cut a piece of Fusible Tear-away stabilizes with a few extra inches cut on each side to allow for variations in hooping.
Step 4:
(Click Image to Enlarge)
Turn the pocket of the apron inside out and press the fusible tear away inside the pocket. It does not all have to be fused around the edges but will be securely fused in the embroidery area. This is much easier to do than trying to line up your hoop while keeping a loose stabilizer lined up with the hoop and placement marks you will be making.
Step 5:
Measure between the hooks on the front of the pocket to find where to draw a vertical centerline with a heat removable pen. You do not want to be hooping through the elastic nor having those pocket hooks inside your hoop. So, see where the hoop fits comfortable up next to the elastic and determine you horizontal and draw a line across the pocket.
(Click Image to Enlarge)
Step 6:
(Click Image to Enlarge)
When placing the bottom hoop inside the pocket it helps to have the screw to adjust the hoop at the top of the pocket. Due to the thickness of this fabric, you may want to tighten the screw with the screwdriver that comes with the machine.
Step 7:
To remove the table from the sewing machine; turn the machine off; slide the pantograph all the way to the back of the machine. Loosen the screws 5 or 6 turns that are underneath the front of the table; with two hands lift and remove the table. Turn the machine on and the pantograph will move back to its normal position.
(Click Image to Enlarge)
Step 8:
Insert the hoop into the machine so that the fabric behind the hooped pocket falls into the space below the sewing arm. Reach in under the hoop and make sure all straps and fabric are free and will not interfere with any part of the machine as the hoop moves back and forth.
(Click Image to Enlarge)
Step 9:
Follow the color chart to embroider your selected design.
(Click Image to Enlarge)
Step 10:
Run your iron over the fusible tear away stabilizer to loosen it from the fabric and remove it from the design.
(Click Image to Enlarge)
Step 11:
Congratulations, you have completed your Harvest Apron. If this was the first time you have done tubular sewing I hope this project answered any questions you may have had about the process.
Award winning Digitizer, Embroidery Educator, Author and a Consultant to the Industry, Pat Williams has 30 years of experience in the embroidery industry. Pat has won multiple awards for her digitizing expertise including the 2007 Impressions Awards Grand Championship, Best of Show as well as the 1st and 2nd Place Awards. Pat’s love of digitizing has afforded her the opportunity to write numerous articles for Impressions magazine in the United States and Images Magazine in Europe. In 2001 Pat was named “Embroidery Educator of the Year.” For many years Pat taught digitizing seminars at the ISS Shows in Long Beach, CA and for Compucon software. She now resides in Tucson, AZ.