Border OptionsHugging border, circle, square, or rectangle — with a 3mm satin stitch.
Backing OptionsAvailable with iron-on, sew-on, or velcro backing.
Fast ShippingShipped quickly from the USA.
Free Online Tools
Powerful embroidery utilities that save time and prevent costly mistakes.
Stitch AssistantRECOMMENDED
Get the exact stabilizer, machine settings, needle, and thread color sequence for every embroidery design you purchase — based on that design's stitch density, dimensions, and color count.
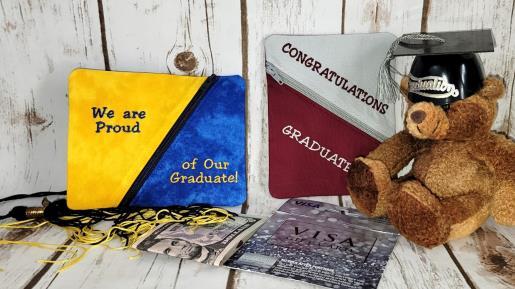
Use school colors for the fabric and coordinate embroidery thread and zipper to go with the fabric colors, making the text color the opposite of the fabric color. For the samples the school colors of fabric and thread were gold and navy, and grey and maroon. Use your school colors in place of the ones shown.
No show mesh to fit hoop
9" zipper to coordinate with fabric colors
6" x 6":
1- yellow for left side, interfaced with Pellon EK130 Easy Knit®
1- navy for right side, interfaced with Pellon EK130 Easy Knit®
7" X 8":
For back- 1 navy interfaced with Pellon EK130 Easy Knit® and 1- yellow
Read through the instructions thoroughly before beginning and assemble all the materials needed to complete the project. Interface the fabrics. Determine which fabric and thread colors are to be on which side of the gift card holder. Load the embroidery thread on the machine and load the chosen gift card holder design on the machine. Hoop one layer of poly mesh stabilizer. Stitch Color 1, the Placement Line. Place the zipper, right side up, over the placement line. Be sure the coil is aligned over the center diagonal line and the ends of the zipper extend well outside of the top and bottom placement lines as shown. Use tape to hold the zipper in place, making sure it is outside of the outer stitching lines. Stitch Color 2 to baste the zipper in place.
(Click Image to Enlarge)
Step 2:
Take the first chosen 6” square fabric piece and lay it flat over the right side of the placement area. Fold back the left edge of the fabric along the right side of the zipper coil. Double check before stitching the next color to make sure when the tackdown line is stitched, the fabric covers the entire right side. Keeping the fabric in place as folded, open it up so now it is wrong side up; tape down the edges. Stitch Color 3 to sew the fabric to the zipper.
(Click Image to Enlarge)
Step 3:
Remove the hoop from the machine and trim the fabric along the zipper edge. Fold the fabric back, right side up, and finger press. Fold the fabric back into position and use the spray or glue stick on the back of the fabric to hold the fabric in place; secure with tape.
(Click Image to Enlarge)
Step 4:
Stitch Color 4 to topstitch the fabric. Stitch Color 5, the text.
(Click Image to Enlarge)
Step 5:
Now repeat for 6” square of interfaced fabric for the left side. Place the fabric down flat, fold the right side of the fabric along the left side of the zipper coil; check it. Open it up flat and tape the edges down. Sew Color 6, to sew the fabric to the zipper.
(Click Image to Enlarge)
Step 6:
Trim the seam, flip the fabric over and finger press along the seam. Tape down the fabric edges. Stitch Color 7 to sew the topstitching. Sew Color 8, the text.
(Click Image to Enlarge)
Step 7:
Remove the hoop from the machine. Flip the hoop over. Using a seam ripper, slit the stabilizer along the center of the zipper and along the stitching on both sides and remove it as shown. Flip the hoop to the right side. Open up the zipper about ¾ of the way. Use tape to secure the zipper ends outside of the stitching line.
(Click Image to Enlarge)
Step 8:
Stitch Color 9 to tack the top and bottom zipper ends in place.
(Click Image to Enlarge)
Step 9:
Remove the hoop from the machine. Place the 7” x 8” interfaced fabric, right side down over the embroidery. Place the remaining 7” x 8” piece, right side up over the previous piece; tape down the edges. Place the hoop back on the machine and stitch Color 10 to Stitch the seamline tacking all layers together.
(Click Image to Enlarge)
Step 10:
Remove the piece from the hoop. Trim all away around, leaving about a ¼” seam allowance; clip the corners. Reach in through the zipper area and turn the piece right side out. Use something like the end of a tweezers to form the corners well.
(Click Image to Enlarge)
Step 11:
Press the edges flat. The gift card holder from the front and the back. By using two different colors for the backing pieces, the lining inside was one color and the back was the other—they could both be the same, it’s your choice.
(Click Image to Enlarge)
Step 12:
This card holder was designed so that the gift cards purchased at the stores will easily fit in the holder.
(Click Image to Enlarge)
Step 13:
The other card holder is done in the exact same way as the first. The only difference is the text placement and words. Just follow the same instructions.
(Click Image to Enlarge)
Step 14:
Thank you for purchasing these Graduate Gift Card Holders!
(Click Image to Enlarge)
Step 15:
We know your graduate will appreciate this keepsake in the school colors and your thoughtful gift—and Congratulations to your graduate!
Ramona Baird has been in the embroidery industry for over 23 years. She and her husband owned a commercial and retail embroidery store in Arizona for many years. She is an experienced digitizer having been mentored by award-winners Pat Williams and Lindee Goodall. Ramona is a contributor to “Creative Machine Embroidery” magazine having 5 covers to her credit. Ramona has worked for Wilcom America and served many years as Education Director for the American Sewing Guild. With a degree in fashion design, she is able to design and execute patterns which Pat Williams says are “out of the box” in creativity and application. Ramona likes to challenge the boundaries of embroidery and bring new and exciting designs, ideas, and projects to EmbroideryDesigns.com. She wants embroiderers of all levels to increase their skills and enjoyment in using their embroidery machine for gift-making and personal pleasure.