Border OptionsHugging border, circle, square, or rectangle — with a 3mm satin stitch.
Backing OptionsAvailable with iron-on, sew-on, or velcro backing.
Fast ShippingShipped quickly from the USA.
Free Online Tools
Powerful embroidery utilities that save time and prevent costly mistakes.
Stitch AssistantRECOMMENDED
Get the exact stabilizer, machine settings, needle, and thread color sequence for every embroidery design you purchase — based on that design's stitch density, dimensions, and color count.
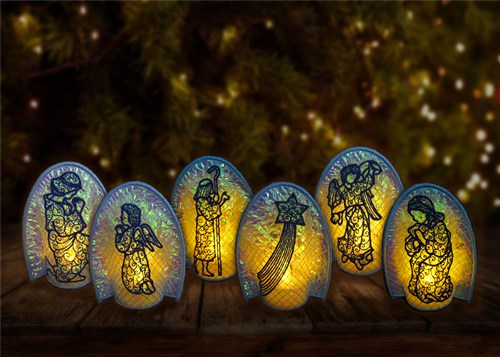
Create a stunning set of In The Hoop Nativity Mylar Tea Lights that fit a 4x4 hoop. Perfect for adding a warm, festive glow to your holiday decor, these tea lights feature elegant nativity designs. Step-by-step instructions are included.
This is a collaboration between ITH Boutique and Holly Workshop. The copyrights to the digitizing and some images belongs to Holly
Step 1:
To begin, hoop your water soluble stabilizer
Step 2:
Wind the same thread on your bobbin as you are using as the top thread.
Step 3:
(Click Image to Enlarge)
The first thread color showing is red, but use the thread color you chose to do the background and outer border. The red thread color is simply a thread color stop (similar to an applique) to give you placement for the mylar.
After the first outline stitches, lay your mylar over the area and let the stitching begin!
Step 4:
(Click Image to Enlarge)
When the stitching stops, remove the hoop and gently tear away the excess mylar. DO NOT REMOVE from the hoop at this point!
While the hoop is off the machine, change the thread to the color you are using for the main design. Be sure to also change the bobbin thread to match.
Step 5:
(Click Image to Enlarge)
Stitch the design
When the machine stops again, change the top thread and bobbin back to the same color you used for the background and the outside border.
With the hoop back on the machine, slip the felt under the design. It will be laying on your sewing machine bed just under the design (make sure the felt is under the WHOLE design). When you stitch the next thread color (red) it will outline the outside border.
After this has stitched, it will attach the felt to the back of your design.
Remove the hoop and closely trim the felt around the design (similar to an applique design).
Keep some excess felt on the bottom of the design, but closely trim around the “U” shape of the design.
After reattaching the hoop, finish the stitching.
Step 6:
(Click Image to Enlarge)
Once the stitching is finished, trim the stabilizer away.
You will wait to trim the felt on the bottom after rinsing. It will be easier to trim after the stabilizer is removed.
Step 7:
(Click Image to Enlarge)
Soak the design in water to remove the water soluble stabilizer. After soaking, gently blot the excess moisture and lay flat to dry.
Step 8:
(Click Image to Enlarge)
Trim the felt on the bottom to match with the stitched front. These will now fit right over the tealight.
Step 9:
The digitizing copyrights for the designs used in this project and the project instruction credit goes to Holly.