Border OptionsHugging border, circle, square, or rectangle — with a 3mm satin stitch.
Backing OptionsAvailable with iron-on, sew-on, or velcro backing.
Fast ShippingShipped quickly from the USA.
Free Online Tools
Powerful embroidery utilities that save time and prevent costly mistakes.
Stitch AssistantRECOMMENDED
Get the exact stabilizer, machine settings, needle, and thread color sequence for every embroidery design you purchase — based on that design's stitch density, dimensions, and color count.
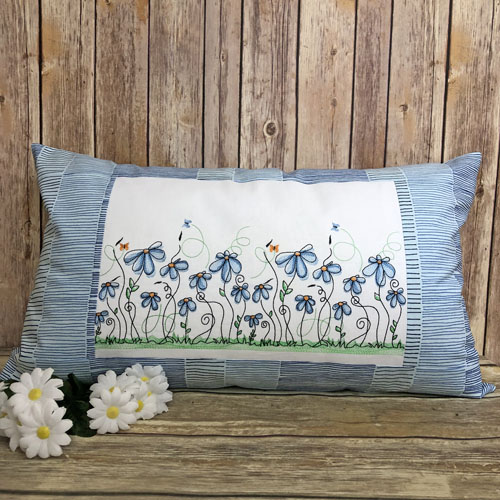
On a bed or on a bench these lovely blue flowers will bring a smile to all that see them. This design will also look beautiful on the ends of a table runner. A large hoop 14” x 7 7/8th” is required for this design.
Cut 2 3.5” x 26” long from your border fabric. The two strips shown were shortened to 26” by measuring out 13” of each strip from the fold. That way I was assured that the striped pattern in the fabric would match when sewn to the center of the pillow top.
Step 2:
Cut two rectangles 9.5” tall by 6.5” wide lining up the pattern with the top and bottom strips if necessary.
(Click Image to Enlarge)
Step 3:
Cut a white Kona® cloth rectangle 14” wide and 9.5” tall.
(Click Image to Enlarge)
Step 4:
Lay and pin the two side panels face down on the Kona® Cloth. With a fabric marker make a little arrow or mark on the Kona® as you will want to keep the right side up to match patterns when sewing on the top and bottom panels. Stitch down both side panels with a ¼” seam. Press the seams towards the border pieces.
(Click Image to Enlarge)
Step 5:
Align the top and bottom borders and pin in place aligning the fabric pattern if necessary. Stitch the top and bottom borders to the center with a ¼” seam allowance. Press the seams towards the borders.
(Click Image to Enlarge)
Step 6:
Rather than just creasing my fabric for the horizontal and vertical alignment I drew horizontal and vertical alignment marks on the fabric. Perfect alignment was going to be necessary as the design is 13 ½” wide and the white center of the pillow cover is 13.5” wide. I wanted the flowers to be closer to the bottom of the Kona® Cloth than to the top so I also marked an X 1” below center.
(Click Image to Enlarge)
Step 7:
Tip: No show stabilizer shrinks when it is ironed, this can cause your embroidery to look puckered. Iron your stabilizer before hooping. Cut a piece of no-show stabilizer and lay it over the bottom hoop. Lay the pillow top over the stabilizer and hoop tautly centering your vertical and horizontal marks with the marks on the hoop.
(Click Image to Enlarge)
Step 8:
(Click Image to Enlarge)
Open the design in your machine. I knew I wanted the center of the design to be lowered by 1”, so in the edit window use the arrows to lower the design. The machine would only let me move the design down by .94”, that was definitely close enough to 1” for this purpose.
Step 9:
(Click Image to Enlarge)
The trace feature on the next page of the machine software was used to center the design in the hoop. Though I thought I had it hooped correctly the design needed to be moved .08” to be exactly centered in the Kona cloth. Trace several extra times to make sure none of the grass will stitch onto the borders.
Step 10:
Follow the color chart to embroider the design. Please note that the grass begins and ends precisely at the border edges. I was excited at the precision of the adjustments made on the machine.
(Click Image to Enlarge)
Step 11:
Press the pillow top to remove the fabric marking pen.
(Click Image to Enlarge)
Step 12:
Trim the stabilizer around the design.
(Click Image to Enlarge)
Step 13:
(Click Image to Enlarge)
The border pieces were cut a little larger than necessary to allow for seam allowance or other errors in piecing the top. Trim the side borders about ½” so that the exact horizontal measurement is 25”.
Step 14:
(Click Image to Enlarge)
The top and bottom borders need only be trimmed about ¼” so that the pillow top measurers 15” in height.
Step 15:
Cut a pillow back 15” x 25”. Make a mark on the bottom of the pillow back and 3” in from the sides.
(Click Image to Enlarge)
Step 16:
(Click Image to Enlarge)
Serge or zigzag the bottom edge of the pillow cover top and back.
Step 17:
(Click Image to Enlarge)
Align the pillow top and back at the bottom edge. These are sewn with a ½” seam allowance. Back stitch at the beginning of the stitching and stitch the first 3” with a normal stitch length; backstitch at the first mark. Change your stitch length to 4 or 5mm and stitch to the second mark; change your stitch length back to your normal stitch length; backstitch at the second mark and complete the seam; backstitch at the end of the seam. Press the seam open.
Step 18:
The balance of the instructions for inserting the zipper are best explained in a video. Youtube has many videos explaining how to set a zipper in the bottom of a pillow. If you do not know how to do this, please watch one of those videos. After the zipper is inserted feel free to trim off the excess zipper below the bottom stitches.
(Click Image to Enlarge)
Step 19:
(Click Image to Enlarge)
Pin the pillow together on the three open sides right sides facing. At the bottom of the pillow pin the zipper seam allowances together.
Step 20:
(Click Image to Enlarge)
Have the zipper open about halfway. Stitch the three open sides of the pillow together with a ½” seam allowance pivoting at the corners.
Step 21:
(Click Image to Enlarge)
Serge or zigzag around the seams just stitched.
Step 22:
(Click Image to Enlarge)
Trim across the corners at an angle.
Step 23:
(Click Image to Enlarge)
Turn the pillow cover right side out through the open zipper. Use a point turner to poke out the corners and press the outside seams.
Step 24:
Insert the pillow form being sure to push all the corners of the pillow form into the pillow cover. Congratulations your Blue Summer Pillow is complete!
Award winning Digitizer, Embroidery Educator, Author and a Consultant to the Industry, Pat Williams has 30 years of experience in the embroidery industry. Pat has won multiple awards for her digitizing expertise including the 2007 Impressions Awards Grand Championship, Best of Show as well as the 1st and 2nd Place Awards. Pat’s love of digitizing has afforded her the opportunity to write numerous articles for Impressions magazine in the United States and Images Magazine in Europe. In 2001 Pat was named “Embroidery Educator of the Year.” For many years Pat taught digitizing seminars at the ISS Shows in Long Beach, CA and for Compucon software. She now resides in Tucson, AZ.