Border OptionsHugging border, circle, square, or rectangle — with a 3mm satin stitch.
Backing OptionsAvailable with iron-on, sew-on, or velcro backing.
Fast ShippingShipped quickly from the USA.
Free Online Tools
Powerful embroidery utilities that save time and prevent costly mistakes.
Stitch AssistantRECOMMENDED
Get the exact stabilizer, machine settings, needle, and thread color sequence for every embroidery design you purchase — based on that design's stitch density, dimensions, and color count.
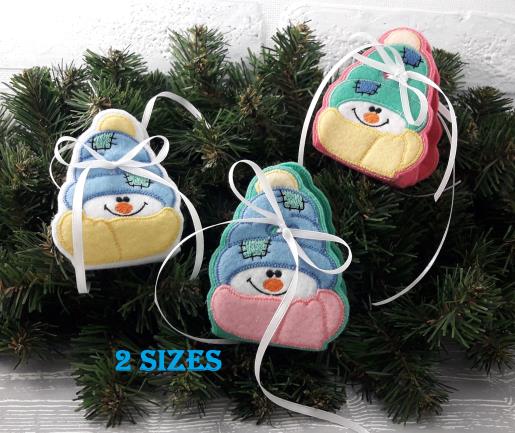
Create a charming ITH Snowman Felt Candy Box perfect for gifts or surprises. This project features a cute snowman design with applique and comes in two sizes suitable for a 6x10 hoop. Ideal for holiday decorations or as a delightful treat holder. Step-by-step instructions are included.
This is a collaboration between ITH Boutique and Kate Gallery Workshop. The copyrights to the digitizing and some images belongs to Kate Gallery
Step 1:
Put the tear-off stabilizer in the hoop.
(Click Image to Enlarge)
Step 2:
Put the hoop in the machine and embroider the first color. This line shows the place of embroidery.
(Click Image to Enlarge)
Step 3:
Put 1 piece of felt over the basting stitch, leaving at least 0.2 inches of allowance. Pin it around the perimeter with pins or use temporary adhesive spray.
Step 4:
Embroider the color 2 (box outline) and color 3 (line shows place for sewing a piece of white felt for the face).
(Click Image to Enlarge)
Step 5:
Remove the hoop from the machine. Put pieces of white felt over the basting stitch, leaving at least 0.2 inches of allowance. Pin it around the perimeter with pins or use temporary adhesive spray.
(Click Image to Enlarge)
Step 6:
Put the hoop in the machine and embroider the color 4 (sewing a piece of white felt).
(Click Image to Enlarge)
Step 7:
Remove the hoop from the machine and carefully trim off the excess felt with scissors.
Step 8:
.
(Click Image to Enlarge)
Step 9:
(Click Image to Enlarge)
Put the hoop in the machine and embroider the colors 5 (nose), 6 (mouse, eyes), and 7 (basting stitch for pompons).
Step 10:
Remove the hoop from the machine. Put pieces of felt-for pompons over the basting stitch, leaving at least 0.2 inches of allowance. Pin it around the perimeter with pins or use a temporary adhesive spray.
(Click Image to Enlarge)
Step 11:
Put the hoop in the machine and embroider the color 8 (sewing a piece of felt). Remove the hoop from the machine and carefully trim off the excess felt with scissors.
(Click Image to Enlarge)
Step 12:
Next, we embroider color 9 (basting stitch for hat).
(Click Image to Enlarge)
Step 13:
Remove the hoop from the machine. Put pieces over the basting stitch and embroider the color 10 (sewing pieces of felt for hat). Next, embroider colors 11,12 (patch), and 13 (sewing pieces of the felt-for hat in a zig-zag). Then carefully trim off the excess felt with scissors.
(Click Image to Enlarge)
Step 14:
(Click Image to Enlarge)
Put the hoop in the machine and embroider the color 14 (basting stitch for the scarf).
Step 15:
Put pieces of felt-for scarf over the basting stitch and sew them (color 15). Remove the hoop from the machine and carefully trim off the excess felt.
(Click Image to Enlarge)
Step 16:
(Click Image to Enlarge)
Turn the hoop to the back side. Put second piece of felt over the basting stitch, leaving at least 0.2 inches of allowance. Pin it around the perimeter with pins (on the front side) or use temporary adhesive spray.
If you are embroidering a different type of box, this point must be done after embroidering the inscription.
Step 17:
Now you need to change the bobbin thread to the saine color as the upper thread.
(Click Image to Enlarge)
Step 18:
Put the hoop in the machine and embroider the color 16 (contour of the box and 2 holes). Color 18 - other 2 holes. Embroider them thread the same color as hat.
The last color is a marking line for cutting. If you can evenly cut a project without it, just don't embroider it.
(Click Image to Enlarge)
Step 19:
Remove the hoop from the machine and take out the embroidery from the hoop. Remove excess stabilizer.
(Click Image to Enlarge)
Step 20:
Take scissors and cut out the bag on the basting line. Now you need to carefully cut the holes for the ribbon. First, cut holes on the front side, then on the back side. Remove excess stabilizer from holes. Remove all remaining thread.
(Click Image to Enlarge)
Step 21:
.
(Click Image to Enlarge)
Step 22:
It remains to tie a ribbon, put in a present and give it to someone.
(Click Image to Enlarge)
Step 23:
That's all! Now you can make a little pretty surprise for all family and friends!