Border OptionsHugging border, circle, square, or rectangle — with a 3mm satin stitch.
Backing OptionsAvailable with iron-on, sew-on, or velcro backing.
Fast ShippingShipped quickly from the USA.
Free Online Tools
Powerful embroidery utilities that save time and prevent costly mistakes.
Stitch AssistantRECOMMENDED
Get the exact stabilizer, machine settings, needle, and thread color sequence for every embroidery design you purchase — based on that design's stitch density, dimensions, and color count.
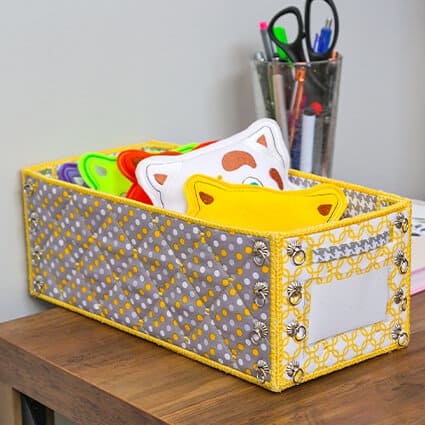
Create an efficient storage solution with this In The Hoop Fat Quarter Organizer Box. The pieces are crafted entirely in the hoop and then assembled using a sewing machine. Decorative brads add strength and charm to the corners, making it both functional and stylish. Step-by-step instructions are included.
Read through the instructions thoroughly before beginning and assemble all the materials needed to complete the project. For this project, coordinating fat quarters were used, with yellow thread for all the stitching. Basically, all the stitching is done in the same order for all pieces. Sew the pieces in this order: 1- bottom 2- sides, 4- corners, and 2- ends. The bottom will get you used to the sequence which is repeated for the remaining pieces with some additions. The side pieces have the edition of eyelets, as do the four corner pieces. The two ends have the eyelets plus the front has the addition of a vinyl window and strap.
(Click Image to Enlarge)
Step 2:
Refer to the materials list for which size pieces of fabrics and stabilizer to use with which section of the box being stitched.
(Click Image to Enlarge)
Step 3:
Load the BOTTOM design (22022503FQBB) on the machine and print out the color sequence. Hoop two layers of fibrous water-soluble stabilizer.
(Click Image to Enlarge)
Step 4:
Stitch Color 1, the placement line. Lay down the piece of stiff stabilizer and sew Color 2, which tacks it down.
(Click Image to Enlarge)
Step 5:
Remove from the hoop and cut just outside of the stitching line and set aside until needed.
(Click Image to Enlarge)
Step 6:
Hoop two layers of water-soluble stabilizer. Stitch Color 3, a placement line. Lay down the cotton batting and the outer fabric on top. Stitch Color 4 to tack all the layers together.
(Click Image to Enlarge)
Step 7:
Stitch Color 5, the motif quilting stitch. Remove the hoop from the machine and turn it over. Spray the back of the craft stabilizer that was set aside with temporary spray adhesive.
(Click Image to Enlarge)
Step 8:
Place the craft stabilizer within the stitching line. Spray the back fabric lightly and lay it over the craft stabilizer. Return the hoop to the machine—make sure the back fabric remains flat once on the machine.
(Click Image to Enlarge)
Step 9:
Place a bobbin that matches the top thread in the machine. Stitch Color 6 to tack all the layers together Remove the hoop from the machine. Trim the back and then the front close to the stitching line
(Click Image to Enlarge)
Step 10:
Return the hoop to the machine. Stitch Color 7, the satin border and motif trim stitch. Remove the hoop from the machine and set the piece aside. This completes the stitching for the box bottom. Next, stitch the sides.
(Click Image to Enlarge)
Step 11:
For the sides repeat Steps 3-9, but load the SIDES design (22022502FQBS), DO NOT remove from the hoop after Step 9. Stitch Color 8, the eyelets. This completes one box side. Repeat steps 3-12 to stitch the second side.
(Click Image to Enlarge)
Step 12:
The 4- corner pieces are stitched next, and basically in the same order as the side pieces, just smaller. To aid in forming the corner pieces after the outlines are stitched on the craft stabilizer, use a ruler and craft knife to score a line down the lengthwise center of the pieces. This allows the craft stabilizer to bend more easily. When placing the stabilizer to the back side at the appropriate step, be sure the scored side is facing up and then the back fabric laid over it.
(Click Image to Enlarge)
Step 13:
Continue making the four corner pieces following the steps. If you gang up pieces in a hoop to sew more than one at a time. If you are doing this, do not color sort at the machine—this could cause mis-registration when sewing out the pieces.
(Click Image to Enlarge)
Step 14:
Next, stitch the two end pieces. For the back end-piece, follow the same steps as was done for the side pieces, stopping after the eyelets are stitched; remove the piece from the hoop.
(Click Image to Enlarge)
Step 15:
For the front end-piece stitch all the steps through the eyelets but DO NOT remove the piece from the hoop. To complete the FRONT END, stitch Color 9 for the vinyl placement. Lay down the vinyl.
(Click Image to Enlarge)
Step 16:
Use a little sprinkle of corn starch over the vinyl and rub it around with your finger. This keeps the presser foot from sticking to the vinyl.
(Click Image to Enlarge)
Step 17:
Stitch the next color to tack down the vinyl. Wipe away the remaining corn starch.
(Click Image to Enlarge)
Step 18:
Prepare the handle. Cut a strip 1 ¼” wide x 8” long. Cut a piece of Heat n Bond Lite the same size and press to the wrong side of the fabric; remove the paper.
(Click Image to Enlarge)
Step 19:
Fold the piece in thirds and stitch along both long edges. Cut the piece down to 5”.
(Click Image to Enlarge)
Step 20:
Stitch the handle placement lines. Place one end of the handle in the placement line.
(Click Image to Enlarge)
Step 21:
Stitch the next color to tack the handle in place. Place the other end of the handle at the right placement line and stitch the last color to stitch it in place.
(Click Image to Enlarge)
Step 22:
Remove the piece from the hoop. Trim the stabilizer about 1/8” from the border. Use the awl or punch to open up the eyelets. Use the sponge and water to dissolve the remaining stabilizer and set the piece(s) aside to dry. Repeat trimming away the stabilizer for all the pieces and punching the eyelets all the pieces (except the bottom which doesn’t have eyelets).
(Click Image to Enlarge)
Step 23:
Once all the pieces have been completed and are completely dry, arrange them as shown, right side up. Be sure the bobbin is full of the same thread color and the assembly begins.
(Click Image to Enlarge)
Step 24:
Begin with the bottom and one side.
(Click Image to Enlarge)
Step 25:
Butt the sides together. The first step is to do a zig-zag in place at each end to tack them together and make sure they stay aligned. Use the button sewing feature for the step to make it easy.
(Click Image to Enlarge)
Step 26:
If you have one, use an edge joining foot to keep the pieces aligned and the stitching straight down the middle. As you stitch, just push the edges together. Use a ladder stitch set as shown to join the edges together. Don’t rush through the sewing—give the machine time to work and form the stitches.
(Click Image to Enlarge)
Step 27:
It was helpful to use a clip to hold the opposite end together. Stitch along using your hands to push the edges together.
(Click Image to Enlarge)
Step 28:
Stitch the length and the first sections are together. They will bend with the thread holding them together.
(Click Image to Enlarge)
Step 29:
Repeat stitching the other side to the bottom and then stitch the end pieces to the bottom using the same steps.
(Click Image to Enlarge)
Step 30:
Now it is time to stitch up the corners. Beginning with the back, bring the adjoining edges together. The corners will be sewn with a blanket stitch set as shown.
(Click Image to Enlarge)
Step 31:
Fold the box flat to allow easier stitching of the corners. Use an open toe foot.
(Click Image to Enlarge)
Step 32:
Begin as before using the button sewing feature to zig-zag the top and bottoms of the corner together.
(Click Image to Enlarge)
Step 33:
Then sew the corner from the top to the bottom using the blanket stitch. The “bite” should be to the left, and the swing of the needle on the right should fall just to the right of the border.
(Click Image to Enlarge)
Step 34:
Stitch the other back corner and then the front edges.
(Click Image to Enlarge)
Step 35:
The last thing to do is to use the brads to fasten the corners in place.
(Click Image to Enlarge)
Step 36:
Because the craft stabilizer was scored, the corner pieces bend just enough to be placed in the corner. Align the eyelets on the corner piece to the eyelets on the end and side pieces.
(Click Image to Enlarge)
Step 37:
Begin at the bottom. Place the brad through the eyelet on the outside to the corner eyelet on the inside and spread the prongs.
(Click Image to Enlarge)
Step 38:
Do both bottoms and then work your way up on each side to the top. You may find it easier to spread the prongs flat with a screw driver. You want the pieces very snug by the brads.
(Click Image to Enlarge)
Step 39:
Repeat adding the corners and brads for the remaining three sides.
(Click Image to Enlarge)
Step 40:
Now fold up all those pretty fat quarters and place them in the box. If you are like me, you’ll be making this Fat Quarter Organizer Box over and over using up some of those fat quarters, to make enough boxes to store all your stash.
(Click Image to Enlarge)
Step 41:
Thank you very much for purchasing this ITH Fat Quarter Organizer Box. Be sure to check out the Chubby Kitties project and designs which can be used as stuffies, pin cushions, and fabric weights to further help aid you in your sewing room or to give as gifts!
Ramona Baird has been in the embroidery industry for over 23 years. She and her husband owned a commercial and retail embroidery store in Arizona for many years. She is an experienced digitizer having been mentored by award-winners Pat Williams and Lindee Goodall. Ramona is a contributor to “Creative Machine Embroidery” magazine having 5 covers to her credit. Ramona has worked for Wilcom America and served many years as Education Director for the American Sewing Guild. With a degree in fashion design, she is able to design and execute patterns which Pat Williams says are “out of the box” in creativity and application. Ramona likes to challenge the boundaries of embroidery and bring new and exciting designs, ideas, and projects to EmbroideryDesigns.com. She wants embroiderers of all levels to increase their skills and enjoyment in using their embroidery machine for gift-making and personal pleasure.