Border OptionsHugging border, circle, square, or rectangle — with a 3mm satin stitch.
Backing OptionsAvailable with iron-on, sew-on, or velcro backing.
Fast ShippingShipped quickly from the USA.
Free Online Tools
Powerful embroidery utilities that save time and prevent costly mistakes.
Stitch AssistantRECOMMENDED
Get the exact stabilizer, machine settings, needle, and thread color sequence for every embroidery design you purchase — based on that design's stitch density, dimensions, and color count.
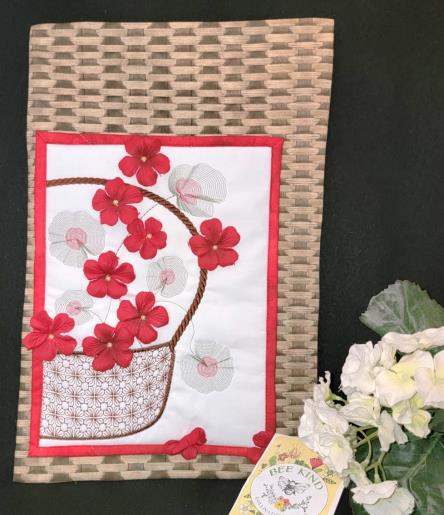
This delightful wall hanging features vibrant silk geranium petals, adding a touch of elegance to any space. The intricate design is easy to complete and perfect for brightening up your home decor. Step-by-step instructions are included.
Read through the instructions thoroughly before beginning and assemble all the materials needed to complete the project. Cut and press the fabrics.
(Click Image to Enlarge)
Step 2:
Pick the needed petals off the geranium bush. If using the single rose petals, then group them together to form a simple flower. Temporarily pin them together.
(Click Image to Enlarge)
Step 3:
Load the design on the machine. Hoop the poly mesh stabilizer with the smaller cut of Battilizer and white Kona cotton. There are actually two ways this can be done: cut the fabric/stabilizer/Battilizer so everything fits in the hoop; or, hoop the poly mesh stabilizer and stitch Color 1, the placement line. Cut the fabric and Battilizer to just larger than the placement line. Place the Battilizer down and then the white Kona cotton on top and stitch Color 2, the tack down. For the project, everything was hooped together. Stitch Color 3 which will stitch the leaves.
(Click Image to Enlarge)
Step 4:
Stitch Color 4, the leaf center color. Stitch Color 5, the basket.
(Click Image to Enlarge)
Step 5:
Stitch Color 6, the placement lines for the flowers. There are color stops between each flower allowing the petal center to be aligned right over the placement line, and then the next color stitched to tack the petal in place. If using the rose petals, carefully place the grouped petals under the foot and sew the color to tack them down.
(Click Image to Enlarge)
Step 6:
Remove the completed embroidery from the hoop. Trim to ¼” all around. Be sure to fold the petals back that are within the cutting area so they don’t get accidently cut off.
(Click Image to Enlarge)
Step 7:
Cut and press the two pieces of basket fabric and Battilizer. Trim the corners of the Battilizer and make sure the sides are trimmed so they won’t get caught in the seam allowances. Place the right sides of the basket fabrics together and stitch all the way around using a ¼” seam. Try and follow the lines of the basket fabric to keep the stitching nice and straight. Spray the Battilizer and position in place temporarily.
(Click Image to Enlarge)
Step 8:
An area for turning will be the right side of the fabric. Determine the placement for the embroidery on the basket fabric; cut a diagonal slit as small as possible just to be able to turn the fabric right side out.
(Click Image to Enlarge)
Step 9:
Carefully work the fabric through the slit, form the corners and press well; press all the edges and also press the cut areas of the fabric together that were used to turn the piece. Position the embroidered piece over the cut area.
(Click Image to Enlarge)
Step 10:
The embroidered area was bound with a single layer, sewn to the embroidered piece, mitering the corners. The binding was folded back and then pinned in place over the prepared basket fabric.
(Click Image to Enlarge)
Step 11:
Stitch the embroidered piece to the basket fabric, stitching in the ditch. Steam the flowers and before they cool, give some shape to the flowers. Tack a couple additional flowers to the bottom and steam and form the petals into position to look like they have fallen off.
(Click Image to Enlarge)
Step 12:
Thank you for purchasing the Geranium Basket design. This design can also be used as a single wall hanging without the background fabric, or even used as part of a larger project.
Ramona Baird has been in the embroidery industry for over 23 years. She and her husband owned a commercial and retail embroidery store in Arizona for many years. She is an experienced digitizer having been mentored by award-winners Pat Williams and Lindee Goodall. Ramona is a contributor to “Creative Machine Embroidery” magazine having 5 covers to her credit. Ramona has worked for Wilcom America and served many years as Education Director for the American Sewing Guild. With a degree in fashion design, she is able to design and execute patterns which Pat Williams says are “out of the box” in creativity and application. Ramona likes to challenge the boundaries of embroidery and bring new and exciting designs, ideas, and projects to EmbroideryDesigns.com. She wants embroiderers of all levels to increase their skills and enjoyment in using their embroidery machine for gift-making and personal pleasure.