Border OptionsHugging border, circle, square, or rectangle — with a 3mm satin stitch.
Backing OptionsAvailable with iron-on, sew-on, or velcro backing.
Fast ShippingShipped quickly from the USA.
Free Online Tools
Powerful embroidery utilities that save time and prevent costly mistakes.
Stitch AssistantRECOMMENDED
Get the exact stabilizer, machine settings, needle, and thread color sequence for every embroidery design you purchase — based on that design's stitch density, dimensions, and color count.
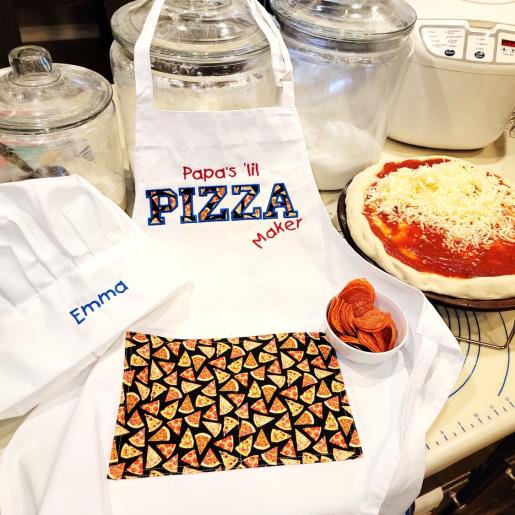
Encourage your child's culinary creativity with this charming apron and cap set. Perfect for pizza night, this set includes a personalized chef's cap and an apron with a fun pizza-themed pocket. Ideal for making kids feel like grown-up chefs. Step-by-step instructions are included.
Step
of
Papa's Little Pizza Maker Apron and Cap Set
By Ramona Baird
Read through the instructions thoroughly before beginning and assemble all the materials needed to complete the project. Let the children choose the thread colors—it may not be what you would choose, but unless the apron is a surprise, they have fun picking out their favorite colors as was done for this project. Print out the paper template.
(Click Image to Enlarge)
Step 2:
Trim the paper template. Fold the apron in half lengthwise and determine the placement. Align the Y crosshair along the fold. Open up the apron and pin the template to the apron.
(Click Image to Enlarge)
Step 3:
Hoop a layer of tearaway stabilizer and load the design on the machine.
(Click Image to Enlarge)
Step 4:
Stitch Color1, the placement line. Fuse the back of the pizza fabric with the Heat and Bond Lite, removing the protective paper.
(Click Image to Enlarge)
Step 5:
Place the fabric over the placement line.
(Click Image to Enlarge)
Step 6:
Stitch Color 2, the letter outlines.
(Click Image to Enlarge)
Step 7:
Remove the stabilizer from around the letters and then cut them apart.
(Click Image to Enlarge)
Step 8:
Cut out the letters on the stitching line; this will release the stabilizer.
(Click Image to Enlarge)
Step 9:
Hoop the apron with a piece of tearaway stabilizer. Stitch Color 3, the P.
(Click Image to Enlarge)
Step 10:
Remove the hoop from the machine, but do not remove the fabric from the hoop. Place the fabric P inside the outline and use the iron to fuse in place; let cool. Return the hoop to the machine and stitch Color 4, the tackdown and satin stitch.
(Click Image to Enlarge)
Step 11:
Repeat the same steps for the remaining letters. For the Z, there is a right and wrong (shown in the photo) direction so just be sure to turn them in the right direction.
(Click Image to Enlarge)
Step 12:
Stitch the last color for the text. Remove the apron from the hoop and remove the stabilizer. If desired, remove the pocket on the apron.
(Click Image to Enlarge)
Step 13:
Cut a piece of the pizza fabric larger than the pocket. Turn the edge over the top of the pocket and stitch it down.
(Click Image to Enlarge)
Step 14:
Press the sides in. Place the pocket back and pin in place.
(Click Image to Enlarge)
Step 15:
Stitch the pocket in place.
(Click Image to Enlarge)
Step 16:
Give the apron a final press.
(Click Image to Enlarge)
Step 17:
If you are doing a chef’s hat, too, fold the hat in half with the fold at the center front. Place a sticker or pins at the center position. At the machine or in software, create the name. If you have a machine with a free-arm, turn the design upside down if needed. Hoop the hat.
(Click Image to Enlarge)
Step 18:
Place the hoop on the machine; be sure none of the excess fabric is caught. Align the needle to the center mark—this is a great time to use the machine’s camera if it has one. Stitch the name in the desired thread color.
(Click Image to Enlarge)
Step 19:
Congratulations! Good job! You’ll make a youngster very pleased.
(Click Image to Enlarge)
Step 20:
Thank you for purchasing the design. Have fun making pizza and memories with your young chef.
Ramona Baird has been in the embroidery industry for over 23 years. She and her husband owned a commercial and retail embroidery store in Arizona for many years. She is an experienced digitizer having been mentored by award-winners Pat Williams and Lindee Goodall. Ramona is a contributor to “Creative Machine Embroidery” magazine having 5 covers to her credit. Ramona has worked for Wilcom America and served many years as Education Director for the American Sewing Guild. With a degree in fashion design, she is able to design and execute patterns which Pat Williams says are “out of the box” in creativity and application. Ramona likes to challenge the boundaries of embroidery and bring new and exciting designs, ideas, and projects to EmbroideryDesigns.com. She wants embroiderers of all levels to increase their skills and enjoyment in using their embroidery machine for gift-making and personal pleasure.