Border OptionsHugging border, circle, square, or rectangle — with a 3mm satin stitch.
Backing OptionsAvailable with iron-on, sew-on, or velcro backing.
Fast ShippingShipped quickly from the USA.
Free Online Tools
Powerful embroidery utilities that save time and prevent costly mistakes.
Stitch AssistantRECOMMENDED
Get the exact stabilizer, machine settings, needle, and thread color sequence for every embroidery design you purchase — based on that design's stitch density, dimensions, and color count.
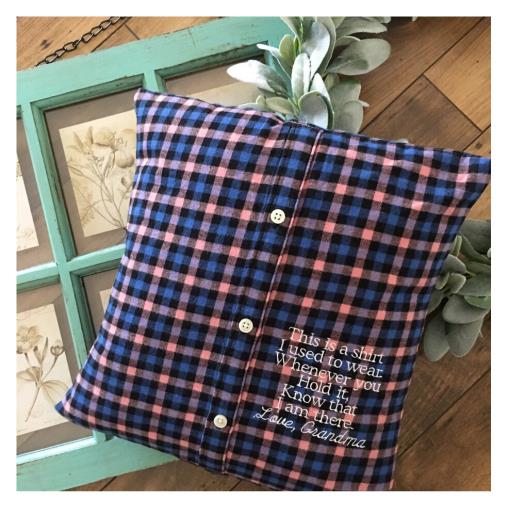
Create a heartfelt keepsake with this applique memory pillow cover, crafted from a cherished button-down shirt. Ideal for preserving memories and adding a personal touch to your living space. Step-by-step instructions are included.
Gather all supplies and review instructions before beginning. Wash and iron shirt. Make template. Template size will be the size of your pillow insert plus 1” squared.
(Click Image to Enlarge)
Step 2:
Cut off sleeves of shirt by cutting along the seams. Cut along the seams of the sides. Cut top yoke at back of shirt. So now you will have 2 pieces. Front and back of shirt.
(Click Image to Enlarge)
Step 3:
Sew a running stitch down from top to bottom of button shirt front. Center place pillow cover template/pattern and cut out pillow cover front. When the positioning of template/pattern keep in mind the seam allowance and the location of the top and bottom buttons as to not be in the way when sewing the seams when constructing. Optional: If needed apply fusible interfacing to the back of the pillow front for fabric stability.
(Click Image to Enlarge)
Step 4:
Cut (2) pieces from shirt back 11” x 15”. These two pieces will be used for the envelope back. Iron and hem the two envelope pieces on one side of each (15” side) by turning down 3/4” seam allowance and folding over again. Top stitch in place
(Click Image to Enlarge)
Step 5:
Print out a paper template of the embroidery design. This design personalizes the grandma. Check out the ED website for additional personalization designs if needed. Place paper embroidery design template into position on the shirt. The template for this tutorial was placed 5” up from bottom and 4” from button front to center of the design. Mark axis points.
(Click Image to Enlarge)
Step 6:
Load design file into your machine. Hoop stabilizer. Spray temporary adhesive spray. Center shirt front matching axis points to your hoop’s axis markings.
(Click Image to Enlarge)
Step 7:
Attach hoop to the machine. Confirm center needle placement. Refer to embroidery design thread color chart for colors or your choice. For this tutorial only one thread color was used due to the fabric design and colors of the shirt used so that the embroidery design would be visible and stand out. Begin embroidering process. Embroidering complete. Detach hoop. Cut /trim all jump stitches and loose thread ends. Cutaway stabilizer approx. ½” away from design
(Click Image to Enlarge)
Step 8:
Envelope Back
With right sides together place envelope back pieces atop front pillow cover matching raw top and side fabric edges. Hemmed side is in the center. One will overlap the other. Pin in place. Stitch all four sides using a 1” seam allowance. Zig-zag raw edges to prevent fraying. Clip corners.
Turn right side out. Insert pillow form. And you are done. You did a wonderful job.