Border OptionsHugging border, circle, square, or rectangle — with a 3mm satin stitch.
Backing OptionsAvailable with iron-on, sew-on, or velcro backing.
Fast ShippingShipped quickly from the USA.
Free Online Tools
Powerful embroidery utilities that save time and prevent costly mistakes.
Stitch AssistantRECOMMENDED
Get the exact stabilizer, machine settings, needle, and thread color sequence for every embroidery design you purchase — based on that design's stitch density, dimensions, and color count.
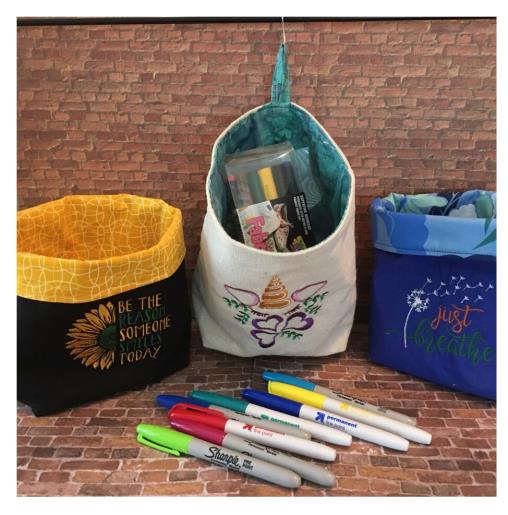
Create a charming set of applique hanging fabric bins perfect for organizing small items. Each bin features a unique applique design, adding a decorative touch to any space. Ideal for keeping your essentials tidy and within reach. Step-by-step instructions are included.
Gather all supplies and review instructions before beginning. Print out paper template of embroidery design. Serge or zig zag raw edges to prevent fraying if using fabrics that fray easily.
(Click Image to Enlarge)
Step 2:
If you haven’t already cut your fabric and interfacing as follows: Cut two pieces 10” x 10” from outer fabric Cut two pieces 10” x 10” from lining fabric Cut two pieces 10” x 10” from fusible interfacing Cut one 1.5” x 8” strip from lining fabric
(Click Image to Enlarge)
Step 3:
Fuse interfacing to wrong side of both outer basket fabric pieces. Refer to manufacturer’s instructions. Cut 2” squares at bottom of each corner of outer basket and lining fabric pieces
(Click Image to Enlarge)
Step 4:
Fold one of the outer pieces in half vertically and finger press fold to crease. This technique will aid in centering of embroidery design template.
(Click Image to Enlarge)
Step 5:
Unfold. Center design template 5.5” from bottom edge to center of design. Mark axis points.
(Click Image to Enlarge)
Step 6:
Load design into your machine. Resize design to 4.6” x 3.7” using your edit function. Refer to your machine’s instruction manual.
(Click Image to Enlarge)
Step 7:
Hoop stabilizer. Spray temporary adhesive spray directly onto the hooped stabilizer. Center and align marked outer piece to markings on your inside hoop. Finger press to secure to stabilizer.
(Click Image to Enlarge)
Step 8:
Attach hoop to machine. Confirm center needle placement. Make any necessary adjustments per your machine’s instructions. Begin the embroidering process. Design stitch out approx 15 min. Per 800 SPM ( stitches per minute) Stitch out complete. Detach hoop. Cut and trim all jump stitches and loose thread ends. Cut away stabilizer approx. ½” from design.
(Click Image to Enlarge)
Step 9:
Layer the two outer fabric pieces right sides together. Pin in place. Stitch both sides and bottom using ¼” seam allowance. Repeat this step with the two lining pieces.
(Click Image to Enlarge)
Step 10:
BOXING CORNERS
Open and align bottom and side seams of the fabric basket at the cut corners. Stitch across using ¼” seam allowance. Repeat step for lining. The bottom of your outer and lining pieces are now boxed.
(Click Image to Enlarge)
Step 11:
LOOP
Make a basic double fold binding out of your cut 1.5” x 8” strip and top stitch. Cut it a 4.5” strip length.. This will be your loop.
(Click Image to Enlarge)
Step 12:
Turn outer bag right side out. Find center back of bag by folding in half. Fold the loop in half and pin the ends of your strap to the top edge of the outside of the back of bag. Stitch in place using 1/8” seam allowance to secure. Back stitch a few times to reinforce.
(Click Image to Enlarge)
Step 13:
Place the outer bag inside of the lining bag right sides together matching the side seams. Pin in place. Sew around the top edge of the two bags using a ½” seam allowance. Leave an opening of approx 2’” for turning of bag. Turn bag right side out through opening. Push lining down into the outer bag. Iron press seams.
(Click Image to Enlarge)
Step 14:
Topstitch top of bag using 1/8” seam allowance. This will also close the opening.
(Click Image to Enlarge)
Step 15:
Your Organization Fabric Bin is done! Way to go!! Make additional baskets using other designs that you will find on the ED website to compliment the décor in your kid’s rooms or any room! If you prefer not to hang your bag turn top down into a cuff.