Border OptionsHugging border, circle, square, or rectangle — with a 3mm satin stitch.
Backing OptionsAvailable with iron-on, sew-on, or velcro backing.
Fast ShippingShipped quickly from the USA.
Free Online Tools
Powerful embroidery utilities that save time and prevent costly mistakes.
Stitch AssistantRECOMMENDED
Get the exact stabilizer, machine settings, needle, and thread color sequence for every embroidery design you purchase — based on that design's stitch density, dimensions, and color count.
Read the directions before beginning the project. Gather all the materials needed to make the project. Iron and lightly starch the fabric pieces. Iron the shirt.
Step 2:
Decide where the embroidery design will be placed on the shirt. An essential tool for embroidery position and placement is a design template. A design template is a printout of the actual size of the design. It has the center of the design identified, as well as the horizontal and vertical axis lines. An embroidery program can print a template of any design. (Embrilliance Essentials embroidery software program was used to print the design template). Another method for placement is using a ruler and a fabric pen to mark the center and axis points on the fabric.
Step 3:
After placement has been determined, the Pellon SF101 will be bonded to the area on the inside of the shirt. Turn the shirt wrong side out. Find the area where the applique design will be embroidered. Place the rough side of the Pellon SF101 onto the fabric. Follow the directions for the Pellon SF101 to bond it to the fabric. The Pellon SF101 will help stabilize the fabric and give a better finished product.
Step 4:
Cut four 5"x5" pieces of Hotfix Adhesive or Heat n Bond lite. The sample pieces were cut slightly smaller and worked fine. However, the 5"x5" pieces will be easier to use. The fabrics will be referred to as FABRIC 1, FABRIC 2, FABRIC 3, and FABRIC 4.
Step 5:
Follow the Hotfix or Heat n Bond lite directions to bond the adhesive to the fabric pieces. Place one piece of Hotfix/Heat n Bond lite to the back side of one piece of fabric. Make sure the adhesive side goes on the back or wrong side of the fabric piece. Use a dry, hot iron to bond the adhesive to the fabric. Let the fabric piece cool. Repeat the process for each piece of fabric. Remove the paper from the back of each fabric piece when it is completely cool.
Step 6:
Hoop one piece of cutaway stabilizer. Do not hoop the shirt. The shirt will be 'floated' on top of the stabilizer. Mark the center point on the stabilizer. Match the center and axis points on the design template or shirt and the hoop. Fold back one side of the shirt, and lightly mist 505 Temporary Adhesive spray on the stabilizer. Press the shirt onto the stabilizer. Repeat for the other side of the shirt. Pins may be added for additional security.
Step 7:
Load the embroidery design onto the machine. Check your needle & bobbin area. Remove debris if needed. Make sure the stitching field is clear. Use the color chart as a guide. The appliqued embroidery technique uses fabric pieces in the design. An appliqued design will use placement, tack down, and finishing stitches. Embroider color stitch one. Color 1 is a placement stitch for the letter 'L'.
Step 8:
Place FABRIC 1 over the placement stitches. Make sure that all the stitches are covered with FABRIC 1. Stitch color 2. Color 2 is the tackdown stitch.
Step 9:
Remove the hoop from the machine. DO NOT remove the project from the hoop. Use applique scissors to trim excess fabric from around the tackdown stitches. Trim close to the stitching, but do not cut any stitches. Re-attach the hoop to the embroidery machine.
Step 10:
Color stitch 3 is the finishing stitches for the letter 'L'. Stitch color 3. Stitch color 4. Color stitch 4 is the placement stitches for the letter 'V'.
Step 11:
Place FABRIC 2 over the placements stitches of letter 'V'.
Step 12:
Stitch the tackdown stitches. Remove the hoop from the machine. DO NOT remove the project from the hoop. Trim excess fabric from around the letter 'V'. Re-attach the hoop to the embroidery machine.
Step 13:
Stitch the finishing stitches for the letter 'V'. Stitch the placement stitches for the letter 'E'.
Step 14:
Place FABRIC 3 over the placement stitches for letter 'E'. Stitch the tackdown stitches. Trim excess fabric around the letter 'E'. Stitch the finishing stitches for the letter 'E'. Stitch the placement stitches for the letter 'O'.
Step 15:
Place FABRIC 4 over the placement stitches for letter 'O'. Stitch the tackdown stitches for the letter 'O'. Trim excess fabric from around the letter 'O'. Stitch the finishing stitches for the letter 'O'. You have completed the stitching for the design.
Step 16:
Remove the hoop from the machine. Remove the shirt from the hoop. Trim excess stabilizer from around the design leaving about 1/2" margin. Be very careful not to cut the shirt while trimming the stabilizer. Trim any long thread if needed.
Step 17:
Follow package directions to bond the appliqued fabric onto the shirt.
Step 18:
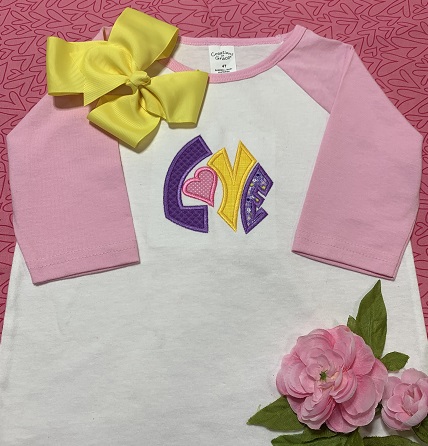
You have completed the LOVE Shirt project! Great job!
Step 19:
A cute design for Valentine's Day. This design is not just for Valentine's Day. Show some LOVE everyday!
Marisa Littleton is a retired educator with a love for teaching and learning. Interests include machine embroidery, hand embroidery, quilting, cooking, and antiques.