Border OptionsHugging border, circle, square, or rectangle — with a 3mm satin stitch.
Backing OptionsAvailable with iron-on, sew-on, or velcro backing.
Fast ShippingShipped quickly from the USA.
Free Online Tools
Powerful embroidery utilities that save time and prevent costly mistakes.
Stitch AssistantRECOMMENDED
Get the exact stabilizer, machine settings, needle, and thread color sequence for every embroidery design you purchase — based on that design's stitch density, dimensions, and color count.
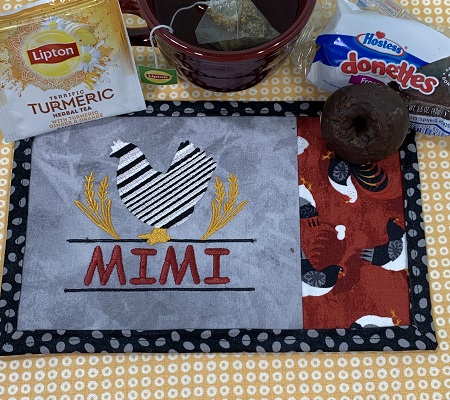
This charming mug rug features an applique chicken design, personalized with the name 'Mimi' on vibrant chicken-themed fabric. Perfect for adding a touch of farm-inspired flair to your coffee or tea time. Step-by-step instructions are included.
An embroidery software program (Embrilliance Essentials) was used to add the name to the chicken namedrop embroidery design. Comic Sans font was used for the name. After you add the name to the design, remember to save the design on a jumpdrive. Another way to add a name to a design is using the font feature found on most embroidery machines.
Step 2:
Read the directions carefully before beginning the project. Gather & prepare the materials. Iron & lightly starch the fabrics.
Step 3:
Follow the package directions and bond the SF101 to the back of the gray blender or your focal fabric. The SF101 will be a permanent stabilizer for the fabric giving a higher quality finished embroidered design.
Step 4:
An essential tool for embroidery position and placement is a design template. A design template is a printout of the actual size of the design. It has the center of the design identified, as well as the horizontal and vertical axis lines. An embroidery program can print a template of any design. (Embrilliance Essentials embroidery software program was used to print the design template).
The design template was used to center the design on the 7"x7" gray fabric. Another method of centering the design on the fabric is using a ruler and marking the center and axis points.
Step 5:
Hoop one piece of medium weight (2.0) cutaway stabilizer. The fabric will be 'floated' on top of the stabilizer. Mark the center point on the the stabizer. Match the center and axis points on the stabilizer with the ones on the focal fabric. Using a temporary adhesive spray or pins to secure the fabric onto the stabilizer.
Step 6:
Load the design onto the embroidery machine. A quick prep check really makes a difference in the stitching process. Is the needle the right size and in good condition? Is there adequate bobbin thread? Are there any small bits of debris in the bobbin or stitching area? Is the sewing field clear?
Follow the color guide to embroider the design. A variegated thread was used to stitch the chicken.
Step 7:
Remove the design from the hoop. Carefully trim excess stabilizer from around the design leaving about 1/2" margin. Trim long threads from the back of the design if needed.
Step 8:
Square and trim the sides of the focal block until it measures 6.5"x6.5".
Step 9:
Cut one piece of coordinating fabric to measure 3"x5.5".
Step 10:
With right sides together, pin the coordinating fabric piece (3.5"x5.5") to the right side 6.5"x6.5" block. Sew the fabrics together using 1/4" seam allowance.
Step 11:
Cut one piece of low nap quilt batting 6.5"x10".
Step 12:
Place the batting on a flat surface. Place the mug rug fabric on top of the batting. Fold over one half of the mug rug fabric. Use a very light mist of temporary adhesive spray on the quilt batting. Fold the mug rug fabric back down onto the batting. Repeat for the other side of the mug rug fabric.
Step 13:
Trim the excess batting from around the mug rug fabric.
Step 14:
It's very normal to have slightly different measurements while sewing a project. Measure the size of your mug rug. Add one inch to the length & width of the sizes. The sample measured 5.5"x8.5". After adding an inch to each side, the sample mug rug needed a backing/binding piece of fabric size 6.5"x9.5". Cut the backing/binding fabric for the mug rug.
Step 15:
Place the backing/binding fabric with the WRONG side upward on a flat surface. Center the mug rug fabric with the RIGHT side upward onto the backing/binding fabric. There should be an 1" overlap on all sides of the mug rug.
Step 16:
Fold the overlap in half on the long sides of the mug rug. Press the fold line with an iron. Next, fold the overlap on the short sides in half and press with an iron.
Step 17:
Fold the backing/binding fabric over again making a 1/2" binding around the mug rug. Use pins or wonder clips to hold the binding in place.
Step 18:
Topstitch a 1/4" seam around the edges of the mug rug.
Step 19:
You have completed a 'Chicken Namedrop Mug Rug'! Awesome job!
Marisa Littleton is a retired educator with a love for teaching and learning. Interests include machine embroidery, hand embroidery, quilting, cooking, and antiques.