Border OptionsHugging border, circle, square, or rectangle — with a 3mm satin stitch.
Backing OptionsAvailable with iron-on, sew-on, or velcro backing.
Fast ShippingShipped quickly from the USA.
Free Online Tools
Powerful embroidery utilities that save time and prevent costly mistakes.
Stitch AssistantRECOMMENDED
Get the exact stabilizer, machine settings, needle, and thread color sequence for every embroidery design you purchase — based on that design's stitch density, dimensions, and color count.
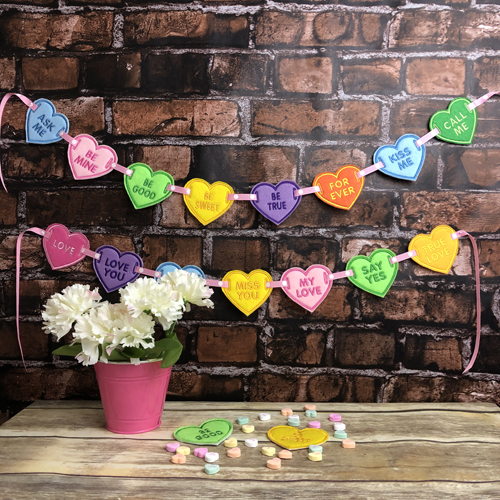
Create a charming garland with these In The Hoop Felt Conversational Hearts. Perfect for decorating your home with messages of love, each heart is a quick and easy project. Step-by-step instructions are included.
Step
of
ITH Felt Conversational Hearts Garland
By Pat Williams
Tautly hoop the cut-away stabilizer cut a 5” x 4” rectangle of a colored soft felt and the white stiff felt.
Step 2:
(Click Image to Enlarge)
If you cut a sheet of the soft or stiff felt as shown you can make 5 hearts from one sheet of felt.
Step 3:
(Click Image to Enlarge)
Run the 1st color stop (CS) as a placement line for the felt.
Step 4:
(Click Image to Enlarge)
Spray adhesive on the soft felt rectangle and position over the placement line so that the felt exceeds the placement line by ½” on all sides. Run CS2 to tack down the felt.
Step 5:
(Click Image to Enlarge)
Run CS 3 to embroider the lettering. This is on its own CS so that you can change the color if desired.
Step 6:
(Click Image to Enlarge)
Remove the hoop from the machine, do not unhoop. Lay the hoop right side down on a flat surface. Spray adhesive on the rectangle of white stiff felt and position it over the placement lines.
Step 7:
(Click Image to Enlarge)
Return the hoop to the machine and run CS 4 to stitch the satin border and buttonholes.
Step 8:
Trim around the heart about 1/8” from the satin stitches. Keep you scissors parallel to the stitching as you trim.
(Click Image to Enlarge)
Step 9:
(Click Image to Enlarge)
Use a seam ripper to poke a hole through the buttonholes.
Step 10:
(Click Image to Enlarge)
Then use the 4” embroidery scissors to complete the cutting open of the buttonholes.
Step 11:
Use the small scissors to trim any thread tails from the back of the heart and buttonholes so they will not stick out from the swag when you assemble it.
(Click Image to Enlarge)
Step 12:
Two pieces of 3/8” ribbon cut to 45” in length are used to string the hearts as shown in the sample picture, but you can cut the ribbon to any desired length. Use the Purple Thang to feed the ribbon through the buttonholes and across the back of the hearts.
(Click Image to Enlarge)
Step 13:
Congratulations you have completed your ITH Conversational Hearts Swag.
Step 14:
If you stop the hearts stitching after the satin border and before the buttonholes start running you can also create little felt hearts to enclose in a card or to just hand out all on their own.
Award winning Digitizer, Embroidery Educator, Author and a Consultant to the Industry, Pat Williams has 30 years of experience in the embroidery industry. Pat has won multiple awards for her digitizing expertise including the 2007 Impressions Awards Grand Championship, Best of Show as well as the 1st and 2nd Place Awards. Pat’s love of digitizing has afforded her the opportunity to write numerous articles for Impressions magazine in the United States and Images Magazine in Europe. In 2001 Pat was named “Embroidery Educator of the Year.” For many years Pat taught digitizing seminars at the ISS Shows in Long Beach, CA and for Compucon software. She now resides in Tucson, AZ.