Border OptionsHugging border, circle, square, or rectangle — with a 3mm satin stitch.
Backing OptionsAvailable with iron-on, sew-on, or velcro backing.
Fast ShippingShipped quickly from the USA.
Free Online Tools
Powerful embroidery utilities that save time and prevent costly mistakes.
Stitch AssistantRECOMMENDED
Get the exact stabilizer, machine settings, needle, and thread color sequence for every embroidery design you purchase — based on that design's stitch density, dimensions, and color count.
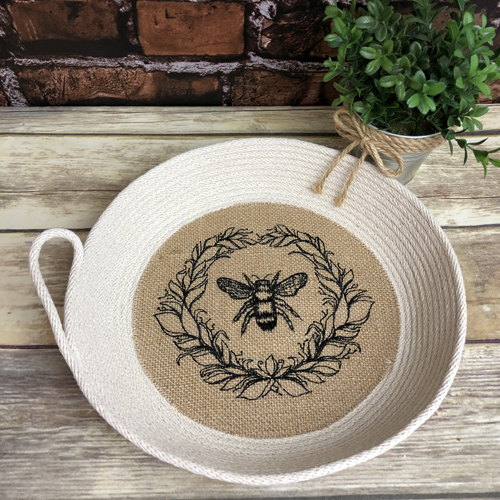
This elegant rope basket features a charming redwork bee design embroidered on burlap, seamlessly integrated during the basket-making process. Perfect for adding a touch of nature-inspired decor to any room. Step-by-step instructions are included.
The burlap jute fabric and fusible tear-away for this sample were cut 14” x 14” to fit the 8” x 8” hoop. If you are using a larger hoop cut your fabric and stabilizer to completely fill the hoop. Fuse the fusible tear away stabilizer to the back of the fabric.
Step 2:
Tautly hoop the fused fabric without adding additional stabilizer.
(Click Image to Enlarge)
Step 3:
(Click Image to Enlarge)
With Emerald Black embroidery thread and a black bobbin in your embroidery machine stitch the one-color design.
Step 4:
(Click Image to Enlarge)
Remove the project from the hoop. To make removal of the tear-away stabilizer easy iron it again and tear away while it is still warm. Tear the stabilizer away from the outside of the wreath and inside the wreath between the wreath and the bee. You do not need to remove it from the inside of the leaves of the bee.
Step 5:
(Click Image to Enlarge)
Cut a 10” square of Heat N Bond Lite®, center it over the back of the design and fuse it to the project.
Step 6:
(Click Image to Enlarge)
Trim the excess fabric from the project cutting it down to the size of the 10” square of Heat N Bond Lite®.
Step 7:
(Click Image to Enlarge)
This is what your embroidery will look like now. Place it aside for the time being.
Step 8:
(Click Image to Enlarge)
Wind at least 3 sewing machine bobbins with the same thread that you will be using to stitch the basket.
Step 9:
(Click Image to Enlarge)
Use a Size 12 sewing machine needle and a sewing machine foot with a center line or split in the foot as it will be your guide for sewing the rope together.
Step 10:
(Click Image to Enlarge)
Wind your rope into a ball. Most of the time the ball of rope will be on the floor to the right of you so if you have a small trash can or bowl that it can sit in, it will keep it from rolling away.
Step 11:
(Click Image to Enlarge)
The rope should have tape around the end. Trim it down so there is only an 1/8” or ¼” rope covered by the tape.
Step 12:
(Click Image to Enlarge)
Tightly coil 4 rounds of rope and place straight pins through the rope to the center.
Step 13:
(Click Image to Enlarge)
With a 3mm straight stich length stitch an X between the pins starting and stopping at the 3rd coil. Stitch slowly and pull the pins back as necessary to avoid sewing through the tips of the pins.
Step 14:
Set your machine to a zigzag stitch that is 5.5mm wide with a spacing of 4mm.
Step 15:
(Click Image to Enlarge)
Starting in the center stitch a zigzag stitch around these first coils. It is very slow around the first coil as you need to stop and pivot at almost every or every other stitch. If you have a machine with a needle down function, use it, as it will help you keep pivoting around the circle. Keep the center of the presser foot between the coils of the rope. Stop and trim the threads both on the top and bottom of the basket so that you can remove the rope from the machine to unwrap the unsewn cords that have coiled around the center.
Step 16:
(Click Image to Enlarge)
Place the stitched coil under the presser foot again having the rope ball on the floor to the right of you. We will continue stitching the rope in a coil until the size of the bottom of the basket is 8” wide. You will be able to sew faster now that the bottom is getting larger.
Step 17:
(Click Image to Enlarge)
When the basket bottom reaches 8” in diameter take it off the machine. Do not cut the rope.
Step 18:
(Click Image to Enlarge)
Peel the paper from the Heat N Bond Lite® on the back of the embroidery. Align the center of bee over the center of the basket bottom. The center of the design is show with the red X in this picture. You can stick a straight pin through the embroidery and the basket bottom to make sure they are aligned. Fuse the embroidery to the rope basket bottom by ironing on the embroidered side.
Step 19:
(Click Image to Enlarge)
Trim the excess fabric around the bottom, trimming right up next to the basket bottom.
Step 20:
For the first round of zigzag after the application of the fabric move your stitch spacing down to 3.5mm. This is to prevent fraying of the fabric.
Step 21:
(Click Image to Enlarge)
Put a pin into the fabric part of the basket to mark where you are beginning this round. Sew one round with the closer zigzag stitches and then set your spacing back to 4mm.
Step 22:
(Click Image to Enlarge)
On the next three rounds slide your hand underneath the project and stitch around. This will start the curvature of your basket sides.
Step 23:
(Click Image to Enlarge)
On the next three rounds Lift the basket higher and closer to the machine. The amount you bring your hand shapes the sides of the bowel.
Step 24:
(Click Image to Enlarge)
Sew two more rounds with the basket even closer to the machine. The finish of these 2 rounds was not where I wanted the handle to be so I stitched along a little further just to get to the side where I wanted the handle.
Step 25:
(Click Image to Enlarge)
Stop sewing when you reach where you want the handle; back stitch and trim your threads. Cut the rope 9” to 10” away from where you stopped sewing. Make an angle cut on the end of the rope to reduce the rope about ½ of its thickness at the end.
Step 26:
(Click Image to Enlarge)
Tuck the trimmed end of the rope under the handle and into where you stopped the original sewing. Backstitch and start sewing again until you have attached approximately half of the handle to the basket. Backstitch again at the end of your stitching.
Step 27:
Congratulations you have created a beautiful rope basket, embellished with embroidery, without having to embroider through the rope!
Award winning Digitizer, Embroidery Educator, Author and a Consultant to the Industry, Pat Williams has 30 years of experience in the embroidery industry. Pat has won multiple awards for her digitizing expertise including the 2007 Impressions Awards Grand Championship, Best of Show as well as the 1st and 2nd Place Awards. Pat’s love of digitizing has afforded her the opportunity to write numerous articles for Impressions magazine in the United States and Images Magazine in Europe. In 2001 Pat was named “Embroidery Educator of the Year.” For many years Pat taught digitizing seminars at the ISS Shows in Long Beach, CA and for Compucon software. She now resides in Tucson, AZ.