Live Chat
Embroidery Designs
Welcome, Embroiderer
Login
Easter Themed Accent Pillow Cover

Easter Themed Accent Pillow Cover Embroidery Project

By   Linda Mills   on   March 03, 2021
  • SKILL LEVELIntermediate
  • TIME REQUIRED01:30
Description

The perfect accent pillow cover adorned with an Easter themed embroidery design to compliment your holiday décor.

Step of

Materials

Project Preview Video

Materials
  • 13” PILLOW FORM
  • TEMPORARY ADHESIVE SPRAY (505)
  • EASTER THEMED COTTON FABRIC FAT QUARTER ( FRONT)
  • HEAVY WEIGHT COTTON FABRIC ( BACK) CUT 14.5” X 14.5”
  • POLYESTHER ZIPPER 12” OR LONGER
  • COTTON BATTING ( REMNANT SIZE MINIMUM 16”X 16”)
  • EMBROIDERY THREAD
  • SEWING THREAD

  • Designs used in this project

    Final Product: What You Will Create

    Preface:
    Placing a piece of cotton batting underneath the cotton fabric when embroidering this design for a pillow cover will help to stabilize and support the design to provide a nice precise definition of the embroidery design and to help keep the pillow cover looking crisp. A zipper closure makes it simple to insert and remove pillow forms when changing of your seasonal pillow covers. 


    Step 1:
    Gather all supplies and review instructions before beginning. 

    (Click Image to Enlarge)


    Step 2:
    With your fat quarter cotton fabric cut the following:
    Cut (1) 14.5” x 14.5” ( This will be the top of your pillow cover)
    Cut (2) 2” x 3”


    Step 3:
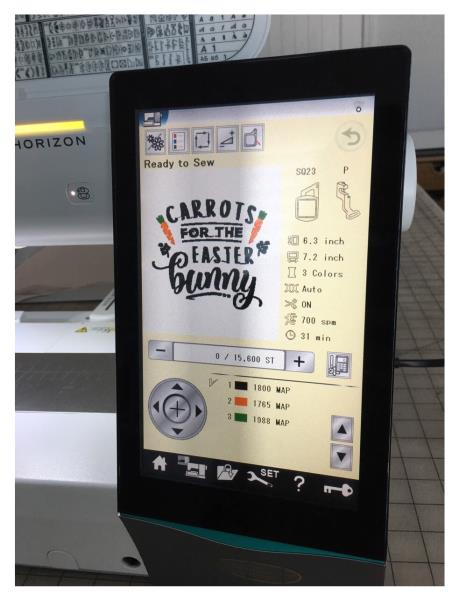
    Load design into your machine. Edit and resize design to approximately 6” x 7”.
    Refer to your machine’s instructions on how to resize. 

    (Click Image to Enlarge)


    Step 4:
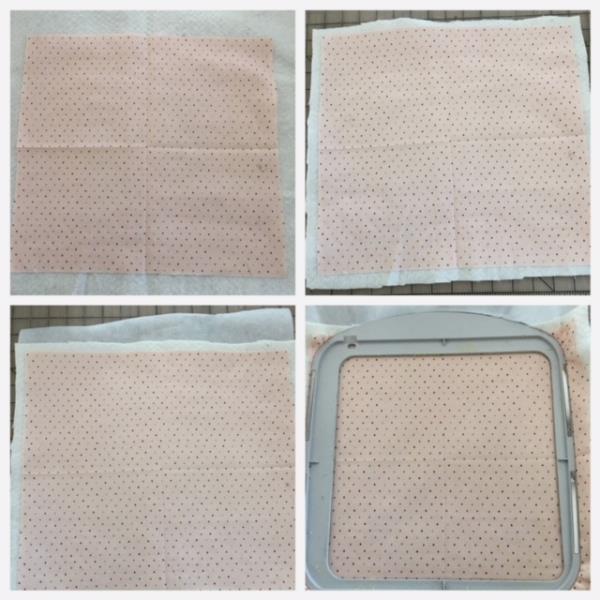
    Quarter fold your front cut cotton piece by folding in half and then half again. Iron or finger tip press. This will create a pressed cross hair. . Using your temporary adhesive spray, lightly spray your cut cotton batting and place your top cut piece on top with right side up. Finger press to secure. Trim excess cotton batting to size.  Iron press if needed.  Trim excess batting from all sides leaving approximately 1” out from all side edges of cotton fabric. Cut a piece of stabilizer to fit and place underneath the cotton batting.  Hoop all three layers matching up axis lines ( using creased cross hair as your guide) to markings on your hoop.

    (Click Image to Enlarge)


    Step 5:
    Attach hoop to machine. Confirm center needle placement. Refer to embroidery design thread color chart. Begin the embroidering process.  Embroidering complete. Remove hoop. Cut and trim all jump stitches and loose thread ends. Front and back.

    (Click Image to Enlarge)


    Step 6:
    INSTALLING ZIPPER
    Zipper will be attached to the bottom edge of front pillow cover. Turn down ¼” on one end of each 2” x 3” pieces. Straight stitch in place. Using the bottom edge of pillow cover as a guide apply one to each end of zipper. Refer to picture. Stitch in place. 

    (Click Image to Enlarge)


    Step 7:
    Trim excess from sides of zipper. 

    (Click Image to Enlarge)


    Step 8:
    Center zipper to bottom edge of front pillow cover with right sides together. Stitch using 1/8”- 1/4" seam allowance. Fold over to right side and top stitch close to folded edge.

    (Click Image to Enlarge)


    Step 9:
    Place pillow back atop front matching bottom edge to zipper edge. Attach zipper in the same manner as in step #8.

    (Click Image to Enlarge)


    Step 10:
    Right sides together. Unzip zipper halfway leaving an opening to turn right side out. Match up side edges and bottom edge. Pin in place. Stitch using ½” seam allowance both sides and top of pillow cover. Carefully stitch through zipper teeth. If needed serge or zigzag top and sides.

    (Click Image to Enlarge)


    Step 11:
    Turn right side out through zipper opening. Push out corners. Insert pillow form. And your are done! Great job! 

    (Click Image to Enlarge)

    Meet the Author: Linda Mills
    Linda Mills
    Linda loves to create by sharing her different sewing and machine embroidery techniques so others can utilize their machines to the fullest
    More From This Author
    Link is Broken, Please check the URL
    Exclusive Embroidery Offers!
    Copyright © {{ currentDate | date:'yyyy'}} - EmbroideryDesigns.com
    GET 50% OFF! ×