

Avoiding Tension Headaches Embroidery Project
When it comes to embroidery and tensions, there are three areas where we need to pay attention: hoop tension, needle thread tension, and bobbin thread tension. In this article, we'll focus on thread tensions. Whether you embroider on a single needle ho
Materials
Project Preview Video

Cut Away Stabilizer - 2.5 Oz wt.

Cut Away Stabilizer - 2 oz wt.
When it comes to embroidery and tensions, there are three areas where we need to pay attention: hoop tension, needle thread tension, and bobbin thread tension. In this article, we'll focus on thread tensions. Whether you embroider on a single needle home machine or a multi-head multi-needle commercial machine, the symptoms, diagnosis and treatment of tension problems are the same. If it were only as easy as sprinkling a couple of ground up Tylenol Tension tablets over your machine!
Tackling Tension Troubles The first step is to determine whether your problem stems from tensions that are too loose, too tight, unbalanced or a combination—and that's not always a simple task. If your bobbin is showing on top, it means the needle thread is pulling the bobbin thread to the top but is it because the needle thread is too tight or because the bobbin thread is too loose or a bit of both? Start with the Bobbin
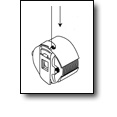
For commercial embroiderers, the best way to set bobbin tension is with a tension gauge (in which case set the bobbin case to between 25 and 35 grams). I don't recommend tension gauges for home embroiderers unless you happen to be trained to service the model you have. Furthermore, I don't know what tension is recommended for the various machines and I suspect it can vary depending on the type of machine and bobbin mechanism you may have. If you don't have a tension gauge and you have a front loading bobbin case (commercial machines as well as Bernina and Pfaff home machines), use what is known as the bobbin drop test (see Figure 1). If you have a home machine with a drop-in bobbin, this test probably won't work for you. Start with a well-conditioned bobbin case. By that I mean one that is clean and free of lint as well as damage-free. Insert a bobbin that is also in good condition. The bobbin should not be out of round and evenly, but not overly, filled if you wound it yourself. Leave the thread out of the final pigtail on the bobbin and dangle the bobbin by the thread over your cupped hand. A little jerk on the thread tail should cause the bobbin to drop an inch or two. If it doesn't, the tension is too tight and the screw needs to be loosened. If it drops rapidly, then the tension is too loose and the screw needs to be tightened. Remember the rule—”Righty tighty, lefty loosey.” Only rotate the screw (Figure 2) about an 1/8 of a turn at a time and test until the bobbin drops just slightly. Be careful not to totally remove the screw! Why start with the bobbin? Because no matter how many needles your machine has, it only has one bobbin. This one bobbin universally affects the tensions on every needle. If you have a single needle machine, most likely you start adjusting tensions at the needle. While this tactic often works well, it won't correct a poorly tensioned bobbin case so please don't overlook this critical area of proper stitch formation. |

Bobbin Tip for Home Machine Owners While we're still talking about the bobbin, I'd like to toss out this tip about prewound bobbins. I love prewound bobbins; they're fast and easy to use and its easy to tell a machine bobbin from a prewound one. Prewounds are ideal for commercial machines and they often fit (and work) in home machines. However, I would caution you not to use them in your home machine when you want top notch results. The bobbin is critical to creating a proper, well-formed stitch and many home machines have "preferred" or even custom bobbins. For example, Husqvarna manufactures their bobbins in their main factory in Sweden so that they have total control over the quality to guarantee optimal stitching. So, while prewound bobbins may actually fit into your bobbin case, they may not be ideally shaped for your machine and not produce ideal stitches. Therefore, if you have a home machine and are working on a special project, rewind that prewound bobbin onto machine bobbins for best results. The FOX Test At your machine or in your software, select a block typeface and type the word "FOX" in one inch tall letters. This combination of letters provides even width columns with changing stitch angles for testing how the machine controls tensions as the pantograph moves side to side versus backward and forward. To be honest, when I test tensions on my multi-needle machine, I just use an "H" (figure 3) but on my single needle home machines, I prefer the more comprehensive version. So that you don't have to worry about your fabric selection, simply tautly hoop one or two pieces of medium weight cutaway. Using an easily visible color in the needle, sew your letters with each needle/needle bar. For home users, insert your large (5x7 or so) hoop, sew "FOX" in the upper left corner of your hoop at the normal or default settings for embroidery. After sewing, remove the hoop (but not the fabric from the hoop) and inspect the wrong side of the stitches. The middle one third should be bobbin thread - but don't expect a straight even column down the center. The outer third on each side of the column should be needle thread. Notice if the tension radically deviates as your columns change angle. Look for tightness or looping. Make note of the settings to the right of the stitching directly on the stabilizer using a fine tip Sharpie. Adjust your tensions, reinsert the hoop, move your needle down and sew FOX again. Inspect, annotate, and repeat. Don't worry if some stitch outs are bad, its good to know what doesn't work as well as what does and you'll learn a lot about how your adjustments affect your stitching results. If it sounds like a lot of work, just be glad you only have to test one needle and not 10 or 12! Tensions are individually set on a multi-needle machine for each needle; thankfully there is still only one bobbin. If you're feeling really scientific and you have two large hoops, swap in the second hoop and a prewound bobbin and duplicate each FOX test to see if you get better results using one type of bobbin over the other. Or use one hoop and sew two lines, one with each bobbin. After you've filled up your hoop, look at the sewouts and determine which are technically good and of those, which you like the best. Set your machine to those tensions and try sewing the FOX test on several fabric swatches to see how they work in the "real world." You shouldn't get much slippage or pull on two layers of cutaway so using this for your embroidery eliminates other potential variables that can simulate tension problems. If your tensions are really wacky and you can't get a satisfactory stitch-out, your machine needs to visit the sewing machine shop. Take your test piece with you to show the technician. |
Do I Tighten or Loosen? Ok, so what if you don't see a textbook perfect result and you need to adjust—how do you know what to do? Here's a case where more needles can help you troubleshoot.
Adjusting needle tensions varies more among home machines and between home and commercial machines. Many home machines are "factory set" to "automatically adjust" when in embroidery mode. And in most cases it works surprisingly well when your machine is kept clean and properly serviced. When things run amok, first check that you've threaded your machine properly, Remember that the presser foot must be up to disengage the tension discs during threading. Also check your manual to see how you can fine-tune your tensions. Another important tip is that most home machines are multi-function—not only are they used for embroidery, but they are also used for construction and decorative machine stitching. Each of these tasks requires tension adjustments. Today's top of the line machines automatically alter tension settings depending on other selections made. What you need to know is that unless you can override the default settings on a more permanent basis, your machine will reset to it's default settings each time you turn off the machine or leave embroidery mode. This is why it's important to maintain a notebook of settings and adjustments you make—just think of it as your personal addendum to the machine reference guide. Multi-needle machine owners may have more needles to control but at least the settings "stick." That doesn't mean they never need adjusting again, it just means that you don't have to worry about the machine resetting all your fine-tuning. Many detailed articles have been written on adjusting tensioners and pretensioners and there are multiple theories for optimizing them. I encourage you to research and read other material and decide what works well for you and your machine. Zen and Perfect Tension As for what tension is the right one, there is no one right, perfect tension. Instead, there is a range that works well under most normal circumstances. The trick is to experiment with tension settings and fine tune them for the thread you use most. Also keep in mind that tension is not "fixed" but variable. One of the values of test sewing a design is to check the tension settings and fine tune for the current circumstances. The answer to how often to adjust is simply when it's needed. Here's a list of common reasons for tension alterations. Factors That Affect Tension Thread Type— Most experts recommend tighter tensions for polyester thread to avoid looping. However, looping is not as much a problem with today's polyester and my concern is with over-tensioning polyester. If poly thread is pulled too tautly during sewing causing it to stretch, it will cause puckering once the design is sewn, removed from the hoop, and the thread relaxes. Thicker threads push the tension discs farther apart which causes increased tensions on the thread. Lower tensions for heavier threads. Thin, flat "ribbon" or Mylar threads may require tighter tensions than 40 weight embroidery thread. Machine Speed— The faster the machine sews the tighter the stitches are made. If your tension seems too tight, slow the machine down a little and see if it improves. Thickness of Goods— Thinner fabrics with little or no stabilizer require more careful attention to keep the tensions balanced and the bobbin thread on the back. Stitch Length— Longer stitches have a tendency to loop, especially in fills while really short stitches have a tendency to pull up the bobbin thread. Some machines are better at controlling the tensions than others. Looping is especially problematic with one particular manufacturer and your best fix may be simply to avoid designs with long stitches if tension adjustments aren't correcting the problem. |