Border OptionsHugging border, circle, square, or rectangle — with a 3mm satin stitch.
Backing OptionsAvailable with iron-on, sew-on, or velcro backing.
Fast ShippingShipped quickly from the USA.
Free Online Tools
Powerful embroidery utilities that save time and prevent costly mistakes.
Stitch AssistantRECOMMENDED
Get the exact stabilizer, machine settings, needle, and thread color sequence for every embroidery design you purchase — based on that design's stitch density, dimensions, and color count.
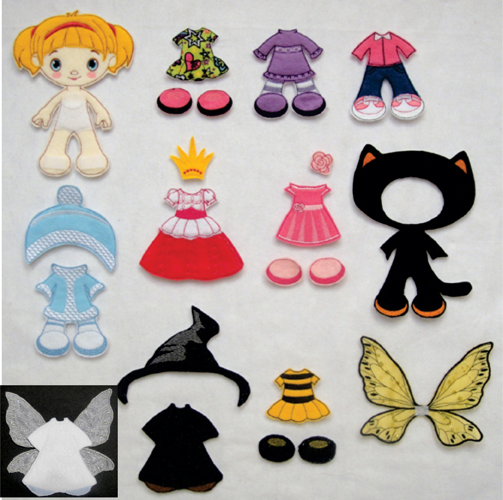
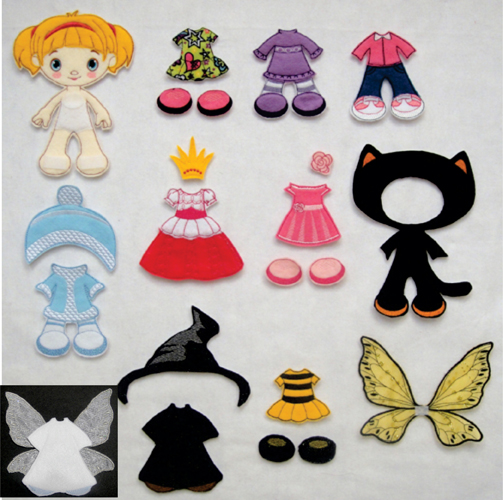
Create a delightful set of felt paperdolls with this in-the-hoop project. Perfect for imaginative play, this set includes various outfits and accessories, making it ideal for children or as a unique craft fair item. Step-by-step instructions are included.
1 sheet Eco-fi FriendlyFelt® (extra stiff craft felt) available at Joann’s
1 sheet Eco-fi Classic Felt® crème (flesh tone)
1 sheet Eco-fi Classic Felt® Hot Pink
1 sheet Eco-fi Classic Felt® Light Pink
1 sheet Eco-fi Classic Felt® Lavender
1 sheet Eco-fi Classic Felt® Dark Blue
1 sheet Eco-fi Classic Felt® Light Blue
1 sheet Eco-fi Classic Felt® Lime green print
1 sheet Eco-fi Classic Felt® Black
1 sheet Eco-fi Glitter Felt® Black Glitter
1 sheet Eco-fi Classic Felt® Gold
12 sheets of Eco-fi Classic Felt® White
¼ yard yellow organza with gold metallic detail
¼ yard of craft netting yellow
¼ yard of white organza with silver metallic detail
¼ yard of white craft netting
Scotch Tape
1 package each of Velcro Brand® Sticky Back for Fabric ovals and 4” x 6” sheet
2.5 ounce extra stable cut a way stabilizer for eleven hoopings, 4 hoopings will be in a 6” x 10” or larger and 7 hoopings will be in a 5” x 7” hoop or larger. Amount needed will depend upon your hoop sizes.
Using the Eco-fi FriendlyFelt® as the backing for the doll enables her to hold her head up, so be sure you have the stiff felt for that purpose. As all of the clothes are backed with felt you will only need to put the loopy side of the Velcro on the doll and on the backs of the hats and accessories as the felt will stick to that without using the soft side of the Velcro. Be sure to use the stick and peel Velcro for fabrics. Please read the instructions for permanent adhesion which says do not use or disturb for 24 hours after applying it to the felt. Due to some small pieces these dolls are not intended for use by children under three years of age.
The doll is sized to fit into a 6” x 10” hoop. The hoop in the pictures is an 8” x 8” hoop as there is not a 6” x 10” for the machine used. The ratio of the designs to the hoop size will look different than the pictures if you are using a 6” x 10” hoop. The hair on the girl doll and the boy doll are a little different so please read the separate instructions for each.
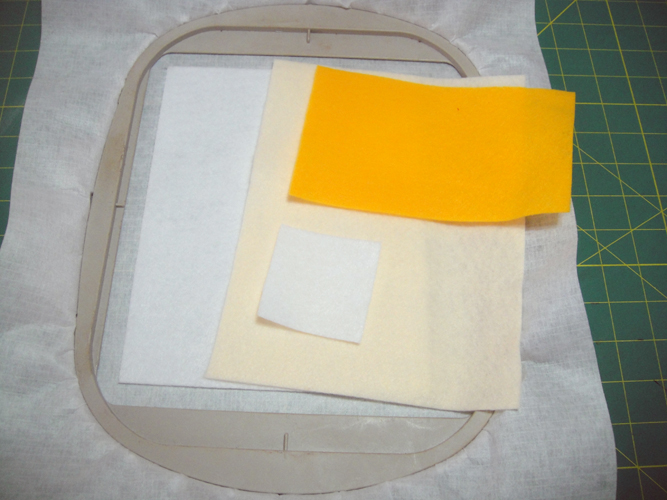
Step 1:
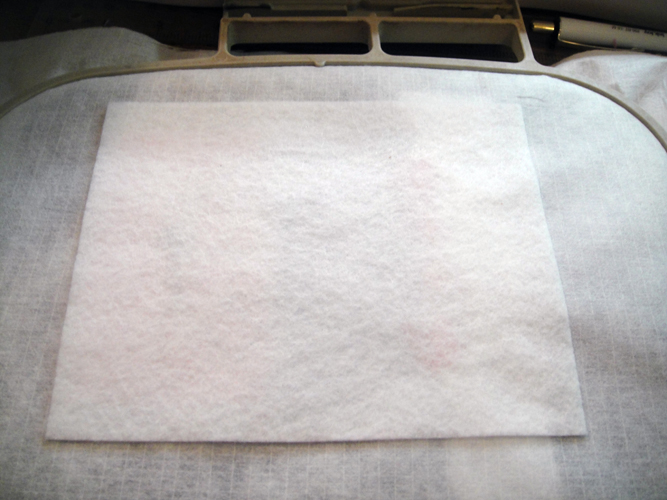
To make the doll you will need a 9” x 7” piece of Eco-fi FriendlyFelt® in white for the back of the doll; a 9” x 7” Eco-fi Classic Felt in crème or flesh tone; a 6” x 4” piece of gold Classic felt and a 2.5” x 2.5” square of white Classic Felt for her body suit. Hoop an appropriate piece of the cut away stabilizer in your embroidery hoop.
(Click Image to Enlarge)
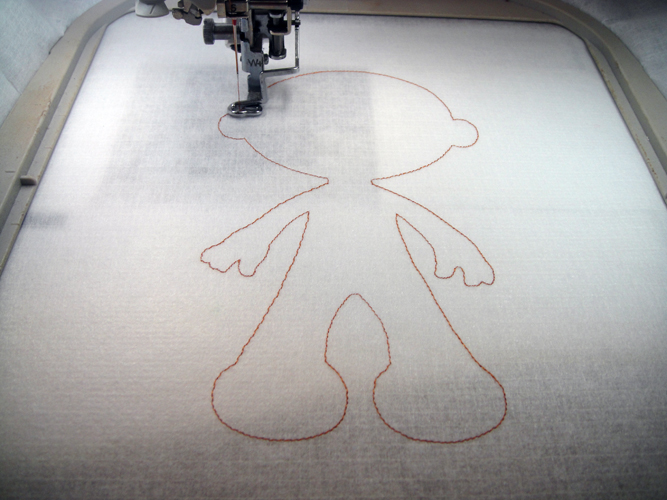
Step 2:
Load design PDQ01 in your machine and run color stop (CS)1 as the placement line in Bronze (1257)
(Click Image to Enlarge)
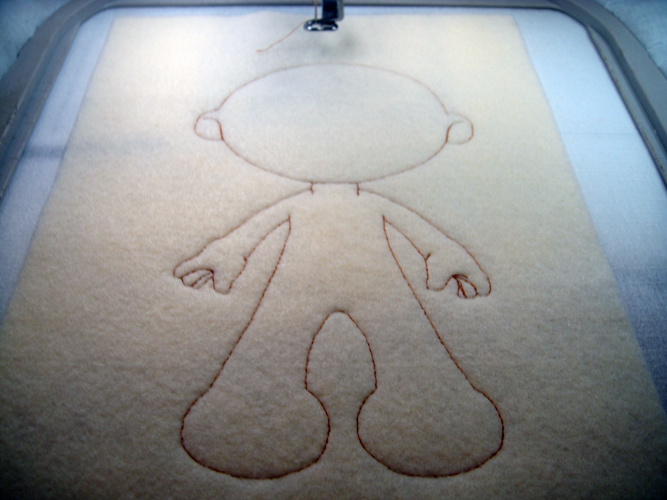
Step 3:
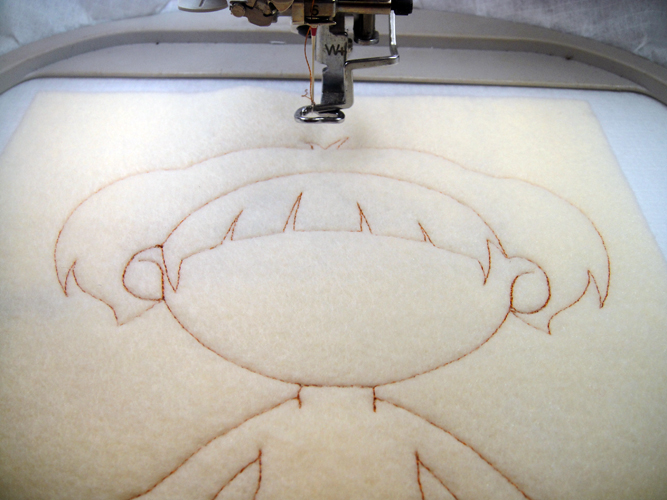
Spray adhesive on the back of the crème colored felt and place over the outlines; run CS 2 in Bronze (1257) as the Tack Down line; do not trim any of the felt off yet.
(Click Image to Enlarge)
Step 4:
Run CS 3 in Bronze for a placement line for her hair.
(Click Image to Enlarge)
Step 5:
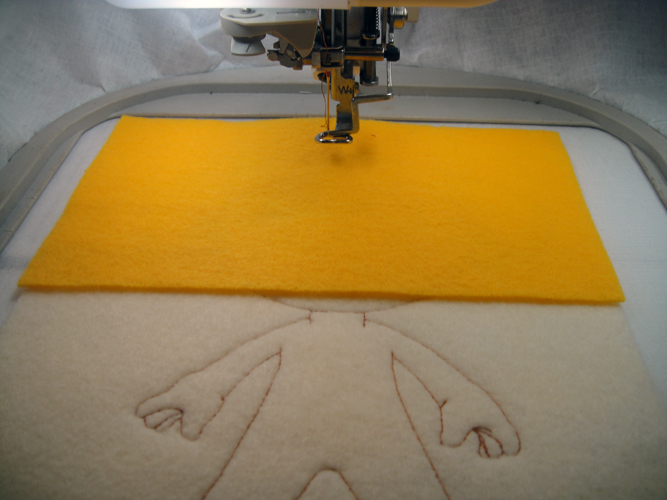
Spray adhesive on the back of the gold felt and lay over the placement line, run CS 4 in Bronze to tack down the hair.
(Click Image to Enlarge)
Step 6:
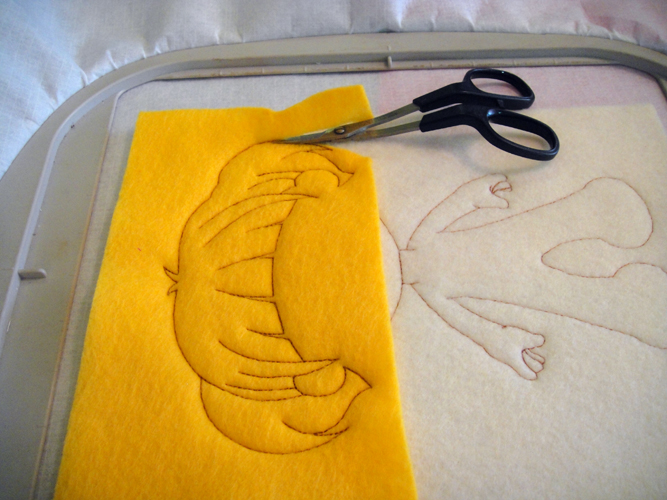
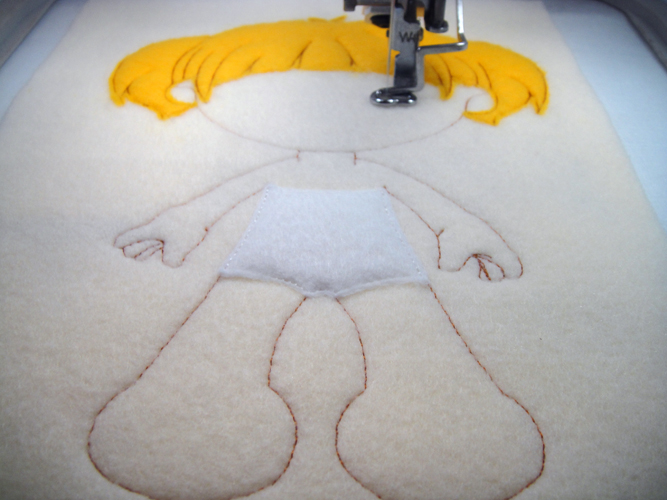
Remove the hoop from the machine; do not unhoop, lay it on a flat surface to avoid loosening the stabilizer; with in the hoop scissors trim away the excess gold felt only, do not cut the crème felt.
(Click Image to Enlarge)
Step 7:
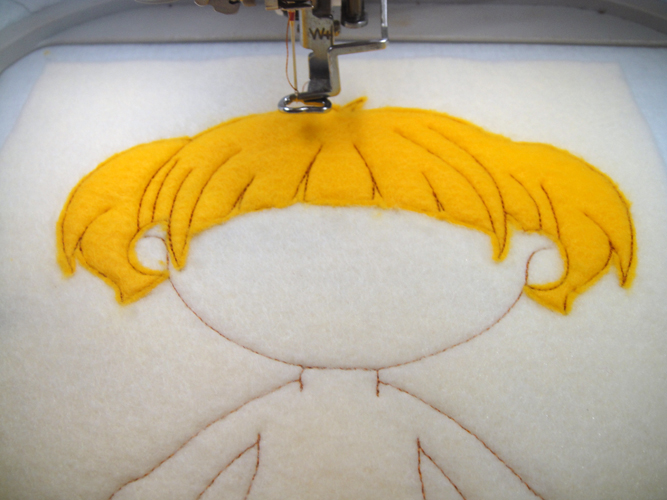
Your project will now look like this.
(Click Image to Enlarge)
Step 8:
Run CS 5 in white as a placement line for the bodysuit; spray the white felt with adhesive and place over the outline; run CS 6 in white to tack down the bodysuit; trim the excess white felt from the project; do not cut the crème felt at this point.
(Click Image to Enlarge)
Step 9:
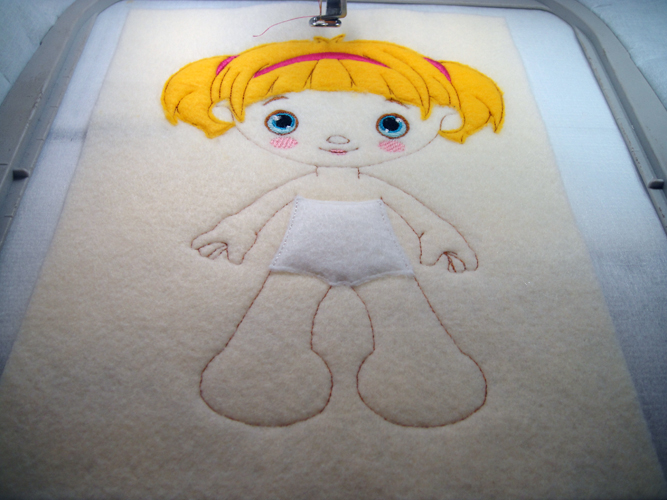
Follow the color chart for CS 7 through CS 14 to embroider the face and details on the doll.
(Click Image to Enlarge)
Step 10:
Remove the hoop from the machine, do not unhoop, place the hoop face down on a flat surface to avoid loosening the stabilizer; spray adhesive on the white Eco-fi FriendlyFelt, the stiff one, and place over the embroidery on the back aligning it with the crème felt.
(Click Image to Enlarge)
Step 11:
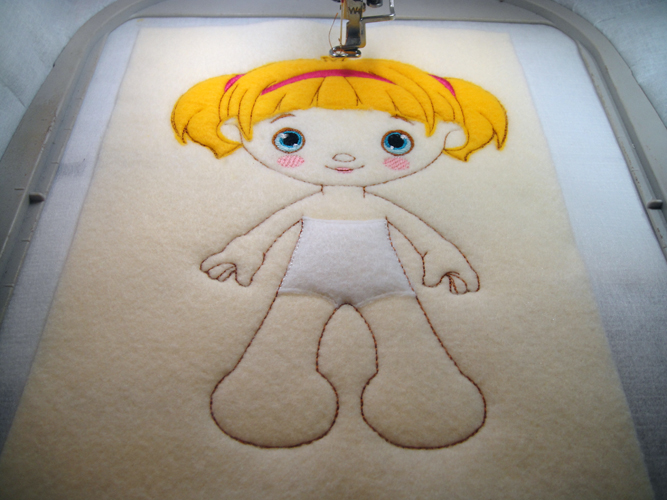
Return the hoop to the machine and run the final CS in Bronze to tack down the back felt to the front.
(Click Image to Enlarge)
Step 12:
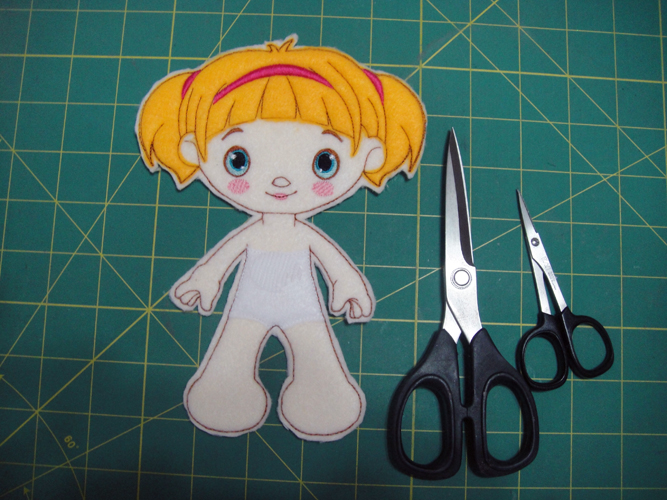
You will now cut around the whole doll through all layers 1/16th to 1/8th “ from the final tack down stitches. I found it useful to have 6” scissors to cut the general outline as well as 3 ½” scissors to trim out the smaller areas.
(Click Image to Enlarge)
Step 13:
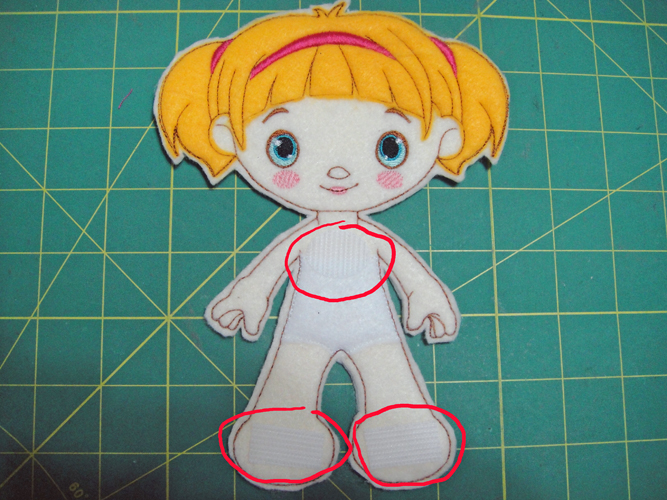
Following the manufacturer’s instructions apply the loopy side of a Velcro Peel and Stick oval high on her chest and cut small rectangles of the loopy side from the Velcro Peel and Stick sheet to apply to the feet of the doll.
(Click Image to Enlarge)
Step 14:
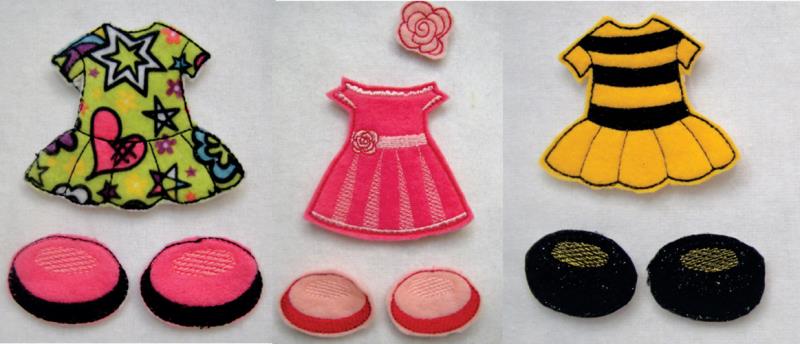
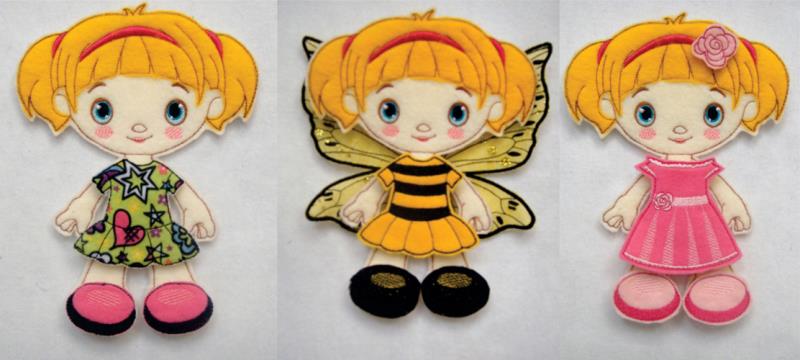
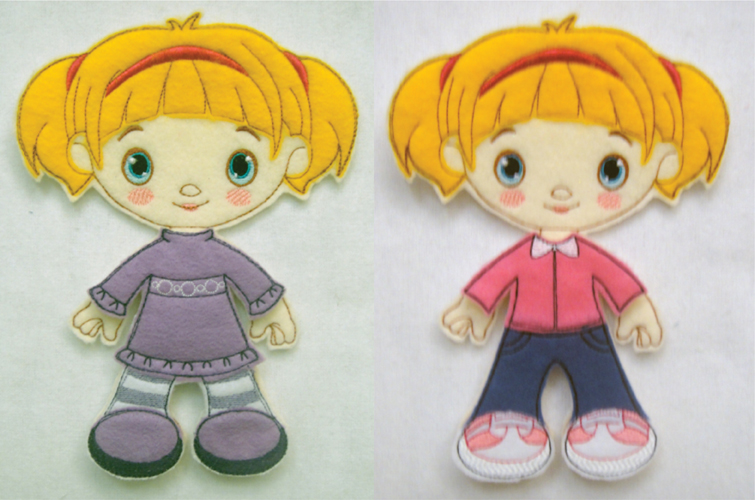
Files PDQ02, the dress and shoes; file PDQ05, the party dress and file PDQ 12, the Bumblebee costume are all made in a like manner as each file has separate shoes. These files will run in a 5” x 7” hoop. Cut a 4” x 4” square of classic felt in the color of each dress and in white classic felt for the backs; cut 2.5” x 5” strips of classic felt in colors for the shoes and in white for the backs of the shoes; for the party dress hair accessory cut a 2” x 2” square of light pink classic felt and in white felt for the back.
(Click Image to Enlarge)
Step 15:
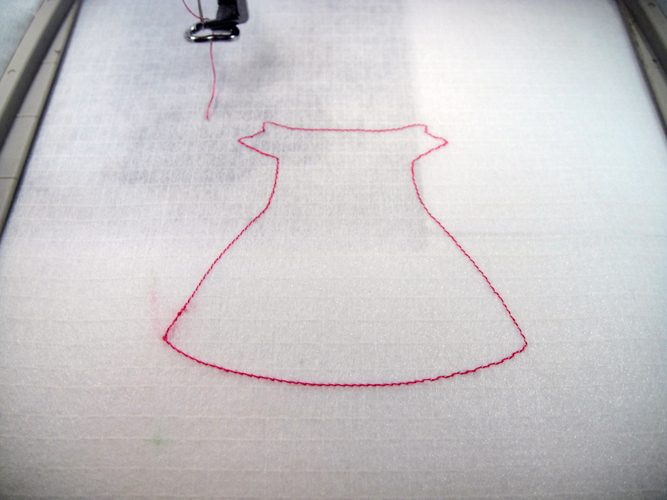
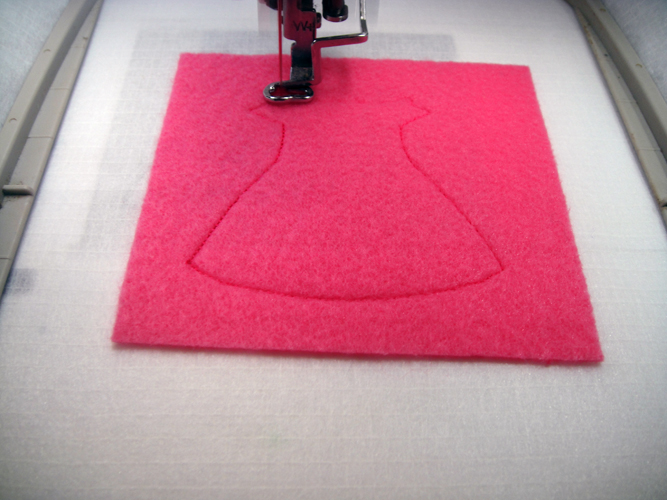
Hoop the cut away stabilizer in the hoop. Use the color that you want to outline the dress with to run the 1st color stop for a placement line; in these dresses black was used to outline the green dress and the bumblebee costume, fuchsia was used to outline the party dress.
(Click Image to Enlarge)
Step 16:
Spray adhesive on the appropriate color felt and place over the outlines; run CS 2 in the same color to tack down the felt.
(Click Image to Enlarge)
Step 17:
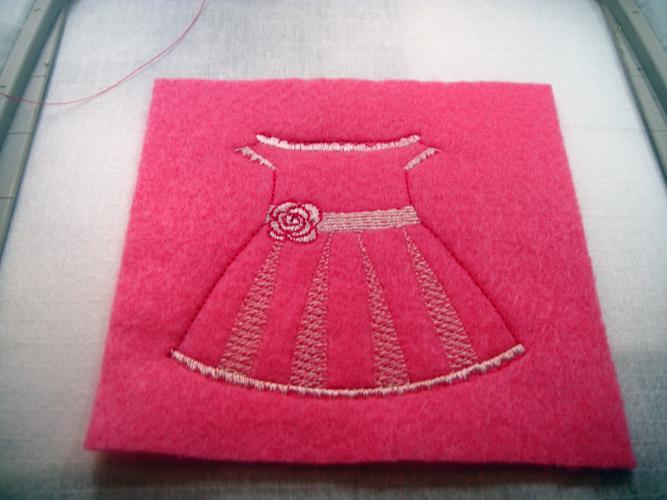
Follow the color chart to embroidery the detail on the dress. At the end of the detail stitching which will be CS 2 on the green dress, CS 4 on the party dress and CS 3 on the bumbles costume remove the hoop from the machine; do not unhoop; do not trim the dress yet.
(Click Image to Enlarge)
Step 18:
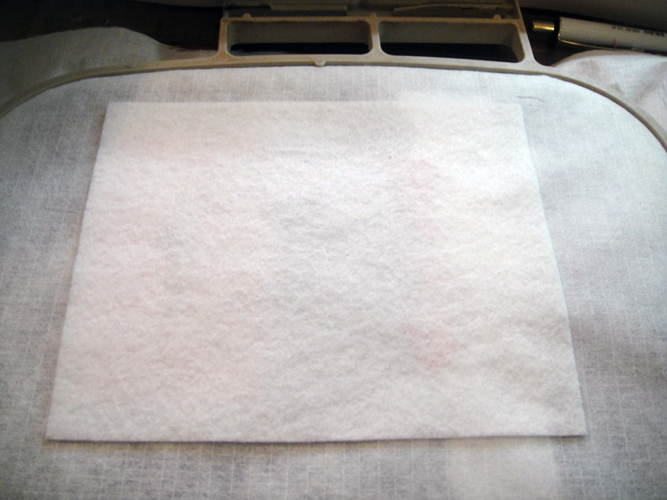
Remove the hoop from the machine; do not unhoop; spray adhesive on white felt and cover the back of the dress; return the hoop to the machine for the tack down stitches to attach the back felt to the dress.
(Click Image to Enlarge)
Step 19:
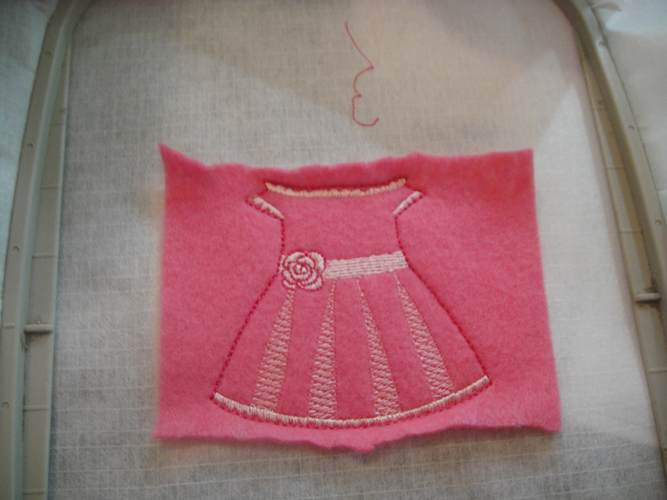
Do not cut out the dress yet but trim the top and the bottom felt from the dress on both the front and back of the hoop so that it will not get it the way when you stitch the rose for her hair and shoes.
(Click Image to Enlarge)
Step 20:
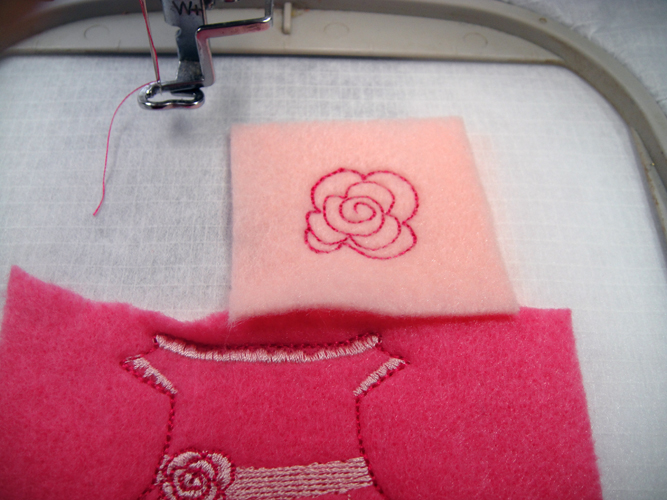
Stitch the rose using the same method; stitch the outline; spray and place light pink felt; stitch the detail on the rose; add white felt to the back of the rose and stitch the tack down stitches. Of course this instruction only applies to the party dress.
(Click Image to Enlarge)
Step 21:
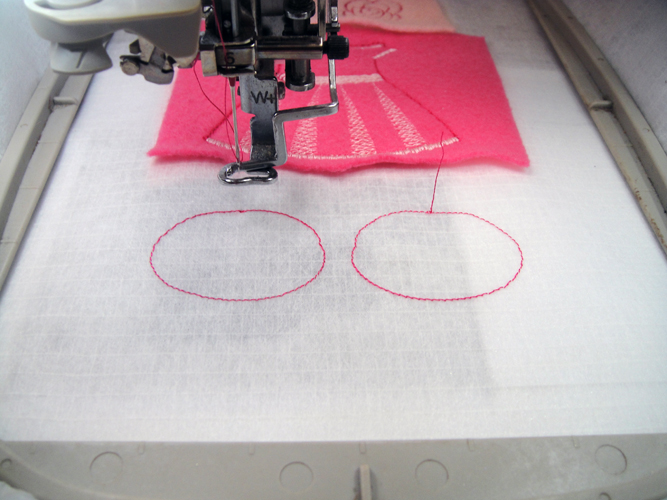
Both shoes are sewn at the same time. Stitch the placement line for the shoes in the same color in which you wish to outline the shoes.
(Click Image to Enlarge)
Step 22:
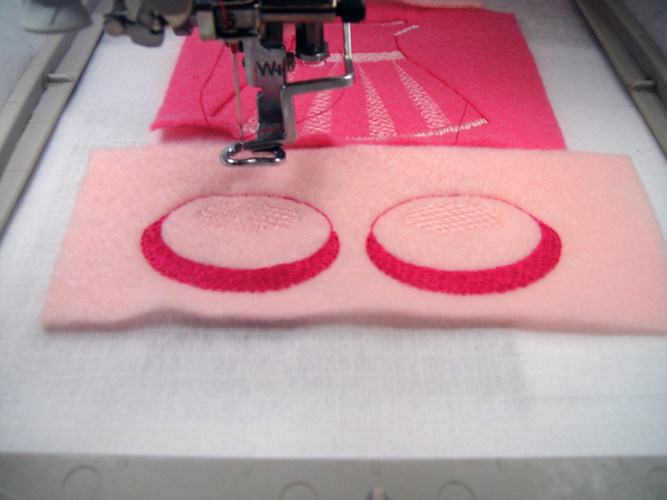
Follow the color charts to stitch the detail on the shoes; before the last CS turn the hoop over and place white felt on the back of the shoes. Return the hoop to the machine and stitch the final CS to tack the felt to the back of the shoes.
(Click Image to Enlarge)
Step 23:
Cut the dresses and the shoes out about 1/16th to 1/8” from the tack down lines. Attach a small piece of Velcro – loopy side – to the back of the rose for her hair. You do not need to attach Velcro to the backs of the dresses or shoes as the felt backs will stick to the Velcro on the doll.
(Click Image to Enlarge)
Step 24:
(Click Image to Enlarge)
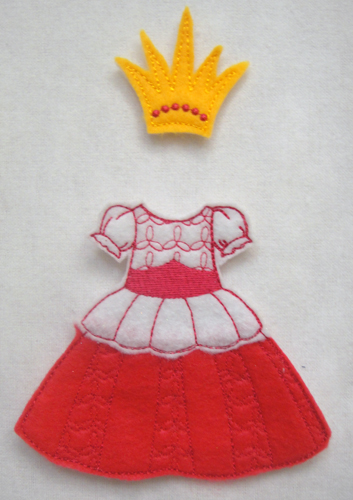
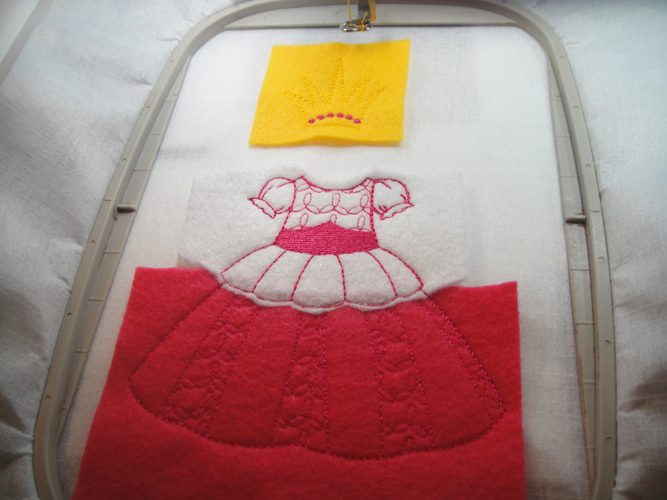
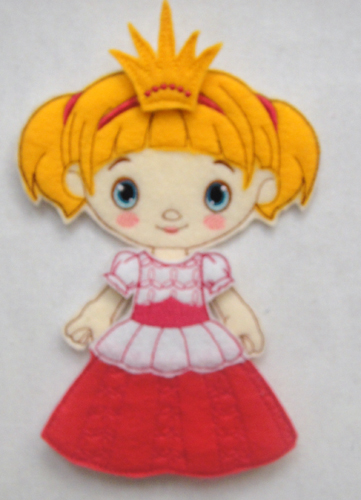
As you can see the princess dress, PDQ04, is sewn in two colors of felt. To make this dress and crown cut a 2 ½” square of gold and white classic felt; cut a 3 ½” x 4” square of white classic felt for the top of the dress and a 4” x 5” rectangle of hot pink felt for the skirt; cut a 5 ½” x 6” rectangle of white felt for the back of the dress. This outfit runs in a 5” x 7” hoop.
Step 25:
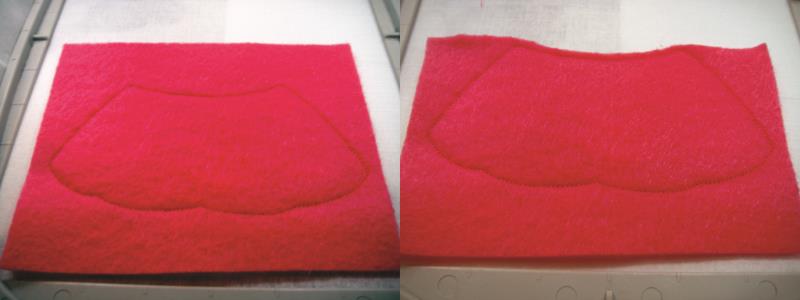
Hoop the cut away stabilizer and run the placement line for the skirt in Fuchsia thread, spray adhesive on the hot pink felt and place over the outlines; run the tack down stitches in Fuchsia to tack down the felt. Trim the felt across the top edge of the skirt and the full width of the felt at about 1/8”. Run CS 3 in fuchsia to embellish the skirt.
(Click Image to Enlarge)
Step 26:
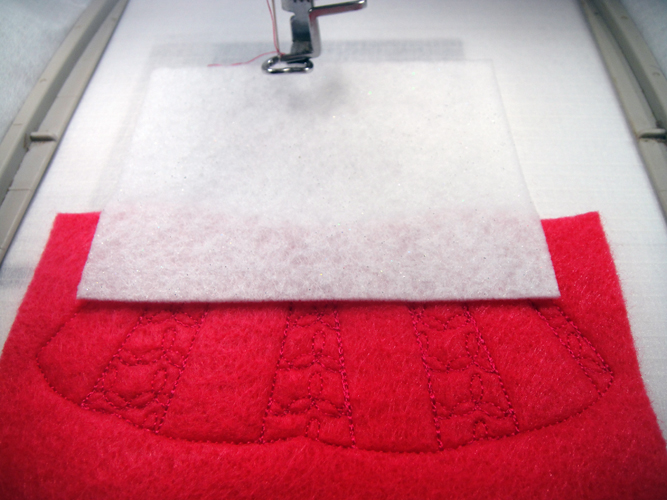
Run CS 4 in fuchsia for a placement line for the dress bodice; spray adhesive on the 3 ½” x 4” rectangle of white felt and position over the placement line.
(Click Image to Enlarge)
Step 27:
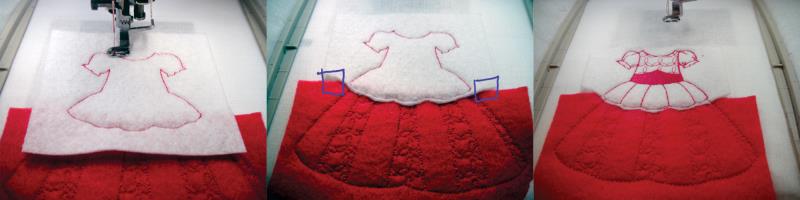
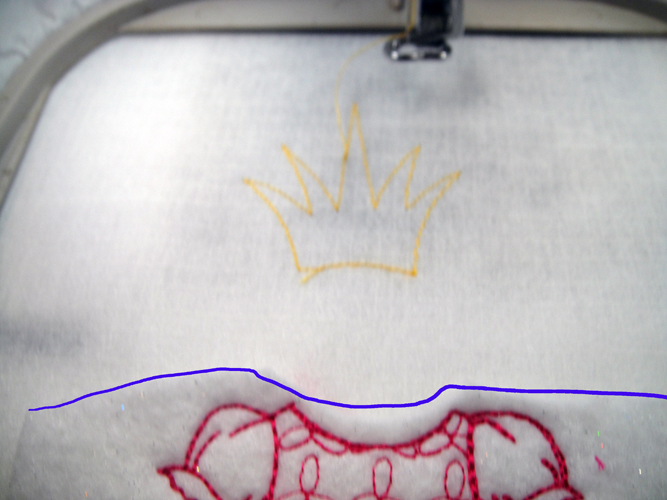
Run CS 5 in fuchsia for the tack down of the bodice. Trim the white felt just across the bottom of the bodice and all the way across the felt. Place scotch tape (not pictured) in the two areas outlined with the blue pen to keep the felt from flipping up during the rest of the sewing process. Run CS 6 in fuchsia to stitch the detail on the dress. Remove the hoop from the machine; turn the hoop to the back; spray the 5 ½” x 6” rectangle of white felt and place it over the whole dress on the back of the hoop. Run CS 7 in fuchsia to complete the dress.
(Click Image to Enlarge)
Step 28:
Trim the white felt on the front and the back of the hoop just across the top of the dress to make more room to stitch the crown. Run CS 8 in Gold Rush as a placement line for the crown.
(Click Image to Enlarge)
Step 29:
Run CS 9 in Gold Rush to tack down the felt; run CS 10 in Fuchsia for the jewels; turn the hoop over; spray adhesive on the 2 ½” white square and apply to the back of the crown; return the hoop to the machine to run the last CS in gold rush to complete the crown.
(Click Image to Enlarge)
Step 30:
(Click Image to Enlarge)
Cut the dress and crown out through all layers about 1/16th to 1/8th” from the tack down lines, add a small rectangle of Velcro - loopy side only – to the back of the crown.
Step 31:
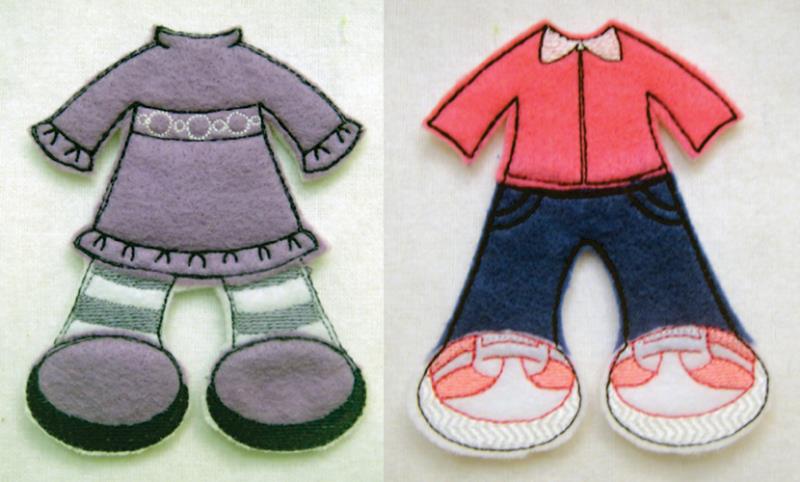
Designs PDQ03, the dress and leggings and PDQ06, the jeans, are run in a 5” x 7” hoop. Design For PDQ03 cut:
1. 4” x 5” lavender classic felt for dress
2. 2” x 5” white classic felt for leggings
3. 2” x 5” white classic felt for shoes
4. 6” x 5” white classic felt for the back of the whole outfit
For PDQ06 cut:
1. 3” x 4” Pink classic felt for shirt
2. 3” x 4” Blue classic felt for jeans
3. 2” x 5” White classic felt for the shoes
4. 6” x 5” white classic felt for the back of the outfit
(Click Image to Enlarge)
Step 32:
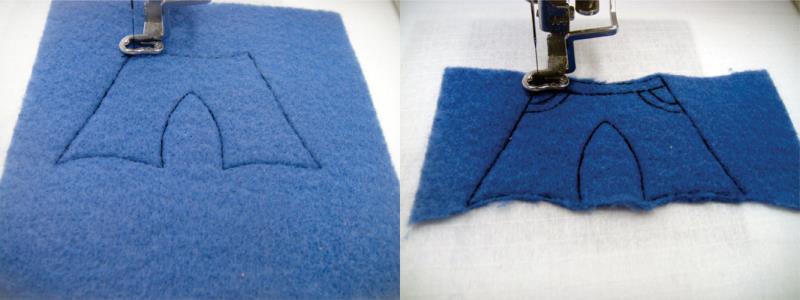
Following the color charts for detail work on the garments stitch the first CS for a placement line or the leggings or pants; run CS 2 as a tack down line; stitch detail per the color charts with CS 3; trim close to the top and bottom of the leggings or pants.
(Click Image to Enlarge)
Step 33:
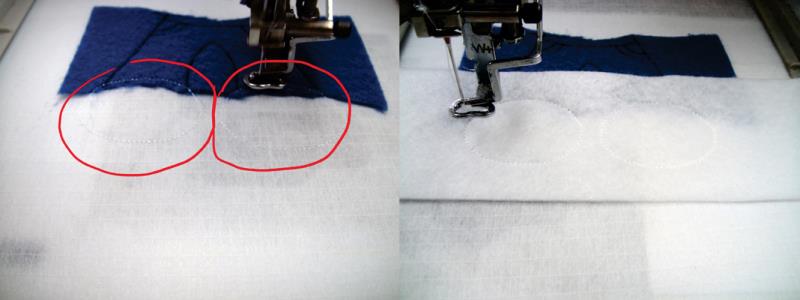
Run CS 4 as an outline for the shoes; spray with adhesive and position white felt over the placement lines; trim the top of the shoe felt; use scotch tape outside of the stitching lines to hold the edges in place so the presser foot will not flip up during the rest of the sewing; stitch shoe details per the color charts.
(Click Image to Enlarge)
Step 34:
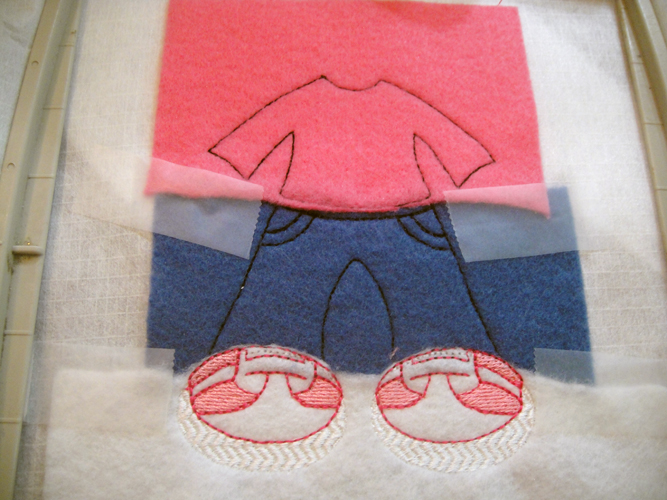
CS 6 on the lavender dress files and CS 9 on the jeans file is the placement line for the top of the garment run in a color to match the outfit; spray and position the appropriate color of classic felt. Follow the color charts through the next to last CS to complete the detail on the garment.
(Click Image to Enlarge)
Step 35:
Remove the hoop from the machine; do not unhoop; turn the hoop over and apply the white classic felt 6” x 5” rectangle over the back of the whole outfit.
(Click Image to Enlarge)
Step 36:
Return the hoop to the machine and run the final CS to complete the garments; trim around the whole garment at 1/16” to 1/8” from the tack down lines; no Velcro is needed to be applied to these garments.
(Click Image to Enlarge)
Step 37:
(Click Image to Enlarge)
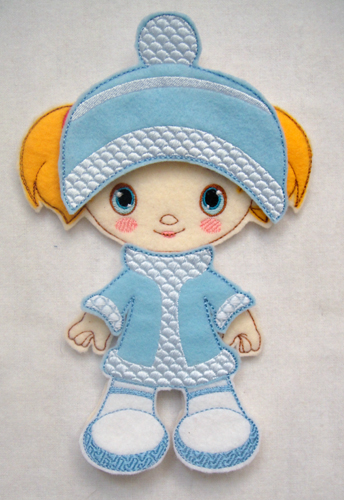
The Snowsuit outfit, design PDQ07 is run in a 6” x 10” hoop. Follow the color chart using the same techniques as in Steps 25 through 30 for the princess dress and crown for trimming and taping the felt. The Snowsuit is stitched first the cap is completed afterwards. All outlines were stitched with Porcelain Blue thread to match the felt. To make this outfit cut:
1. 4 ½” x 6 “ light blue and white classic felt for the cap
2. 4” x 5” light blue classic felt for the jacket
3. 3” x 5” white classic felt for the boots
4. 6” x 5” white classic felt for the back of the whole garment
Step 38:
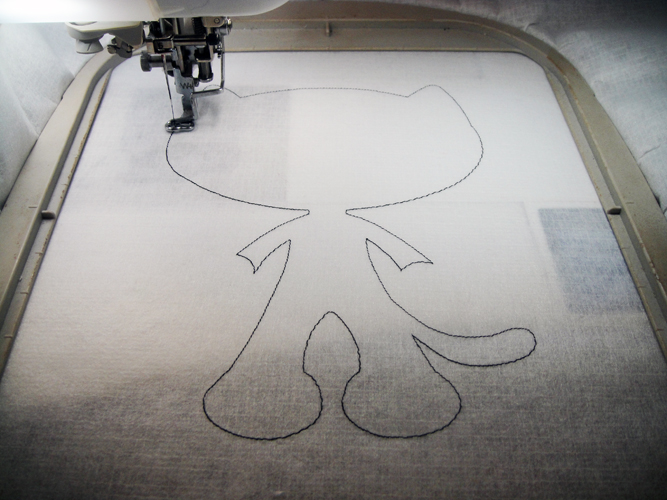
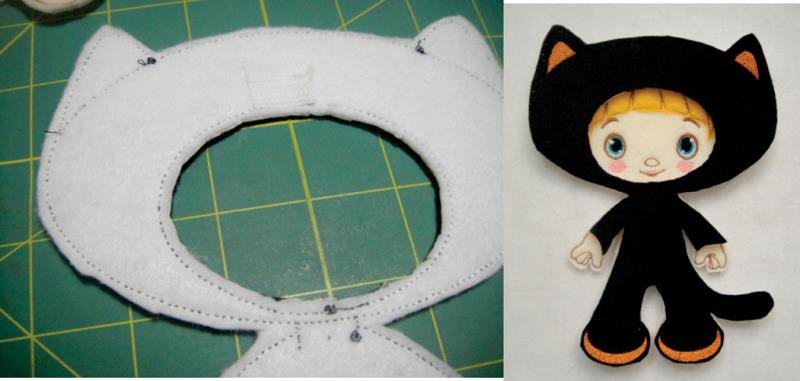
The cat costume is made in a 6’ x 10” hoop. Cut a 9” x 10” rectangle of Black and White Classic felt. Hoop cut away stabilizer in your hoop and run the 1st CS in black for the placement line.
(Click Image to Enlarge)
Step 39:
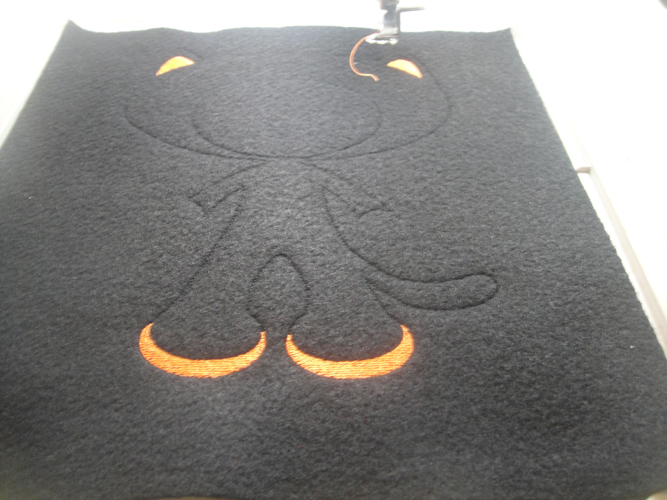
Run CS2 in black to tack down the felt; run CS 3 in Carrot for the ear and feet detail; spray the white felt with adhesive and apply to the back of the costume, run CS 4 in black to tack the white felt to the costume.
(Click Image to Enlarge)
Step 40:
Due to the black thread on the black felt it is easiest to cut this costume out from the back side, cut around the outside edges as well as the inside hole for her face; attach a small piece of the loopy side of Velcro to the edge above the face opening so it will adhere to head.
(Click Image to Enlarge)
Step 41:
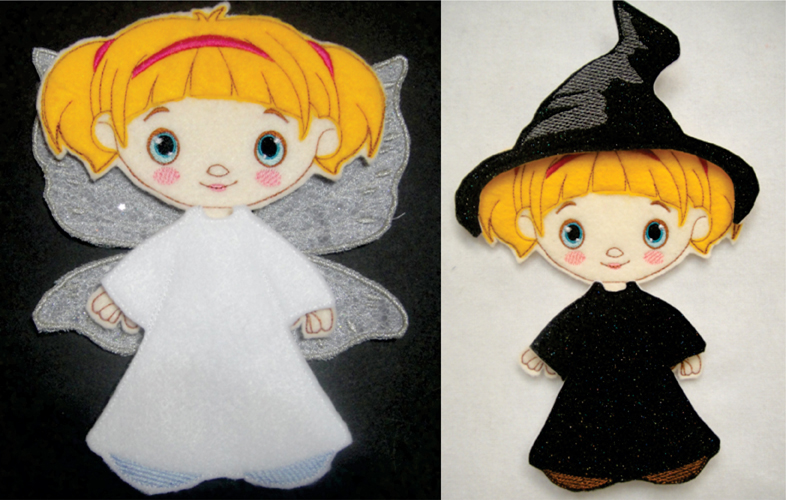
The Angel and Witch costumes are made with the same design file, PDQ09. In a 5” x 7” hoop. Cut a 6” x 6” square in white or black glittered felt for the costumes and a 6”x 6” square of white felt for the back of each; stitch CS 1 in a color to match the felt; stitch CS 2 in a color to match the felt for the tack down line; stitch CS 3 in the desired color for the shoes; attach white felt to the back of the project; stitch CS 4 in a color to match the felt; trim the garment as you have all the others.
(Click Image to Enlarge)
Step 42:
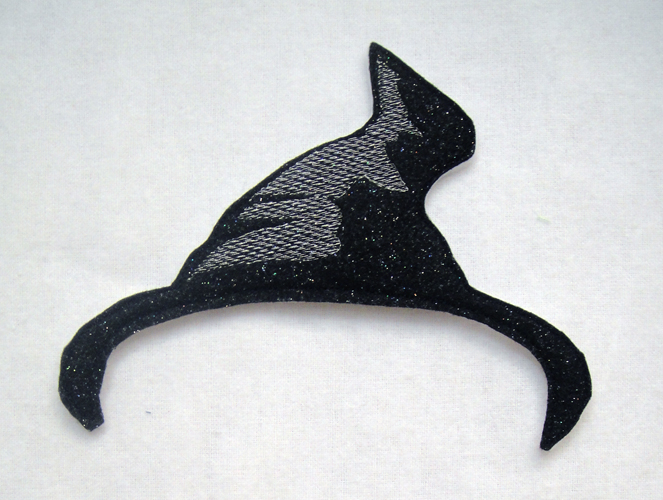
Due to its size the witches hat, PDQ10, is made sideways in a 5” x 7” hoop. Cut a 6” x 8” rectangles of black glittered and white classic felt. Hoop the cut away stabilizer and run the 1st CS in black for a placement line; spray and position the black felt over the placement line; stitch CS 2 in black for a tack down line; run CS 3 in metallic silver or regular silver embroidery thread for the detail on the hat; spray adhesive on the white felt and apply to the back of the project; run the final CS in black to tack down the back felt; cut out the hat and add tiny pieces of the loopy side of Velcro to the side brims as well as to the center front of the cap.
(Click Image to Enlarge)
Step 43:
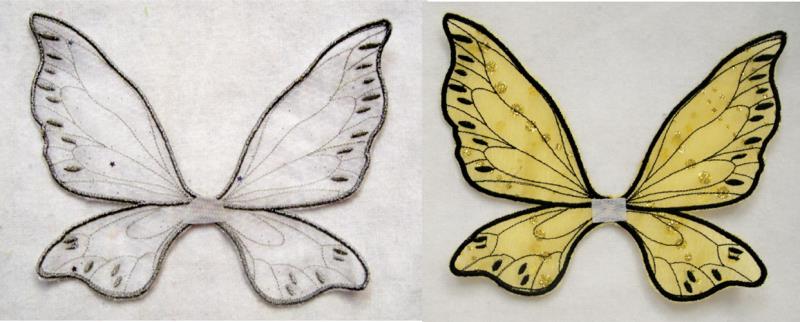
The wings for the Bumblebee and Angel costume are made with design file PDQ11. You can make them with felt if you like or do as I did using organza and netting. The wings are large so they run sideways in a 6” x 10” hoop. To make them in felt cut 8” x 6” rectangles of felt, using one piece of felt for the front and CS 1 for a placement line, CS 2 for a tack down and detail, and CS 3 for the attaching the back felt.
(Click Image to Enlarge)
Step 44:
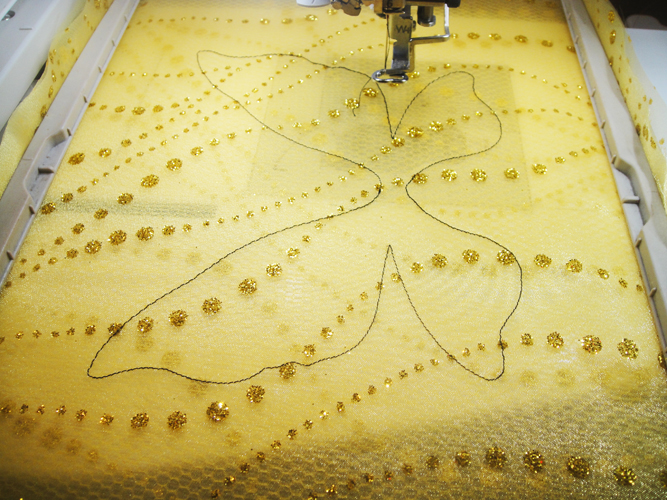
To make the wings in organza and netting you do not need any stabilizer. Cut two layers of organza and two layers of net to fit your hoop. Place one layer of the organza face down; place two layers of net on top of the organza; place one layer of organza face up on top; hoop all four layers together. Run all three color stops in the same color thread; if using black thread it would be good to also put black in the bobbin; if using metallic thread on top use a regular thread in the bobbin. Cut out as close to the outlines as possible and add a small piece of the loopy side of the Velcro to the font center.
(Click Image to Enlarge)
Step 45:
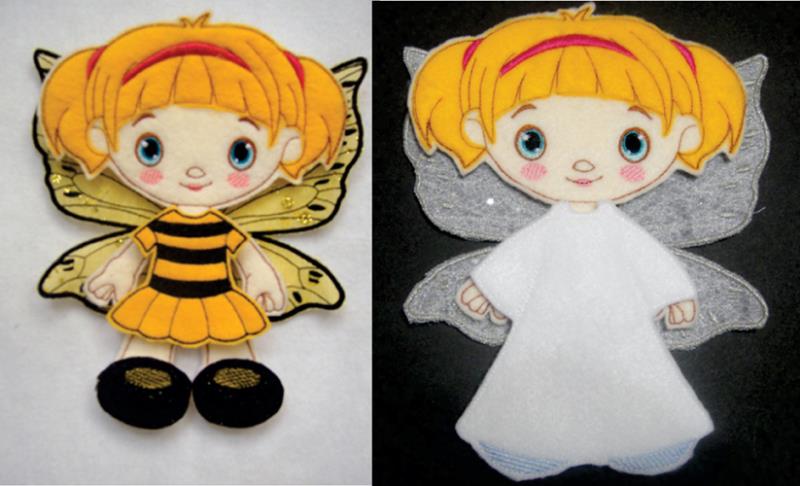
The wings attach to the back of the doll for the Bumblebee and Angel costumes.
(Click Image to Enlarge)
Step 46:
Congratulations your Felt Paperdoll and outfits will be sure to delight some little girl. These will certainly make your craft a table a popular one too!
Award winning Digitizer, Embroidery Educator, Author and a Consultant to the Industry, Pat Williams has 30 years of experience in the embroidery industry. Pat has won multiple awards for her digitizing expertise including the 2007 Impressions Awards Grand Championship, Best of Show as well as the 1st and 2nd Place Awards. Pat’s love of digitizing has afforded her the opportunity to write numerous articles for Impressions magazine in the United States and Images Magazine in Europe. In 2001 Pat was named “Embroidery Educator of the Year.” For many years Pat taught digitizing seminars at the ISS Shows in Long Beach, CA and for Compucon software. She now resides in Tucson, AZ.