Border OptionsHugging border, circle, square, or rectangle — with a 3mm satin stitch.
Backing OptionsAvailable with iron-on, sew-on, or velcro backing.
Fast ShippingShipped quickly from the USA.
Free Online Tools
Powerful embroidery utilities that save time and prevent costly mistakes.
Stitch AssistantRECOMMENDED
Get the exact stabilizer, machine settings, needle, and thread color sequence for every embroidery design you purchase — based on that design's stitch density, dimensions, and color count.
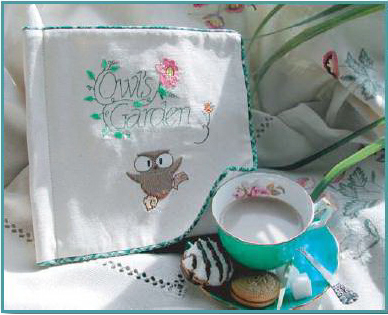
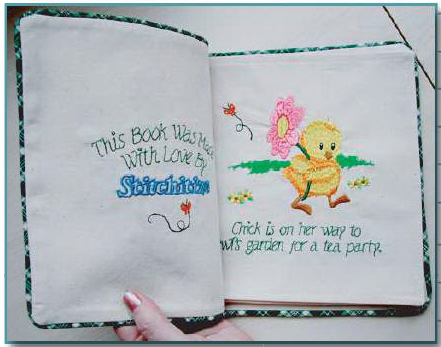
Create a charming keepsake with the Owl's Garden Children's Book, featuring delightful illustrations and two dedication pages for personalization. This durable book is perfect for sharing with generations to come. Step-by-step instructions are included.
Step
of
Owl's Garden Children's Keepsake Book
By Stitchitize
Everyone loves a good book, especially small children. Unfortunately their excitement usually results in ripped pages, even with their favorite books. Stitchitize decided to create a book that is fun and durable, a treasured keepsake to share from generation to generation. There are two different dedication pages included in the design pack to personalize the book.
Complete Pages Version: most recommended. Minimum embroidery hoop – 20cm x 14cm (8” x 5.5”). This version has 11 designs, 1 design for each page of the book and only requires one hooping for each page. The finished size of the book will be 220mm wide x 215mm high (8.75” x 8.5”).
Split Pages Version: Minimum embroidery hoop – 12.5cm x 11cm (5” x 4.25”). This version has been created for use with smaller hoops and includes 20 designs. Each page has 2 or 3 designs that sew separately but line up to create one image. The finished size of the book will be 220mm wide x 215mm high (8.75” x 8.5”).
Step 1:
(Click Image to Enlarge)
Fabric Preparation:
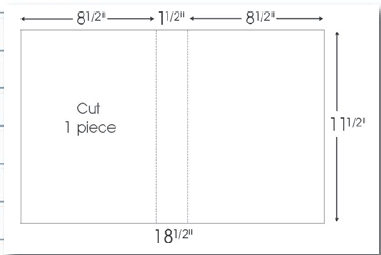
Outside cover – cut one piece 18 ½“ x 11 ½“ of fabric (muslin used) and one of same size piece of interfacing.
Step 2:
(Click Image to Enlarge)
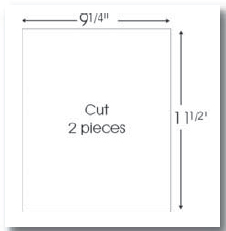
Inside front and back cover – cut two pieces 9 ¼” x 11 ½” of fabric and two of the same size pieces of interfacing. TIP: 2” has been added to the length of the pages in order to create a larger area for hooping of the fabric in our 200mm x 140mm (7.75” x 5.5”) “B” hoop. Add the necessary amount to accommodate your hoop size. This will be trimmed away later after the embroidery is done.
Step 3:
(Click Image to Enlarge)
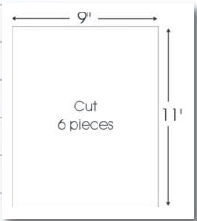
Inside pages – cut six pieces 9” x 11” of fabric and six of the same size pieces of interfacing.
Step 4:
Apply interfacing to the wrong side of all fabric pieces using medium heat setting on iron. TIP: when finding the center of each page for embroidery, be sure not to include the marked binding area. When hooping pages for embroidery, odd numbered pages and the back inside cover will have the marked binding on the left. Even numbered pages and the front inside page will have the marked binding on the right.
Step 5:
Mark a dotted line ¾” from binding side of all 6 inside pages and 2 inside cover pages. Be sure that the line is on the binding side of each page. This line is marked to help when finding the center of the page for embroidery. As the binding will be hidden, it is important that the area not be included when measuring for page center.
Step 6:
Mark the 1 ½” binding area in the center of the Front/back cover.
Step 7:
Mark the center of each page’s embroidery area with a ruler at the diagonal corners (the binding area should not be included here).
Step 8:
Embroidery:
There are two versions of the book that each complete a finished book size of 220mm wide x 215mm high (8.75” x 8.5”). The first version (Complete Pages) includes one embroidery design for each page. In order to sew each page you will a hoop no smaller than 20cm x 14cm (8” x 5.5”). The embroidery designs Ki383-Ki393 can be purchased as a pack and download from your download center as a zip file (.exe) that will self-extract to a folder on your C drive.
Step 9:
Complete Pages Version - For use with an embroidery hoop no smaller than 20cm x 14cm (8” x 5 ½”). Download the Stitchitize design pack Owl’s Garden complete pages designs Ki383-Ki393 (11 files). Transfer designs to your machine.
Step 10:
Hoop the front/back cover piece of fused fabric. Hoop according to previously marked embroidery area center.
Step 11:
Slide a piece of lightweight tear-away stabilizer under the hooped fabric. Be sure that the piece of tear-away is larger than the area to be sewn.
Step 12:
Sew embroidery design following html printable sewing sequence page found in your “Download Center”.
Step 13:
Repeat steps 10-11-12 for all remaining pages of book with corresponding designs in pack except Ki384 (“This book belongs to”) and Ki385 (“This book was made with love by”). These designs are meant to sew on the inside front cover as dedications and require a name to be added. Use your software or machine’s monogramming features to add a dedication to your book. Note: if a dedication on the front inside cover is not desired, use the same design (Ki392 – Teacup and Butterfly) that sews on the back inside cover so that the page is not left blank.
Step 14:
The second version (Split Pages) includes includes two or more embroidery designs for each page. In order to sew each page you will need a hoop no smaller than 12.5cm x 11cm (5” x 4.25”).The embroidery designs Ki394 – Ki413 can be purchased as a pack and downloaded from your download center as a zip file (.exe) that will self-extract to a folder on your C drive.
Split Pages Version - For use with an embroidery hoop no smaller than 12.5cm x 11cm (5” x 4.25”). Download the Stitchitize design pack Owl’s Garden split pages designs Ki394-Ki413 (20 files). These files have been created as “self-extracting” and do not require WinZip to open.)
Step 15:
Set up your machine for Professional-Style embroidery. Press the Embroidery Mode key.
Step 16:
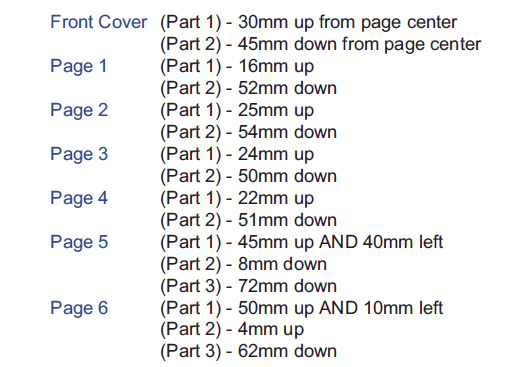
Transfer all designs to an ATA PC card or send directly to your machine except Ki396 and Ki397. These are the two choices for the dedication page and will require a name to be added. If a dedication on the front inside cover is not desired, use the same design (Ki412 – Teacup and Butterfly) that sews on the back inside cover so that the page is not left blank. Note: several of the pages for this book have been split into two or more designs to fit in smaller embroidery hoops and will require multi-hooping. Pages that require: 1 Hooping – both dedication pages, back inside cover, back cover; 2 Hoopings – pages 1, 2, 3, 4, Front Cover; 3 Hoopings – pages 5, 6.
Step 17:
Mark the center point for each page (be sure not to include the binding area). If the page has more than one part to sew (multi-hooping) you will need to measure and mark the center point for each design. Use the following measurements for each multi-hoop page.
Step 18:
Hoop each part of each page using your markings as your guide for hoop center. Slide a piece of tear-away stabilizer under hooped fabric. Be sure that the piece of tear-away is larger than the design to be sewn. Sew embroidery design following html printable sewing sequence found in your “Download Center”.
Step 19:
Book Construction
All seam allowances are ½ inch. Set up your machine regular for regular sewing. Trim 1” from the top and bottom of all the pages. Attach zipper foot. Thread the needle and bobbin with all-purpose thread.
Step 20:
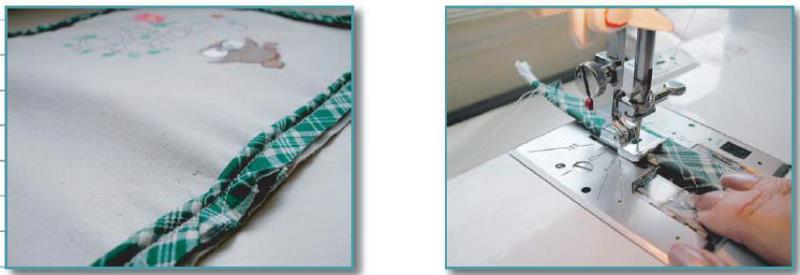
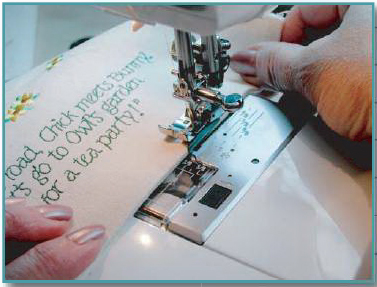
Line up raw edge of piping with raw edge of outside cover fabric. Starting in the center of the bottom edge, sew completely around outside cover. When you return to the start, overlap piping ½ inch, fold excess inward and finish. Note: create your own piping from contrast fabric and piping cord. To make your own piping, cut strips of contrasting fabric on the bias 1 ¼” wide. Sew them together until you have a length long enough to go around the book. 46” should be plenty. Attach piping foot to your machine. Fold fabric strip over the cord, place under piping foot and sew.
(Click Image to Enlarge)
Step 21:
(Click Image to Enlarge)
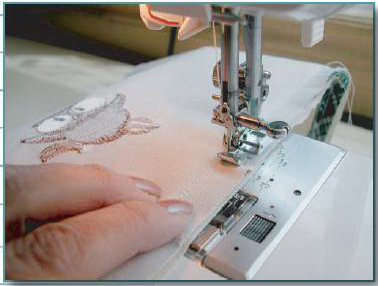
With right sides together, sew the inside front page to the outside cover on three sides.
Step 22:
Clip corners, trim seam allowances to ¼ inch, turn fabric right side out, push out corners from the inside with tool and press outside edge.
Step 23:
Repeat steps 21 and 22 to complete the inside back cover. Attach standard foot.
Step 24:
(Click Image to Enlarge)
Pair up embroidered inside pages 1 and 2, 3 and 4, 5 and 6. Sew pages right sides together along three sides, leaving the binding side open. Clip corners, trim seam allowances to 1/4th inch, turn fabric right side out, push out corners with tool and press outside edge.
Step 25:
(Click Image to Enlarge)
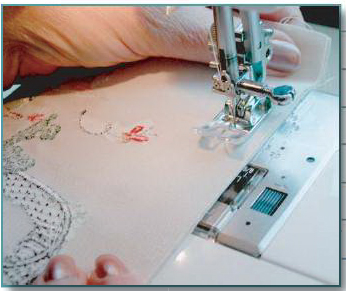
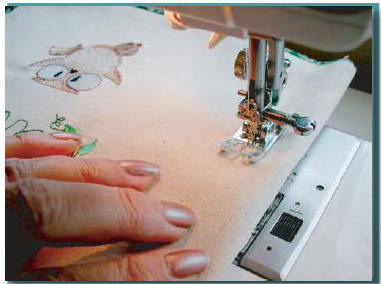
Attach ¼” Seam Foot and set stitch length between 3.5 and 4. Sew top stitch around the three finished sides of the pages. Lay completed pages neatly together in order, match up finished edges. Pin pages together on opposite side from raw edge to hold them in place. Re-attach Standard Foot.
Step 26:
(Click Image to Enlarge)
Place pinned pages inside cover, centering in between front of back cover when folded over. Fold over the cover and stitch 34” from the fold edge to encase all pages. This forms the binding of the book.
The name Stitchitize was coined and registered in 1988 when the Conquergoods sold their first contract embroidery business. “Stitchitize” was coined as the art of digitizing stitches for machine embroidery. The company actually started developing embroidery designs in 1983 and soon saw the need for Stock Embroidery Designs. By 1988 the company had several thousand Stock Designs to sell, however the majority of their development was still geared towards the commercial embroidery market. It wasn’t until 2001 when Trevor, the Conquergoods eldest son, now managing Stitchitize, saw the opportunity to start developing designs for the emerging domestic embroidery market. In 2002 the Conquergoods opened a Sewing Centre selling domestic machines and embroidery models. The staff members that were hired for the Sewing Centre were all accomplished sewers and they worked very closely with the Stitchitize staff developing new designs. It soon became apparent that project based designs would be well received by the consumers.
In late 2003 it was George Conquergood, the patriarch of the family that suggested the poem and storybook “Twas The Night Before Christmas” as a good place to start development. The manager of the Sewing Centre at that time, Brenda, was an accomplished artist and she was given the task to prepare the graphics for the storybook. Her drawings were then given to the digitizing department under direction of Beverley and her sister Linda the actual digitizer to execute. Another Sewing Centre staff member Darlene had the task of sewing the original prototypes, which eventually became an even bigger project. A quilt was also developed and Darlene and graphic artist Colin began the task of photographing and documenting every step of the construction process. Finally the collaborative efforts of eight staff members brought the project to completion and the production of the CD. To have the last word, George decided that as part of the product launch in 2004, Stitchitize would give every dealer a personalized copy of the storybook as a Christmas gift. The Conquergoods commercial production manager Darcy was brought in to discuss the logistics. Some of the pages in the book had over 24 colours and up to 42 color changes. Darcy was given the task to pleasingly reduce this to a maximum of 15 colours per page, as that was the maximum number of colours that their largest commercial machine could handle. He did this and started production of the over 200 books required. Darlene got to assemble all 200+ copies on a domestic sewing machine. The books were completed and sent out to all the dealers for Christmas 2004.
The following year George suggested the development of the Mother Goose 1 & 2 Collection, which was so well received that a second collection, Mother Goose 3 & 4 was produced. The graphics and nursery rhymes came from the original book “Mother Goose and her Goslings” which had belonged to George’s mother when she was a child, and read to George as a child. That book is now over 100 years old.
Other collaborative works included the FSL – 3D Flowers & Butterflies Collection, Italian Lace Collections, Mardi Gras Masks and the 13 Stitchitize Bees, which were fully tested by consumers in the Creative House Sewing Centre classrooms.