| Preface: | This wonderful book project has been made available in two different sizes (Large or Small) to accommodate most embroidery machines hoop sizes. Each size has also been made in two versions: Large Complete, Large Split and Small Complete, Small Split. The Large and Small Complete versions are a complete design for each page to sew in one hooping per page. The complete versions should be your first choice if you have a hoop that will accommodate the design sizes. The complete versions have been split to make Large and Small Split versions. Each page has been split into 2 or 3 designs that sew separately and line up on each page. Because there are multiple designs for each page, 2 or 3 hoopings are required for each page. Only choose to sew the split version of your desired size if your maximum hoop available is limited. Listed below are design and hoop sizes for each version of each size.
Small Complete version: most recommended. Minimum embroidery hoop: 20cm x 14cm = 8” x 5.5”. This version has 14 designs, 1 design for each page of the book and only requires one hooping for each page. The finished size of the book will be 240mm wide x 267mm high (9.5” x 11”).
Small Split version: Minimum embroidery hoop: 12.5cm x 11cm = 5” x 4.25”. This version has been created for use with smaller hoops. Each page has 2 or 3 designs that sew separately, but line up to create one image. The finished size of the book will be 240mm wide x 267mm high (9.5” x 11”). The instructions below give details on re-hooping each design of each page so that they line up perfectly!
Large Complete version: Minimum embroidery hoop: 30cm x 18cm = 12” x 7.5”. This version has been created for use with very large hoops. There are 14 designs, 1 design for each page of the book and only requires one hooping for each page. The finished size of the book will be 268mm wide x 343mm high (10.5” x 13.5”).
Large Split version: Minimum embroidery hoop: 20cm x 14cm = 8” x 5.5”. Each page has 2 or 3 designs that sew separately, but line up to create one image. The finished size of the book will be 268mm wide x 343mm high (10.5” x 13.5”). The instructions below give details on re-hooping each design of each page so that they line up perfectly! |
Step 1: | Night Before Christmas – SMALL VERSION
There are 2 versions of the Small book that each complete a finished book size of 240mm W x 267mm H (9.5” x 11”). The first version (Small complete) includes one embroidery design for each page In order to sew each page you will need a hoop of no smaller than 20cm x 14cm (8” x 5.5”). The second version (Small Split) includes 2 or more embroidery designs for each page. In order to sew each page you will need a hoop no smaller than 12.5cm x 11cm = 5" x 4.25". The instructions below include measurements and explanation on how to re-hoop each page for each part of each page. |
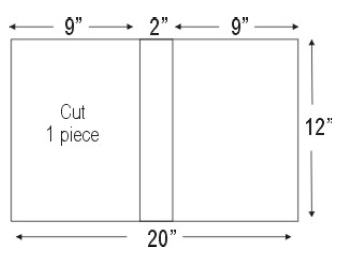
Step 2: | 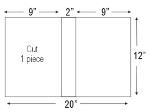 (Click Image to Enlarge) Fabric Preparation
Outside Cover - Cut 1 piece of fabric 20" x 12" and 1 of same size piece of interfacing. |
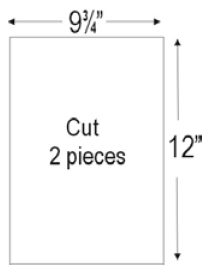
Step 3: | 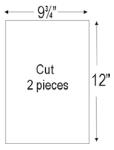 (Click Image to Enlarge) Inside Front and Back Cover - Cut 2 pieces of fabric 9 3/4 " x 12" and 2 pieces of same size of interfacing. |
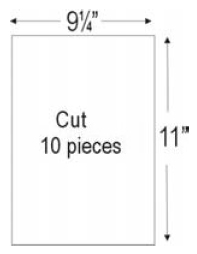
Step 4: | 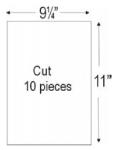 (Click Image to Enlarge) Inside Pages - Cut 10 pieces of fabric 9 1/4 " x 11" and 10 pieces of same size of interfacing. |
Step 5: | | Apply interfacing to wrong side of fabric pieces using medium heat setting on iron. |
Step 6: | | Mark a dotted line 3/4" from book binding (inside edge) side of all 10 pages and 2 inside cover pages. Be sure that the line is on the book binding side of each page.This line is marked to help find the center of the page for embroidery. As the binding will be hidden, it is important that the area not be included when measuring for page center. |
Step 7: | | Mark the 2" binding area in the center of the Front/Back cover. |
Step 8: | | Mark the center of each page. When finding the center of each page for embroidery, be sure not to include the marked book binding area. TIP - When hooping pages for embroidery, odd #'d pages and the back inside cover will have the marked binding area on the left. Even #'d pages and the front inside page will have the marked binding on the right. |
Step 9: | Book Embroidery
Small Complete Version - For use with an Embroidery Hoop no smaller than 20cm x 14cm = 8" x 5.5" |
Step 10: | a.) Download the Stitchitize Design Pack - 'Twas the Night Before Christmas Small Complete Design#'s Ch292-Ch304 (14 files).
b.) Transfer designs to your machine. c.) Hoop the front/back cover piece of fused fabric.
d. Slide a piece of lightweight tear-away stabilizer under the hooped fabric. Be sure that the piece of tear-away is larger than the area to be sewn.
e.) Sew embroidery design following html printable sewing sequence page found in your "Download Center".
f.) Repeat steps c-d-e for all remaining designs in pack. |
Step 11: | Small Split Version - For use with an Embroidery Hoop no smaller than - 12.5cm x 11cm = 5" x 4.25"
NOTE: All of the pages in this version have been split into 2 or 3 designs to fit in the smaller hoop and will require multi-hooping. |
Step 12: | | Download the Stitchitize Design Pack - 'Twas the Night Before Christmas (Small Split) Design#'s Ch306-Ch346 (41 files). Transfer designs to your machine. Using the previously marked center of each page follow these measurements to mark the center of each design of each page. |
Step 13: | Front Cover: (Part 1 - Ch306) - Center of entire page (same as previous mark), (Part 2 - Ch307) - 42mm up from center, (Part 3 - Ch308) - 60mm down from center
Front Inside Cover: (Part 1 - Ch309) - 42mm up, (Part 2 - Ch310) - 13mm down, (Part 3 - Ch311) - 68mm down
Page 1: (Part 1 - Ch312) - 32mmup, (Part 2 - Ch313) - 39mm down, (Part 3 - Ch314) - 81mm down
Page 2: (Part 1 - Ch315) - 33mmup, (Part 2 - Ch316) - 37mm down, (Part 3 - Ch317) - 71mm down
Page 3: (Part 1 - Ch318) - 29mmup, (Part 2 - Ch319) - 41mm down, (Part 3 - Ch320) - 74mm down
Page 4: (Part 1 - Ch321) - 38mmup, (Part 2 - Ch322) - 44mm down, (Part 3 - Ch323) - 86mm down
Page 5: (Part 1 - Ch324) - 33mmup, (Part 2 - Ch325) - 46mm down, (Part 3 - Ch326) - 88mm down
Page 6: (Part 1 - Ch327) - 39mmup, (Part 2 - Ch328) - 42mm down, (Part 3 - Ch329) - 85mm down
Page 7: (Part 1 - Ch330) - 43mm up, (Part 2 - Ch331) - 39mm down, (Part 3 - Ch332) - 80mm down
Page 8: (Part 1 - Ch333) - 51mm up, (Part 2 - Ch334) - 42mm down, (Part 3 - Ch335) - 91mm down
Page 9: (Part 1 - Ch336) - 46mm up, (Part 2 - Ch337) - 43mm down, (Part 3 - Ch338) - 88mm down Page 10: (Part 1 - Ch339) - 37mm up, (Part 2 - Ch340) - 40mm down, (Part 3 - Ch341) - 75mm down
Back Inside Cover: (Part 1 - Ch342) - 7mm up, (Part 2 - Ch343) - 50mm up, (Part 3 - Ch344) - 40mm down
Back Cover: (Part 1 - Ch345) - 7mm up, (Part 2 - Ch346) - 42mm down and 10mm to the right. |
Step 14: | | Hoop each Part (1,2, and 3) of each page using your markings as your guide for hoop center. Slide a piece of lightweight tear-away stabilizer under the hooped fabric. Be sure that the piece of tear-away is larger than the area to be sewn. Sew the designs for each page following the html printable sewing sequence found in your "Download Center". |
Step 15: | Book Construction
a) All seam allowances are 1⁄2 inch.
b) Set up the MC10001 for regular sewing.
c) Attach Zipper Foot. Thread the needle and bobbin with all-purpose thread. d) Starting 1" from the end of the piping/cord and with right sides together, pin piping around outer edge of book cover. e) Ease extra piping into corners. Sew completely around outside cover stitching as close to piping as possible.When you return to the start, overlap piping on a slight diagonal to form a "V" and stitch through both layers of piping.This makes a smooth overlapping join.Trim off excess piping.
f) With right sides together, sew the inside front page to the outside cover on three outer sides, sewing on previous stitching line.
g.) Clip corners, trim seam allowances to 1/4", turn fabric right side out, push out corners from the inside with tool and press outside edge.
h.) Repeat f) and g) to complete the inside back cover.
i.) Attach standard foot.
j.) Pair up embroidered inside pages - 1 and 2, 3 and 4, 5 and 6, 7 and 8, 9 and 10.
k.) With right sides together, sew along three sides of each set of pages, leaving book binding side open.
l.) Clip corners, trim seam allowances to 1/4", turn fabric right side out, push out corners with tool and press outside edges.
m.) Attach 1/4" seam foot and set stitch length between 3.5 and 4.Top stitch around three finished sides of all pages and around cover.
n.) Lay completed pages together in order,matching up finished edges. Pin pages together on finished edge to hold them in place.
o.) Attach standard foot.
p.) Place pinned pages inside cover, lining up book binding markings. Fold over the cover and stitch 1" from the fold edge to encase all pages.This forms the binding for the book.
q.) Finished! |
Step 16: | Note: The book can be dressed up with ribbon, cord, or tassels by attaching or tying in binding area before p.). For additional decoration, bells or small ornaments could be added to the ribbon ends! | 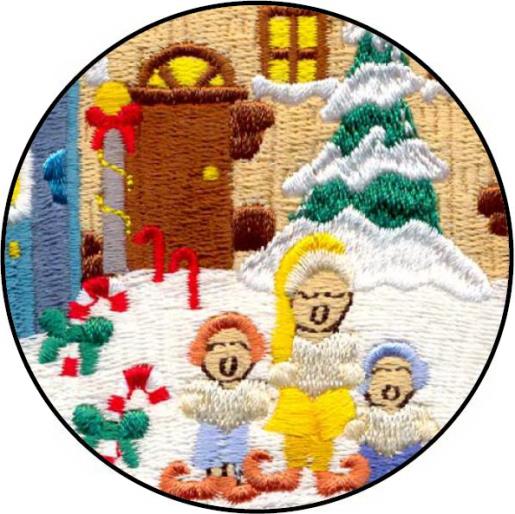 (Click Image to Enlarge) |
Step 17: | Night Before Christmas – LARGE VERSION
There are 2 versions of the Large book that each complete a finished book size of 268mm W x 343mm H (10.5” x 13.5”). The first version (Large complete) includes one embroidery design for each page. In order to sew each page you will need a hoop of no smaller than 30cm x 18cm (12” x 7.5”).
The second version (Large Split) includes 2 or more embroidery designs for each page. In order to sew each page you will need a hoop no smaller than 20cm x 14cm = 8" x 5.5". The instructions below include measurements and explanation on how to re-hoop each page for each part of each page. |
Step 18: | Fabric Preparation
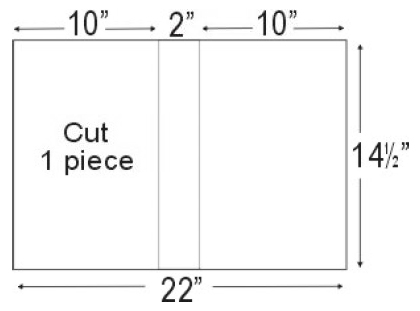
Outside Cover - Cut 1 piece of fabric 22" x 14 1/2" and 1 of same size piece of interfacing. | 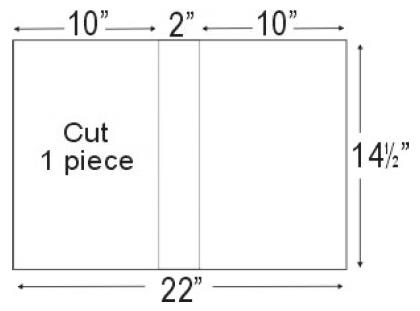 |
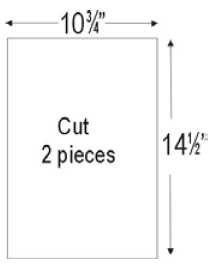
Step 19: | 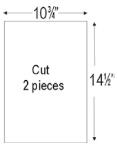 (Click Image to Enlarge) Inside Front and Back Cover - Cut 2 pieces of fabric 10 3/4 " x 14 1/2" and 2 pieces of same size of interfacing. |
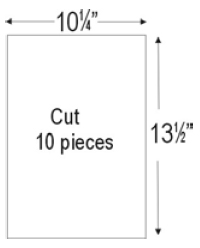
Step 20: | 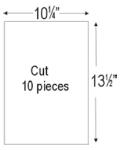 (Click Image to Enlarge) Inside Pages - Cut 10 pieces of fabric 10 1/4 " x 13 1/2" and 10 pieces of same size of interfacing. |
Step 21: | | Apply interfacing to wrong side of fabric pieces using medium heat setting on iron. Mark a dotted line 3/4" from book binding side of all 10 pages and 2 inside cover pages. Be sure that the line is on the binding side of each page.This line is marked to help find the center of the page for embroidery. As the binding will be hidden, it is important that the area not be included when measuring for page center. Mark the 2" binding area in the center of the Front/Back cover. Mark the center of each page.When finding the center of each page for embroidery, be sure not to include the marked binding area. |
Step 22: | | TIP - When hooping pages for embroidery, odd #'d pages and the back inside cover will have the marked binding area on the left. Even #'d pages and the front inside page will have the marked binding on the right. |
Step 23: | Book Embroidery Large Complete Version - For use with an Embroidery Hoop no smaller than - 30cm x 18cm = 12" x 7 1/4"
a.) Download the Stitchitize Design Pack - 'Twas the Night Before Christmas Large Complete Design#'s Ch240-Ch253 (14 files).
b.) Transfer designs to your machine.
c.) Hoop the front/back cover piece of fused fabric.
d.) Slide a piece of lightweight tear-away stabilizer under the hooped fabric. Be sure that the piece of tear-away is larger than the area to be sewn.
e.) Sew embroidery design following html printable sewing sequence page found in your "Download Center".
f.) Repeat steps c-d-e for all remaining designs in pack.
|
Step 24: | Large Split Version - For use with an Embroidery Hoop no smaller than 20cm x 14cm = 8" x 5 1/2"
NOTE: All of the pages in this version have been split into 2 or 3 designs to fit in the hoop and will require multi-hooping.
Download the Stitchitize Design Pack - 'Twas the Night Before Christmas Large Split. Design#'s Ch254-Ch291 (38 files). Transfer designs to your machine. Using the previously marked center of each page follow these measurements to mark the center of each design of each page. |
Step 25: | Front Cover: (Part 1 - Ch254) - 6mm down from center, (Part 2 - Ch255) - 49mm up from center, (Part 3 - Ch256) - 88mm down from center
Front Inside Cover: (Part 1 - Ch257) - 52mm up, (Part 2 - Ch258) - 18mm down, (Part 3 - Ch259) - 90mm down
Page 1 (Part 1 - Ch260) - 36mm up, (Part 2 - Ch261) - 72mm down, (Part 3 - Ch262) - 113mm down
Page 2 (Part 1 - Ch263) - 30mm up, (Part 2 - Ch264) - 75mm down, (Part 3 - Ch265) - 113mm down
Page 3 (Part 1 - Ch266) - 34mm up, (Part 2 - Ch267) - 75mm down, (Part 3 - Ch268) - 113mm down
Page 4 (Part 1 - Ch269) - 37mm up, (Part 2 - Ch270) - 79mm down, (Part 3 - Ch271) - 124mm down
Page 5 (Part 1 - Ch272) - 34mm up, (Part 2 - Ch273) - 81mm down, (Part 3 - Ch274) - 123mm down
Page 6 (Part 1 - Ch275) - 40mm up, (Part 2 - Ch276) - 75mm down, (Part 3 - Ch277) - 122mm down
Page 7 (Part 1 - Ch278) - 41mm up, (Part 2 - Ch279) - 76mm down, (Part 3 - Ch280) - 122mm down
Page 8 (Part 1 - Ch281) - 43mm up, (Part 2 - Ch282) - 80mm down, (Part 3 - Ch283) - 133mm down
Page 9 (Part 1 - Ch284) - 44mm up, (Part 2 - Ch285) - 79mm down, (Part 3 - Ch286) - 122mm down
Page 10 (Part 1 - Ch287) - 34mm up, (Part 2 - Ch288) - 74mm down, (Part 3 - Ch289) - 115mm down
Back Inside Cover: (Ch290) - 1 hooping
Back Cover: (Ch291) - 1 hooping
|
Step 26: | | Hoop each Part of each page using your markings as your guide for hoop center. Slide a piece of lightweight tear-away stabilizer under the hooped fabric. Be sure that the piece of tear-away is larger than the area to be sewn. Sew each design for each page following the html printable sewing sequence found in your "Download Center". |
Step 27: | Book Construction
a.) All seam allowances are 1⁄2 inch.
b.) Set up your machine for regular sewing.
c.) Attach Zipper Foot.
d.) Thread the needle and bobbin with all-purpose thread.
e.) Starting 1" from the end of the piping/cord and with right sides together, pin piping around outer edge of book cover. Ease extra piping into corners. Sew completely around outside cover stitching as close to piping as possible.When you return to the start, overlap piping on a slight diagonal to form a "V" and stitch through both layers of piping.This makes a smooth overlapping join.Trim off excess piping.
f.) With right sides together, sew the inside front page to the outside cover on three outer sides, sewing on previous stitching line.
g.) Clip corners, trim seam allowances to 1/4", turn fabric right side out, push out corners from the inside with tool and press outside edge.
h.) Repeat steps 6 and 7 to complete the inside back cover.
i.) Attach standard foot.
j.) Pair up embroidered inside pages - 1 and 2, 3 and 4, 5 and 6, 7 and 8, 9 and 10.
k.) With right sides together, sew along three sides of each set of pages, leaving binding side open.
l.) Clip corners, trim seam allowances to 1/4", turn fabric right side out, push out corners with tool and press outside edges.
m.) Attach 1/4" seam foot and set stitch length between 3.5 and 4.Top stitch around three finished sides of all pages and around cover.
n.) Lay completed pages together in order,matching up finished edges. Pin pages together on finished edge to hold them in place.
o.) Attach standard foot.
p.) Place pinned pages inside cover, lining up book binding markings. Fold over the cover and stitch 1" from the fold edge to encase all pages.This forms the binding for the book.
q.) Finished! |
Step 28: | | Note: The book can be dressed up with ribbon, cord, or tassels by attaching or tying in binding area before p.). For additional decoration, bells or small ornaments could be added to the ribbon ends! |
|