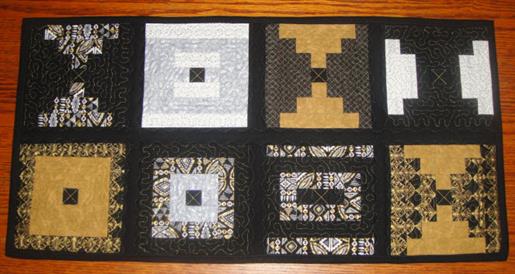
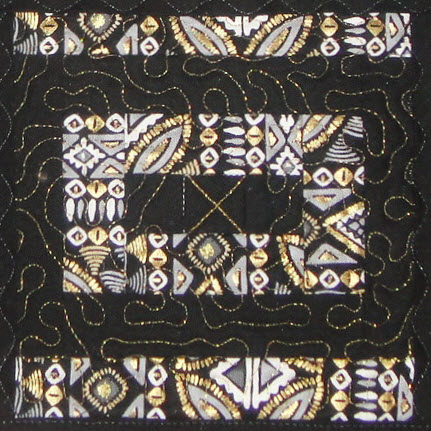
This little table runner is titled “Mixing Metals” due to the gold and silver metallic prints in the fabrics. Metallic thread was also used to do the quilting. You can do this or use regular thread if there is no metallic in your fabrics.
Embroidery thread for quilting and bobbin to match (In this sample metallic thread was used for the quilting on top and a regular polyester embroidery thread was used in the bobbin). You may use regular embroidery thread in the top and bobbin if you choose.
Invisible thread
Fabrics: since you will be using fabrics from your stash – it is difficult to give exact yardage for these blocks but you will need approximately 42” of 1.25” strips for each block. Seven different fabrics were used in the sample. You will need approximately:
1 40” strip 1.25” wide of black fabric for block centers - sub cut into 1.25” squares
4 40” strips 1.25” wide of light fabrics
4 40” strips 1.25" of dark fabrics
2 40” strips 1.25" of a high contrast fabric
1/2 yard of backing fabric cut into eight 7” squares
2 strips 1.5” wide for front sashing
2 strips 1.25” wide for back sashing
2 strips 1.5” wide for binding
1 1/3 yards of Battilizer® (A combination quilt batting and stabilizer), or enough low loft quilt batting and poly-mesh or no-show stabilizer to cut 8 12” squares depending on backing width.
Embroidery machine
6” square or larger hoop (if using a larger hoop you will need additional Battilizer® or low loft quilt batting and stabilizer to accommodate 12 hoopings)
Spray adhesive
Scotch tape
Sewing machine with a walking foot or walking foot attachment
Featuring the Court House Steps quilt blocks, that are pieced and quilted in the hoop; you can quickly make a table topper for yourself or for a gift. This little table runner was specifically made for a small table in an RV. You can make a larger table runner by simply adding more blocks to both the length and width of the project. If your machine has larger hoops and you would like to make larger blocks this design will easily enlarge as it consists of all running stitches. Be sure to adjust the width of quilt strips to be cut based upon your final size. This table topper is made of eight 5” pieced and quilted in the hoop quilt blocks. Completed size 22” x 11” (8 blocks).
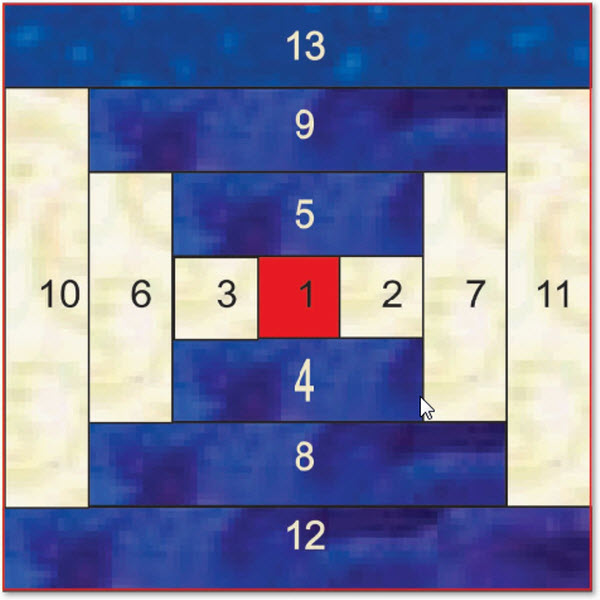
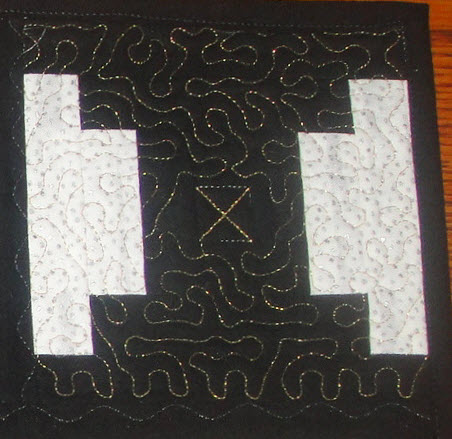
This table topper is made of eight 5” pieced and quilted in the hoop quilt blocks. The block used is the In the Hoop Court House Steps block. In some blocks the Court House Steps block becomes the Court House Squared Quilt block by changing the placement of the various colored fabrics. The layout for the Court House Steps block is pictured here.
(Click Image to Enlarge)
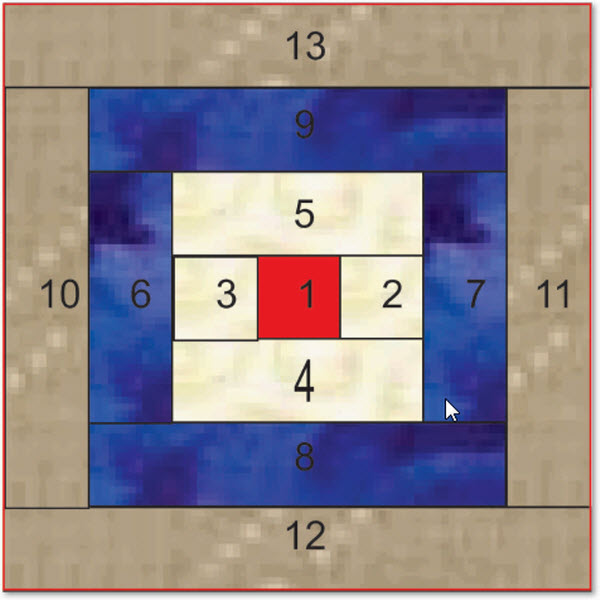
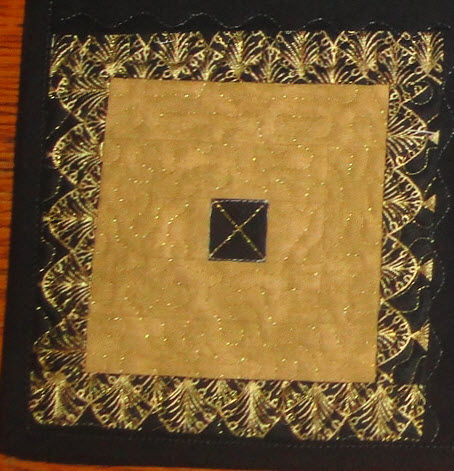
The layout for the Court House Steps Squared block is shown below. These two blocks are made from the same digitized embroidery design; the placement of the fabrics is just different to give the different look to the finished block.
(Click Image to Enlarge)
Assemble the Court House Steps Block
The first block on the left and the third block in the first row were made in this layout. So was the lost block in the bottom row.
Step 1:
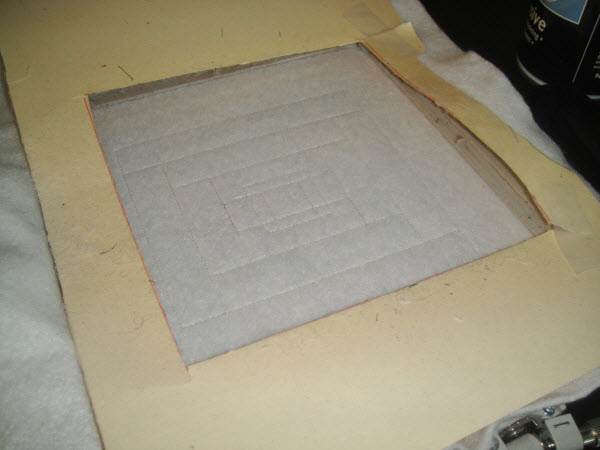
Prepare ½ of a file folder to use as a hoop protector when spraying adhesive. Place your top hoop on the file folder and draw a square onto the file folder. Cut out that square.
Step 2:
Hoop the Battilizer in a 6” hoop. (If you do not have Battilizer, hoop a block of poly-mesh stabilizer and low loft batting with the poly mesh stabilizer on the bottom.)
Step 3:
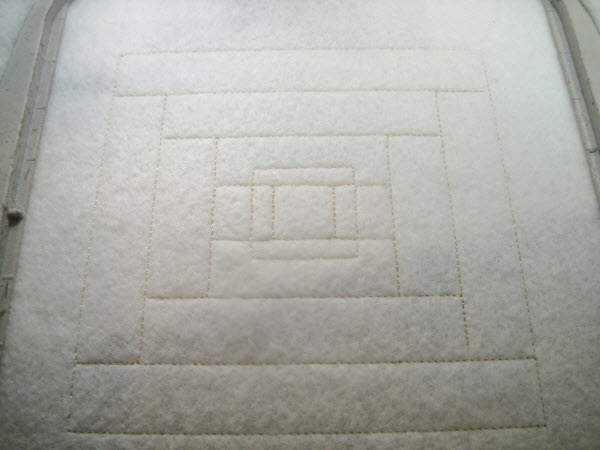
Stitch the first stitch sequence in neutral thread. The lines sewn represent the seam lines for this block, except there are two sets of lines for the center square. The inside lines represent the seam lines for this square. The outer square is the outline for the placement of the first piece of fabric.
(Click Image to Enlarge)
Step 4:
Remove the hoop from the machine. Place the hoop protector over the hoop and spray the insides with spray adhesive. The spray adhesive will hold your strips of fabric to the batting.
(Click Image to Enlarge)
Step 5:
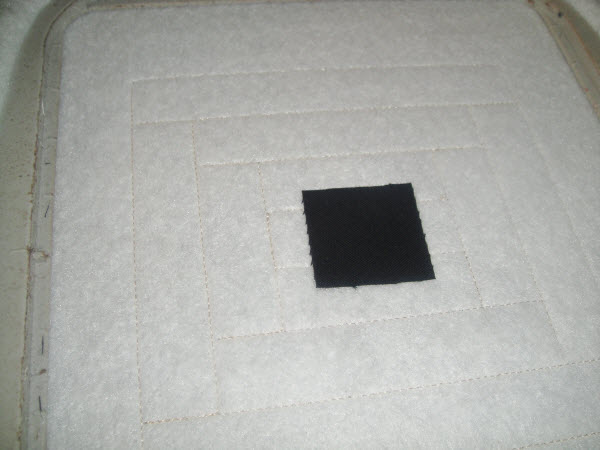
Place a 1.25” square, right side up, exactly on the outside outlines of the center square. You want to align the fabric placement carefully as this guides the placement for the following pieces of fabric.
(Click Image to Enlarge)
Step 6:
Put water soluble thread in the top of your machine only, regular neutral bobbin. Stitch the second color sequence which is the tack down for the center square.
Step 7:
Place neutral thread in the top of the machine.
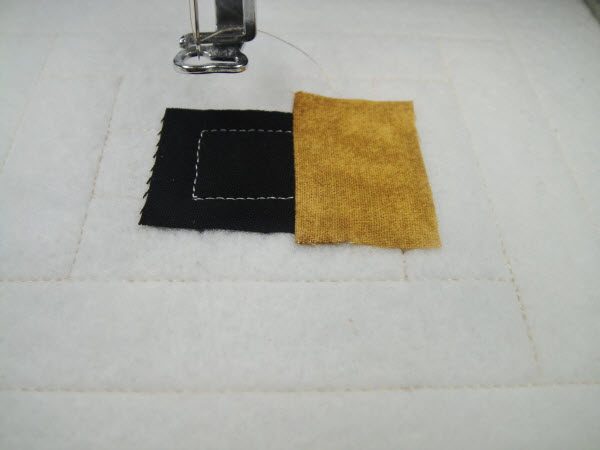
Step 8:
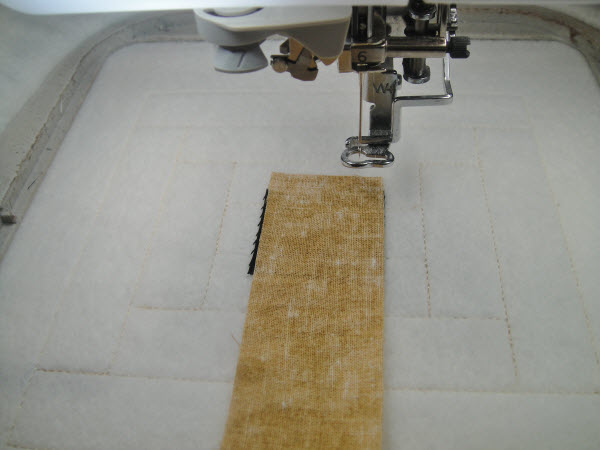
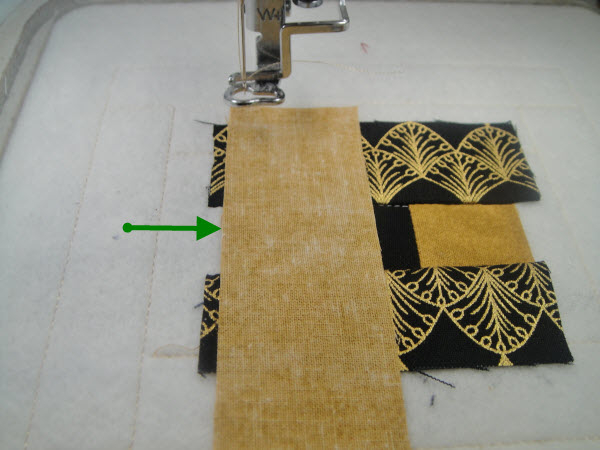
Place a light strip of fabric face down over the square aligning the right edges. The top edge can extend a little higher that the top of the first to square to keep adhesive from getting on the bottom of the presser foot. Stitch the 3rd color sequence which is the seam for this strip.
(Click Image to Enlarge)
Step 9:
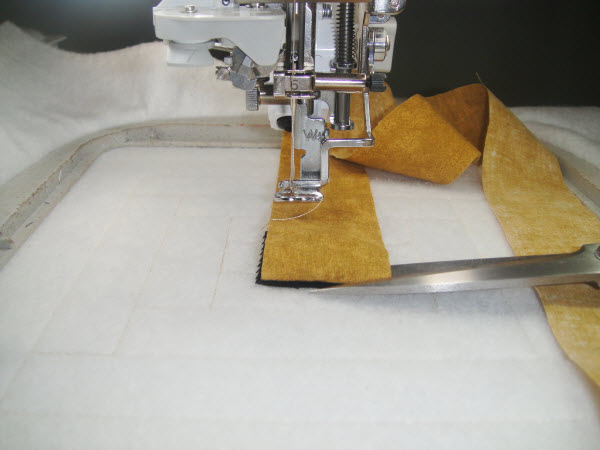
Flip the long edge of the strip of fabric back over itself. Align your scissors with the bottom edge of the first square and trim strip 2 to that length.
(Click Image to Enlarge)
Step 10:
Open up strip two and finger press to the adhesive sprayed batting.
(Click Image to Enlarge)
Step 11:
Place a light strip of fabric, face down, on the left edge of the original square. Stitch color sequence 4 which is the seam line for this strip.
(Click Image to Enlarge)
Step 12:
Flip the strip back and trim off the length as you did previously.
(Click Image to Enlarge)
Step 13:
Open the new strip and finger press it to the sprayed batting.
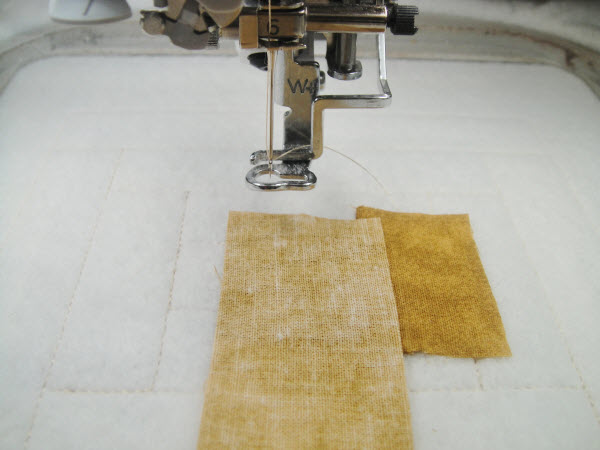
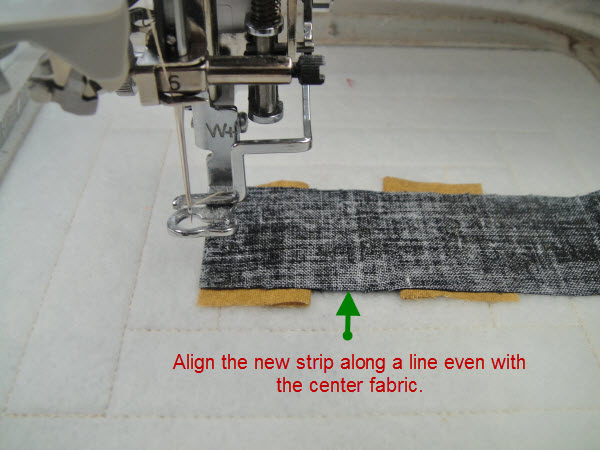
Step 14:
Place a dark fabric, face down, over the three previous fabrics. Align the strip with the center fabric edge. Run the next color sequence which is the seam line for that strip.
(Click Image to Enlarge)
Step 15:
Open the strip and finger press to the sprayed batting. Note: always place the strips so the excess fabric is to the right on horizontal strips and is at the bottom of the hoop on vertical strips as this will make trimming easier.
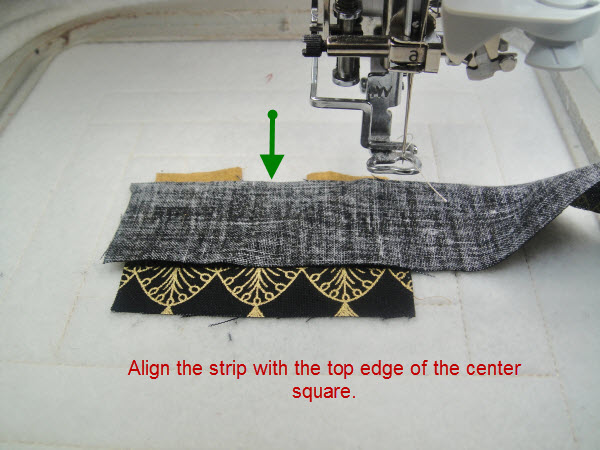
Step 16:
Place a dark strip face down aligning the top of the strip with the top of the center square. Run the next color sequence which is the seam line for that strip.
(Click Image to Enlarge)
Step 17:
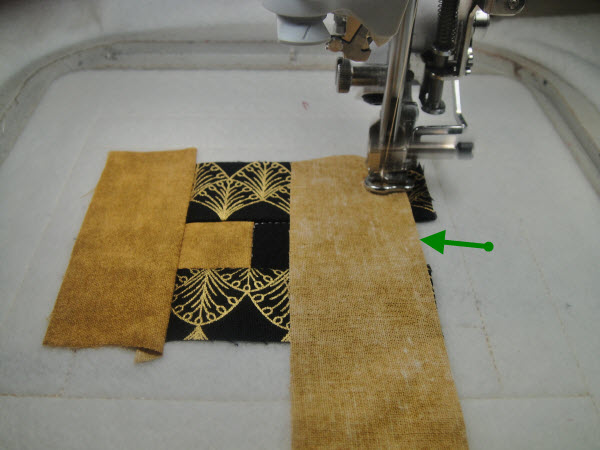
Place a light strip face down over the left side of the fabrics aligning the edge with the center strip. Stitch the next color sequence which is its seam line.
(Click Image to Enlarge)
Step 18:
Repeat on the right side, stitch and finger press open.
(Click Image to Enlarge)
Step 19:
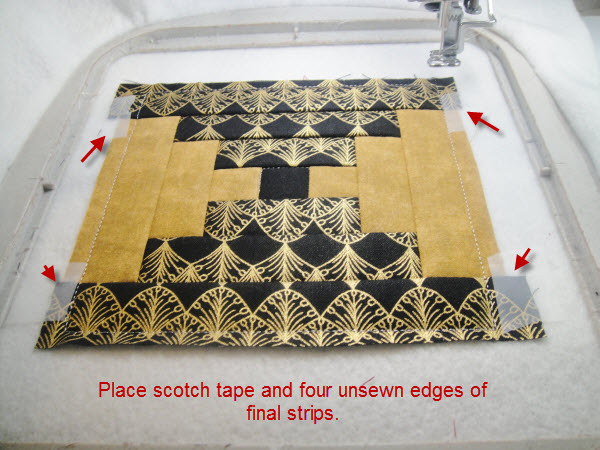
Repeat placing light strips on the vertical side and dark strips on the horizontal sides until all the strips have been stitched. Important: where the outside strips meet the block there will be little unstitched edges. Place scotch tape over those edges so the presser foot doesn’t flip them up while we complete the blocks.
(Click Image to Enlarge)
Step 20:
Load water soluble thread in the top of the machine only. Stitch the next color sequence which will be a tack down for the outside edges of the final strips as well as serve as an outline for the placement of the quilt block back.
Step 21:
Remove the hoop from the machine. Do not un-hoop the project.
Step 22:
Spray adhesive spray on the wrong side of a 7” x 7” rectangle of backing fabric.
Step 23:
Place the sprayed rectangle wrong side down on the back of the hoop making sure you exceed the outline stitch by ½” on all edges.
(Click Image to Enlarge)
Step 24:
Return the hoop to the machine and with the water soluble thread that is still in the machine stitch the tack down line for the backing fabric.
Step 25:
Load the metallic thread in the top of the machine with a coordinating embroidery thread in the bobbin if using metallic thread of the quilting. If you do not chose to use metallic thread for the quilting load the top of the machine and the bobbin with a contrasting color of regular embroidery thread.
Step 26:
Return the hoop to the machine. Bring the bobbin thread to the top by pushing the needle up button twice while holding unto the tail of the top thread.
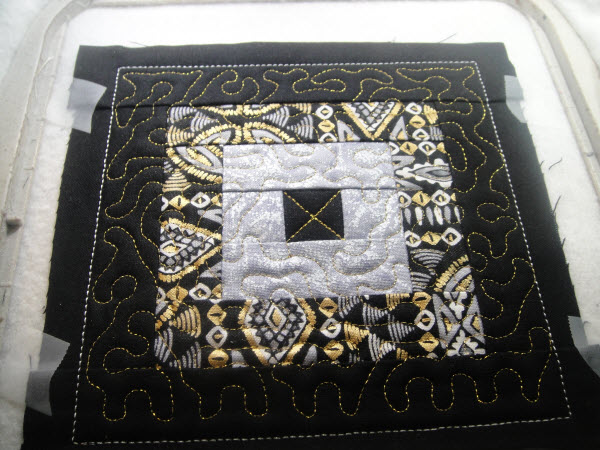
Step 27:
Sew the quilting stitches.
Step 28:
Un-hoop the project, but do not trim the block until later when decisions are made regarding the method for join the blocks. This will be discussed later in this project.
Assemble the Court House Steps Square Blocks
If you look at the second block on the second row of Fig 1 you will see the most common Court House Squared block, however blocks 2 and 4 in the first row and the first three blocks of the second row are all Court House Squared blocks. They all use the same digitized file as the Court House Steps block just the placement of the colors has changed.
Step 1:
You start with a center square in all blocks.
Step 2:
In this block, which is the second one in row two of the table runner;
(a) Light silver fabric was used for strips 2, 3, 4 and 5
(b) Medium print was used for strips 6, 7, 8 and 9
(c) Black strips were used for strips 10, 11, 12 and 13
(Click Image to Enlarge)
Step 3:
In this block, which is the second block in the first row;
(a) Light silver fabric was used for strips 2 and 3
(b) White fabric with silver dots was used for Strips 4 and 5
(c) Light silver fabric was used for strips 6 through 11
(d) White fabric with silver dots was used for strips 12 and 13
Step 4:
In this 4th block on the top row;
(a) Strips 2 through 5 are black
(b) Strips 6 & 7 are white with silver dots
(c) Strips 8 & 9 are white
(d) Strips 10 & 11 are white with silver dots
(e) Strips 12 and 13 are black
Step 5:
In the first block of the second row;
(a) Strips 2 through 9 are gold
(b) Strips 10-13 are a black and gold print
Step 6:
In the 3rd block of the second row;
(a) Strips 2 and 3 are black
(b) Strips 4, 5 , 6 & 7 are a gold/silver/black print
(c) Strips 8, 9, 10 & 11 are black
(d) Strips 12 & 13 are gold/silver/black print
As you can see, you can come up with a number of blocks with unique appearances by changing the order of the colors of the strips in the Court House Steps and the Court House Steps Squared blocks. You also have choices in how you assemble these blocks. You can assemble them so there is sashing on the front or not. The method shown in the “In the Hoop Stash Buster Table Runner” project you will find the instructions for the method with the sashing on the top. That is the way this little table runner was assembled, but the sashing was cut thinner for this project. The back sashing was cut 1.25” wide and the front sashing was cut at 1.5” wide. The binding for this table runner was also cut at 1.5” wide.
If you would like to assemble this project without sashing, please see our project assemble instructions for the “In the Hoop Classic Log Cabin Pillow Cover”. Those instructions will give your table runner another look. You may bind the quilt in the method of your choice; we have instructions for applying binding with mitered corners in our article “Binding an In the Hoop Quilt Project.”
Your options are many, just changing colors from those pictured will make a great project with a totally different look. You can also change the look of your project by adding a few ‘In the Hoop Classic Log Cabin” blocks.
As your project will be absolutely unique we invite you to post pictures of it in the “Share Your Work” section of www.embroiderydesigns.com.
Award winning Digitizer, Embroidery Educator, Author and a Consultant to the Industry, Pat Williams has 30 years of experience in the embroidery industry. Pat has won multiple awards for her digitizing expertise including the 2007 Impressions Awards Grand Championship, Best of Show as well as the 1st and 2nd Place Awards. Pat’s love of digitizing has afforded her the opportunity to write numerous articles for Impressions magazine in the United States and Images Magazine in Europe. In 2001 Pat was named “Embroidery Educator of the Year.” For many years Pat taught digitizing seminars at the ISS Shows in Long Beach, CA and for Compucon software. She now resides in Tucson, AZ.