


5 Easy Embroidery Projects For Beginners Embroidery Project
PROJECT DETAILS
Explore five beginner-friendly machine embroidery projects to build essential skills and create beautiful, personalized items with confidence
Project Preview Video
5 Easy Embroidery Projects for Beginners
Want to start machine embroidery but don’t know where to begin? This guide covers five simple projects designed for beginners, teaching you essential skills like hooping, stabilizing, and threading your machine. Here’s a quick overview of what you’ll learn and need:
- Skills Covered: Hooping, stabilizing, threading, handling fabrics, and fixing common issues.
- Tools: Embroidery machine (4"×4" hoop minimum), stabilizers, needles, threads, scissors, and scrap fabric.
- Projects: Monogrammed towels, coasters, quilt squares, lace ornaments and napkin embellishments.
With step-by-step instructions and troubleshooting tips, you’ll gain confidence to create polished embroidery designs. Let’s get started!
5 Tips for Machine Embroidery Beginners
Required Tools and Supplies
Here’s a list of tools and supplies you'll need to get started.
Machine Embroidery Equipment List
- Embroidery machine (minimum hoop size: 4"×4")
- Hoops (multiple sizes for different projects)
- Embroidery needles
- Sharp thread scissors
- Stabilizers
- Embroidery and bobbin thread
- Scrap fabric for practice
- Entry-level option: Bernette b79 with a 10"×6" hoop, priced at $2,499.
Finding Designs and Materials
Digital designs are affordable, starting at $0.49. Design packs range from $9 to $15, and basic fonts typically cost around $5 [1].
- Look for stabilizers from brands like Madeira or Sulky.
- Starter kits are a convenient option, bundling thread, needles, and stabilizers.
Once you've gathered your supplies, the next step is learning how to properly hoop and stabilize your fabric for perfect stitching results.
For free designs, fonts, and supply discounts, check out the Embroidery Circle Membership on EmbroideryDesigns.com.
Basic Skills and Techniques
Getting the hang of embroidery basics is key to starting off strong. Here’s a breakdown of the core techniques you'll need to know for crafting eye-catching designs.
How to Hoop and Stabilize
Hooping correctly keeps your fabric aligned and prevents puckering. Choose the smallest hoop that fits your design for better support. Tighten the hoop until the fabric is firm but not stretched.
Match your stabilizer to the fabric:
- Tear-Away Stabilizer works well for cotton or linen.
- Cut-Away Stabilizer is ideal for knits or stretchy materials.
- Wash-Away Stabilizer suits thick or loose-pile fabrics.
Cut the stabilizer about 2 inches larger than your hoop. Hoop the fabric and stabilizer together, then use a water-soluble marker to draw vertical and horizontal guide lines. Once you’ve hooped and stabilized the fabric, you’re ready to thread your machine and start stitching.
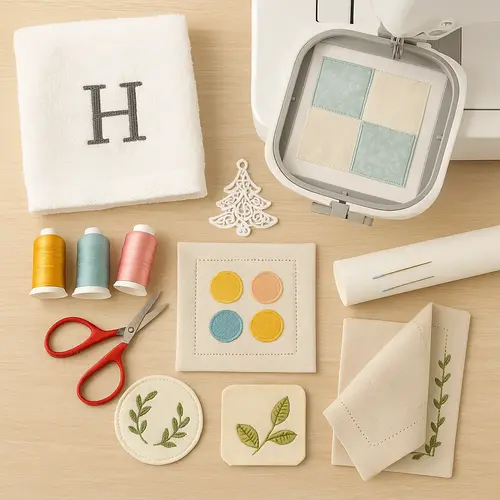
5 Beginner-Friendly Projects
Once you've got the basics of hooping and threading down, you're ready to try these five simple projects. Each one helps you practice key skills like stabilizing, setting up your machine, and finishing your work. Download the step-by-step guides for each project from EmbroideryDesigns.com to get started.
Simple Monogram Towel
Use a stabilizer to hoop a cotton towel, embroider your chosen monogram, trim the extra stabilizer, and give it a quick press.
Basic Embroidered Coaster
Hoop cotton fabric along with stabilizer, stitch the in-the-hoop coaster design, attach a backing, trim the edges, and press it flat.
Embroidered Quilt Square
Hoop your fabric with stabilizer, embroider the quilt block design, trim it to size, and get it ready for piecing into a quilt.
Simple Lace Ornament
Hoop a Wash-Away Stabilizer, stitch the free-standing lace design, rinse off the stabilizer, and let it dry completely.
Basic Napkin Embellishment
Hoop the corner of a napkin with stabilizer and a water-soluble topping. Stitch your design, then press the napkin from the back for a clean finish.
Problem-Solving Guide
Once you've nailed hooping and stitching, it’s time to tackle some common issues that might pop up.
Fix Common Problems
Thread Loops
If you notice thread loops on top of your design, it’s likely a tension issue. Adjust both the needle and thread tension settings. To clean up stray loops, use a loop-and-tail wand.
Puckering
Puckering happens when the fabric bubbles around your design. This is usually caused by under-stabilization or incorrect hooping.
- Avoid stretching the fabric in the hoop
- Choose the right stabilizer weight
- Preshrink your fabric before stitching
- Reduce design density if needed
Double-check that your stabilizer matches the fabric type and the design’s density.
Stabilizer Guide
- Cut-Away Stabilizer: Best for knits and fabrics that lack stability.
- Tear-Away Stabilizer: Ideal for woven fabrics and towels.
- Wash-Away Stabilizer: Perfect for lace and delicate materials.
Conclusion
Pair these projects with the troubleshooting tips from the Problem-Solving Guide to sharpen your skills. Through five approachable projects - like monogrammed towels and lace ornaments - you’ve honed your hooping, stabilizer selection, and tension control, creating practical and beautiful items.
With growing confidence, you can explore endless possibilities, from personalized home décor to custom gifts.
Check out thousands of beginner-friendly designs starting at just $0.56 for Embroidery Circle members. Plus, take advantage of exclusive freebies and discounts to grow your collection.
Every stitch is a chance to learn and improve. With the right tools and practice, you’ll be crafting embroidery that looks polished and professional in no time.