














































PROJECT INSTRUCTIONS


PROJECT INSTRUCTIONS

Understanding Hoop Size & Sewing Field Embroidery Project
By
Bonnie Landsberger
on
October 29, 2014
Description
The term “hoop size” used throughout the machine embroidery community is confusing. The issue can be frustrating when trying to find the right size while shopping for designs, so let’s see if we can shed a little light on this issue.
Step
of
Materials
Project Preview Video

Horse Force
$8.19
Circle Price: $6.14

QUICK VIEW
Cat Patchwork
$6.79
$3.40
Circle Price: $3.25

Cut Away Stabilizer - 2.5 Oz wt.
$8.94
Circle Price: $8.05

Cut Away Stabilizer - 2 oz wt.
$8.52
Circle Price: $7.67


| Understanding Hoop Size & Sewing Field |
 | The term “hoop size” used throughout
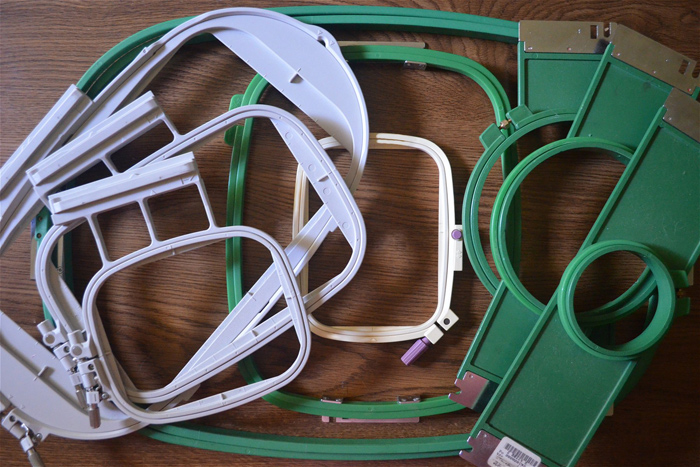
the machine embroidery community is confusing. For example, you might measure your actual
physical hoop to find it is 6.25 x 4.50” and you have been told that your
machine can only sew a design that fits the 4 x 4” hoop, but in reality the
actual sewing field of your particular machine model will not stitch a design
that exceeds 3.937 x 3.937” - and not a fraction more! We can blame this conflict of measurements on
decades of upgrades and changes to meet global demands for machines that
require very fine measurements that can’t be calculated in inches, along
with the struggle for some of us to grasp the metric system. But no matter
where the confusion originated, the issue can be frustrating when trying to
find the right size while shopping for designs, so let’s see if we can shed a
little light on this issue. With the exception of commercial machines like a Tajima that will stitch as far as its pantograph will reach, most every machine has a “sewing field” limitation. The sewing field is programmed into the machine software to not allow stitching designs larger than what has been preset for the main purpose of protecting the machine from damage. When a needle comes down on the hoop, the needle will likely break, and this can also crack the hoop, as well as cause other mechanical problems like throwing off the “timing” of the needle and hook assembly or other situation that requires a technician’s repair. Be aware that unless your machine’s sewing field allows, you cannot purchase a larger hoop and expect it to work for larger designs.As well, some machines offer optional larger hoops, like the Plus Hoop for a small model Husqvarna-Viking, but in this case, to use the hoop for a large design, it requires splitting the design into sections no larger than the preset sewing field.Splitting the file is accomplished by using the appropriate software that in most cases won’t be included with the purchase of a larger hoop. |
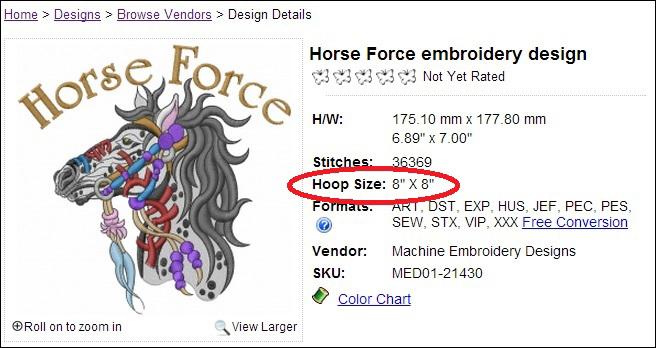 | Hoop Size Each design product page on EmbroideryDesigns.com includes the actual size of the design in both millimeters and inches. The product page also includes “Hoop Size” in inches, which is supposed to be the equivalent to the sewing field in millimeters, but humans like to approximate things. For example 100mm equals 3.937”, which is so very close to 4” that we who hate decimals round up the figure. Also the sewing field of 130 x 180mm equals 5.12 x 7.09” but we round down the figure to 5 x 7”. So, “Hoop Size” has evolved over the years to being just a term without mathematical accuracy, used to indicate the approximate sewing field limit in inches that your machine must allow in order to accommodate the actual size of the design. |
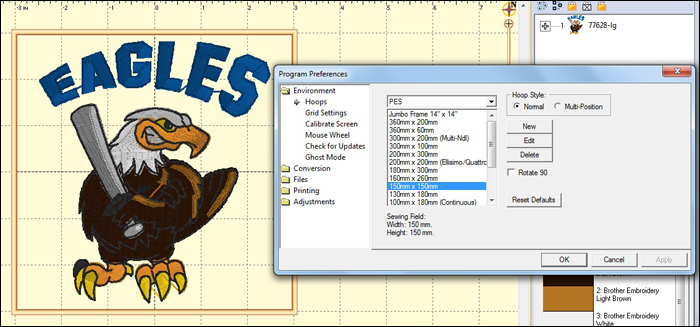 | Sewing Field The measurement of your machine’s sewing field limit is usually listed in the manual, sometimes buried where you least expect to find it. Some software programs, such as Embrilliance Essentials, offer the ability to check and set the sewing limit by machine and hoop size.Many of us have discovered our machine’s sewing field limit while trying to stitch a design that exceeds the preset boundaries.My Husqvarna-Viking Rose, an older model that runs from a program card with one small hoop and no image monitor, will try to stitch the design until it reaches the point where the design exceeds its sewing field limit of 3.93 x 3.93” – a frustrating waste of materials and time.On the other hand, some machines will simply refuse to stitch a design that is too large, and often won’t clearly reveal the reason, such as my Baby Lock Ellageo that doesn’t even recognize that the design is on the USB drive when the design size is more than its sewing field limit of 10.2 x 6.2”. Learn your machine’s sewing field limit, and you will be able to determine whether a design will fit within the recommended “Hoop Size”. |
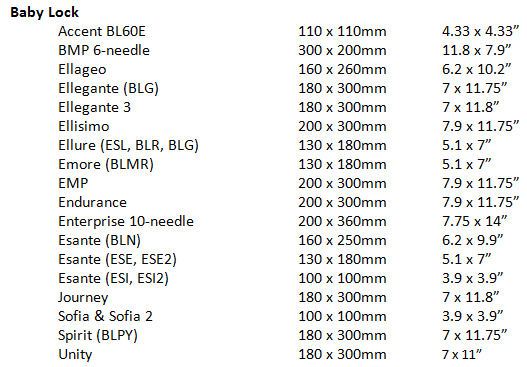
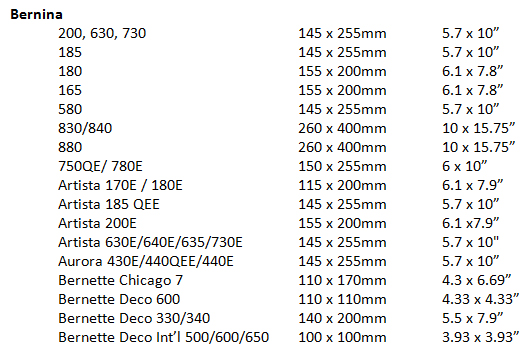
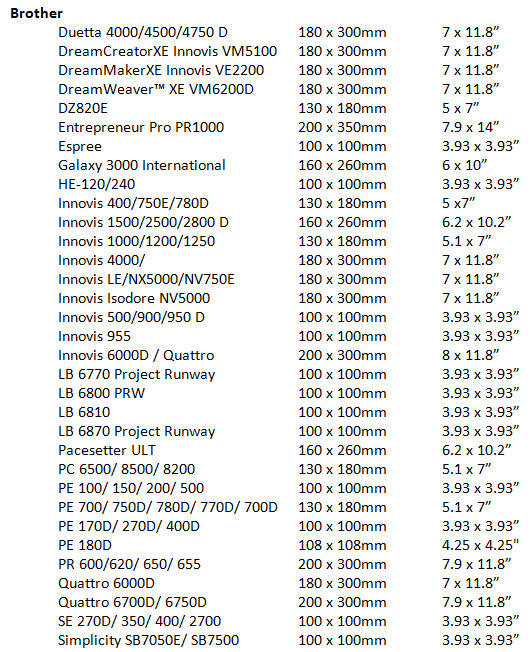
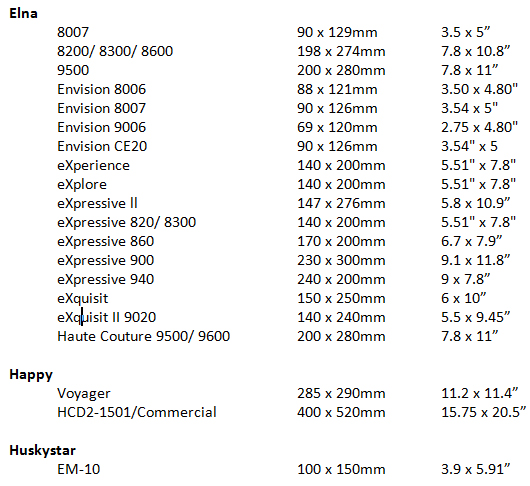
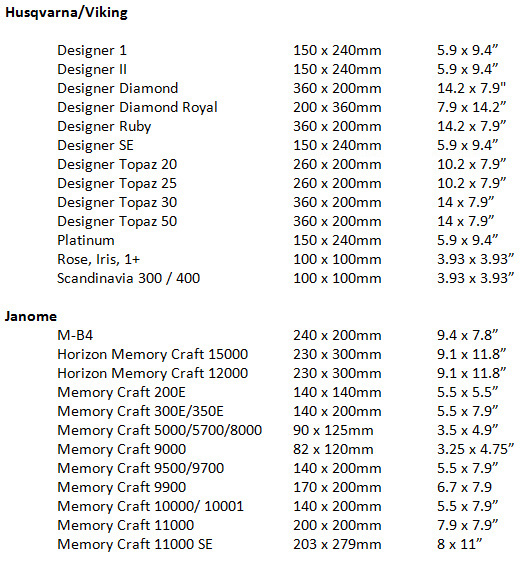
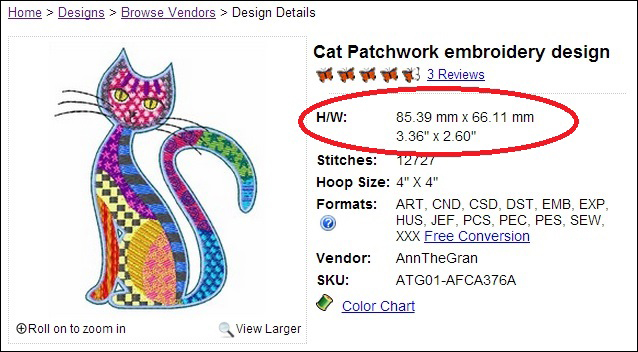 | Determining Hoop Size First understand that the inch has been defined and internationally accepted as being equivalent to 25.4mm (millimeters) or 2.54cm (centimeters).If your ruler displays centimeters, just move the decimal one digit to the right to calculate millimeters. Following is a chart of approximate, but close conversions of sewing field limits. When shopping, be sure to double check the actual size of the design along with the recommended Hoop Size. |
 |
 |
 |
 |
 |
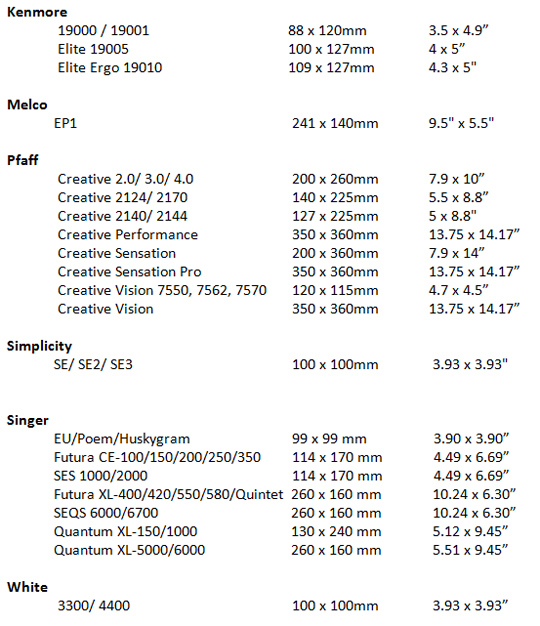 |
| Use the above chart to help you decide whether a design will fit within your sewing field limit when shopping for designs.And remember, if the design is within 20% too large for your hoop, our Design Support Team can decrease the size for you. Just call us with your order number after your purchase and we will resize and email the resized design to you. |
| Related articles – Resizing Designshttps://www.embroiderydesigns.com/emb_learning/project/876/resizing-designs |
Projects You May Like
Meet the Author:
Bonnie Landsberger

Bonnie Landsberger has been a crafter and hand embroiderer since childhood and a machine embroiderer and digitizer since 1986. She was the in-house head digitizer for a 50-head embroidery shop for 11 years and later offered custom digitizing services and stock design sales through her web site for Moonlight Design since 1993. She currently also holds a position as a customer service representative at EmbroideryDesigns.com.
Bonnie has won several awards for digitizing, including a gold medal in the 2002 Digitizing Olympics and grand prize in all categories & first place for Winter Holidays category in the Stitches Magazine Great Greeting Card Contest 2003.
Her embroidery and digitizing technical articles can be found in various trade magazines and she is currently a contributing writer and Editorial Advisory Board Member for Stitches Magazine. You can also find more of her articles online at EmbroideryDesigns.com and will continue to contribute articles to our Learning Center.
Feedback
Characters Remaining
Please Login to Submit a Feedback
Invalid Characters, Please enter a valid Comment
Please enter a valid Comment
Reviewed On
Link is Broken, Please check the URL