


PROJECT INSTRUCTIONS


PROJECT INSTRUCTIONS

Needles - Getting To The Point Embroidery Project
By
Bonnie Landsberger
on
June 12, 2014
PROJECT DETAILS
Description
Needles - Getting To The Point
Project Preview Video

Water Soluble Stabilizer - 12" x 25 Yds
$32.46
Circle Price: $29.21

Needles - Getting To The Point Confused about needles? Beginning the work with a new needle, and choosing the right size and type of needle for the design and fabric that you are stitching on, can make a world of difference in the quality of the finished embroidery. When the wrong needle is chosen for the work or the needle is in poor condition, the threads can loop, skip stitches, or break. As well the fabric might pucker around the design and stitches may distort and appear shabby. Learning a bit about needles can help you solve many problems that would otherwise be quite frustrating, as well as costly when the wrong needle causes damage to the garment. Let's take a closer look. Click on the small thumbnail images to enlarge. |
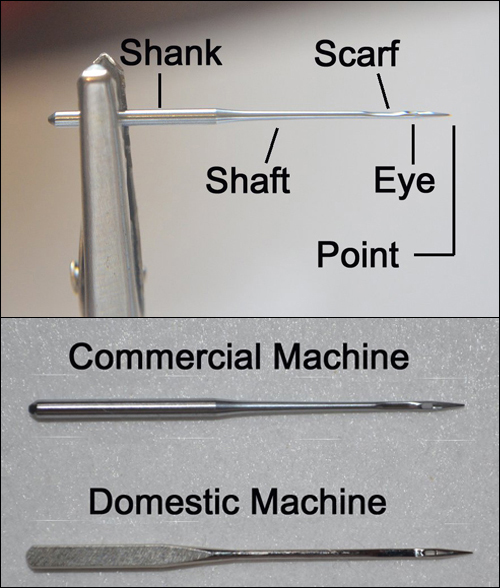 | Parts of the Needle Shank: the top part of the needle that fits into the needle bar and its shape reveals whether the needle is for a commercial machine or a domestic machine. If the shank is completely round in circumference, it is for a commercial machine, and if it's flat on one side, it is for a domestic machine. Blade or Shaft: the part of the needle that extends from the bottom of the shank to the point. Scarf: curved indent above the eye on the back of the needle. This indent allows room for the hook that comes up and around and catches the top thread, locking it with the bobbin thread to form a stitch. Groove: straight indent on the front of the needle between the eye and the base of the shank that allows for the thread to lie close against the shaft while the needle passes through the fabric. Eye: the hole where the thread passes through. Point: the tip of the needle at the bottom below the eye that pierces the substrate, such as fabric, leather, paper, etc. |
 | Needle Points At left is a commercial Ball Point, and at right is a domestic Universal Point. Ball: the point is slightly rounded to push between the fabric fibers without cutting them, eliminating runs and tears in fabric like knits, nylon and fleece. A Light Ball Point, such as Universal, is not quite a sharp point and not quite a ball point, landing somewhere in between. Sharp: the point will cut through the fibers allowing for a more accurate penetration on the fabric without causing puckers and it's suitable for fabrics that don't usually run like denim, terrycloth, and tightly woven fabrics, as well as leather and paper. An Acute Round Point id the sharpest point needle. |
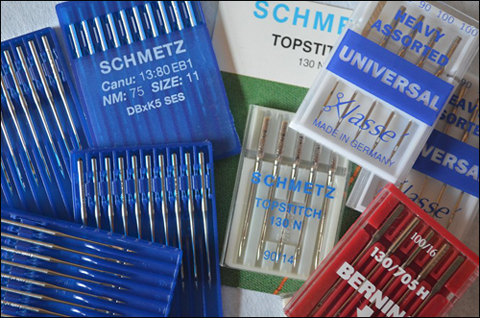
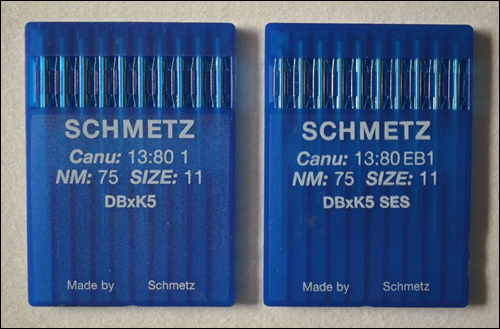 | Needle Sizes and Types Most needle packages list both European and American sizes. A high number indicates a thicker needle and larger eye, and a lower number indicates a thinner needle and smaller eye. On commercial machines an average size of DBxK5 75/11 ball point or light ball point (SES) often works best for most fabrics when stitching with 40 WT thread, whereas, a larger size would be best for the thicker 30 WT thread. |
 | Needles for domestic machines include the size number, but many that can be used for both embroidery and normal sewing are marked for the job, such as “Topstitch” or “Universal”. You will also find specialty needles, such as the Wedge Point that has a V-shaped sharp point, used to cut a larger hole in leather and allow the thread to pass through without shredding. Teflon Coated needles will make stitching with metallic threads less difficult by reducing the friction on the thread and keep it from fraying, and they also work well for stitching coated or waterproof fabrics. Denim needles are designed for tightly woven fabrics like denim or similar, and will also stitch through multiple layers of fabric, such as for quilting. Twin needles are handy for stitching a double-line topstitch, such as for hems. Double eye needles have two eyes in one needle for stitching with two spools of thread at the same time; used for decorative stitching. Self-threading needles have a notch in the side of the needle to slip the thread through the eye, instead of threading directly through center and are helpful to those with impaired vision. |
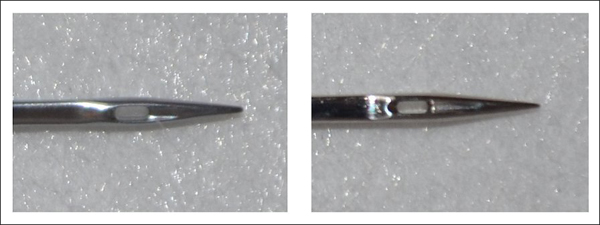
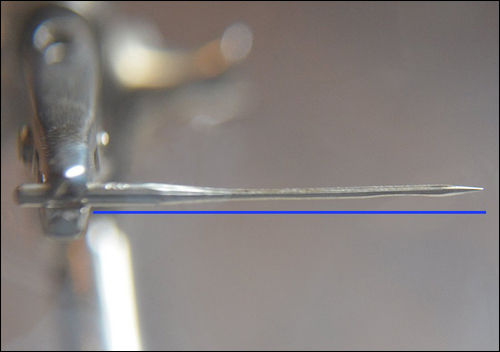 | Needle Condition This damage is difficult to recognize, but when viewed through a magnifying glass, it's revealed this needle was bent slightly when striking a pin; as indicated when compared against the blue horizontal guideline. You should never start stitching without first examining the needle. Problems like a dull, bent or chipped point are not always obvious and can result in a poor sew-out or damaged goods. A dull needle can be the cause of stitches looping on the top, flagging in the hoop (fabric bouncing up and down with the needle), as well as loose bobbin stitches and birdnesting. |
 | Birdnesting: A collection of tangled thread between fabric and needle plate that resemble the nest of a bird, usually caused by poor top tension, top thread not through take-up lever, incorrect thread path, needle not seated properly or fabric flagging. Removal consists of carefully snipping away the threads between the fabric and the needle plate; threads can be pulled away from the needle plate with a tool like a small needle nose pliers or hemostat (locking clamp), and then cut with an X-Acto utility knife. Schmetz Needles advises, “The operator should check the needle point regularly for damage. This can be done with the fingernail of the pointing finger or with a piece of nylon stocking. The best effect is achieved if the check is done every hour. This check is essential when you are sewing knitwear because only this measure together with a needle change policy will maintain a good quality garment.” When new needles continue to break, be sure that the needle is inserted correctly, the needle clamp screw is tightened and the needle is straight with the eye facing front to back. Any slight collision of the needle can cause it to bend, such as hitting the hoop, striking a pin or the needle plate, or even when the hoop is held a bit too high when removed, allowing the fabric or hoop to scrape the point. |
Needle Use Chart Canvas: 80/12 sharp Coated/waterproof: 80/12 sharp/ball point Corduroy: 75/11 sharp/ball point Cotton Sheeting: 70/10, 75/11, 80/12 sharp Denim: 75/11 sharp Dress Shirt: 70/10, 75/11, 80/12 ball point Duck Cloth: 75/11 sharp Golf Shirt: 70/10, 75/11, 80/12 ball point Knits: 75/11 ball point Lace: 75/11 sharp point Leather: 80/12, 90/14 sharp point or 75/11, 90/14 wedge point Lingerie & Silk: 60/8, 70/10, 75/11 sharp/ball point Lycra, Spandex: 70/10, 75/11, 80/12 ball point Nylon Wind breaker: 70/10, 75/11, 80/12 ball point Organza: 65/9 ball point Paper: 75/11 sharp point Rayon: 75/11 ball point Satin Jacket: 75/11 ball point Sweatshirt: 70/10, 75/11, 80/12 ball point Taffeta: 65/9 ball point Terry cloth towel: 75/11 sharp/ball point Water Soluble Stabilizer (for FSL): 75/11 sharp Velvet: 65/9 ball point Vinyl: 75/11 sharp point or 75/11 wedge point |
Test The Needle Always stitch the design on same or very similar fabric as the final garment, using the needle recommended for the substrate. Examine the sample and if you see any large needle penetrations, switch to a smaller needle, or if the thread is shredding or breaking, switch to a larger needle. If the fabric is puckering around the design or the stitches appear distorted, it might be caused by a ball point needle pushing at and stretching the fabric; if so, switch to a sharp point. If you are using a sharp point and see fabric fibers fraying next to the stitches, or fill stitches in the design are shredding as top elements stitch, switch to a ball point. |
Projects You May Like
Meet the Author:
Bonnie Landsberger

Bonnie Landsberger has been a crafter and hand embroiderer since childhood and a machine embroiderer and digitizer since 1986. She was the in-house head digitizer for a 50-head embroidery shop for 11 years and later offered custom digitizing services and stock design sales through her web site for Moonlight Design since 1993. She currently also holds a position as a customer service representative at EmbroideryDesigns.com.
Bonnie has won several awards for digitizing, including a gold medal in the 2002 Digitizing Olympics and grand prize in all categories & first place for Winter Holidays category in the Stitches Magazine Great Greeting Card Contest 2003.
Her embroidery and digitizing technical articles can be found in various trade magazines and she is currently a contributing writer and Editorial Advisory Board Member for Stitches Magazine. You can also find more of her articles online at EmbroideryDesigns.com and will continue to contribute articles to our Learning Center.
Feedback
Characters Remaining
Please Login to Submit a Feedback
Invalid Characters, Please enter a valid Comment
Please enter a valid Comment
Reviewed On
Link is Broken, Please check the URL