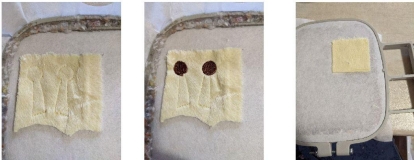
EARS: I start by making the ears, muzzle and ossicones, I always work out of frame, you can take the temporary glue to help you. First step put your support in your frame 10x10cm. Follow the steps on the worksheet:
Step 1:
The first seam must be done on the support to tell you where to put your fabric, be careful to hide this seam with your fabric. At each step, I take the measure that I need material to cover the seam.
Step 2: The second seam is done on your fabric to sew your fabric on your support.
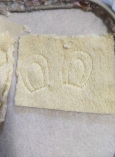
Step 3:
Embroidery on ossicones.
Step 4: For the next step, put your piece of fabric on the back of the frame at the exact place of your piece of fabric that is on the place of your frame, this seam will join the back and front of the assicones.
Step 2:
(Click Image to Enlarge)
Step 5: Sewing to show you the location of your fabric for the ears, take the measurement and put your fabric over this seam before moving on to the next step.
Step 6:
Sewing the fabric of the ears on your support.
Step 7:
Sewing to tell you where to put your fabric for the inside of the ears.
Step 8: Seam your piece for the inside of the ears, once this seam is finished, remove the excess fabric. Take your piece of fabric for the back of the ears, put this piece place against place on your ear part work and move on to the next step.
Step 9: Back seam with front for ears that is the muzzle, put and support to the point of embroidery.
Step 3:
(Click Image to Enlarge)
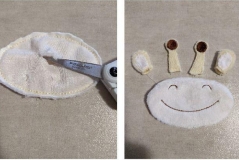
Step 10: Once your embroidery stitches are finished, remove your hydrosoluble support, take vour piece for the back of the muzzle and put it on your piece in front.
Step 11: Seam the front and back of the muzzle together, notice that the seam is complete. It remains only to get out of the frame, clean the ossicones, for the muzzle, it is necessary to make a small opening of the part of the fabric that is on the reverse, from this opening you can turn your piece.
Step 4:
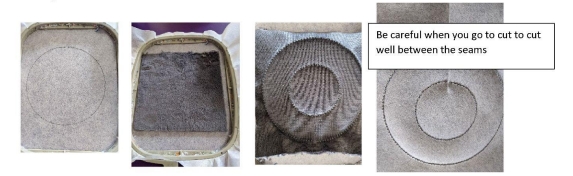
THE RING
Step 1:
This fact on the support to tell you where to put your fabric, put your fabric on your support to hide the seam.
Step 2: This seam is used to hold your fabric on your frame, once this seam is finished, put your piece of fabric, place against place.
Step 3: This seam is used to join your two pieces of fabric together. When finished, get out af your frame, cut where there is no a No sewing, be careful to cut in the right place. Remove excess fabric, return to the place, fill with stuffing and make an invisible seam for Putting it both together.
(Click Image to Enlarge)
Step 5:
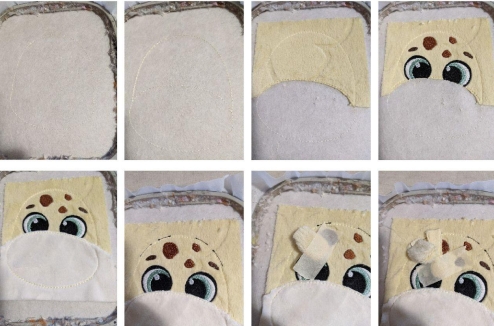
THE HEAD
Step 1: Sewing on your stand to show you the size of the head when finished.
Step 2:
Seam to show you the location of your fabric for the upper face (pale yellow part).
Step 3:
Sewing your fabric on your support, once this seam is finished, remove the excess fabric and take your water-soluble support and put it on your piece of fabric before moving on to embroidery.
Step 4:
Track colors for embroidery stitches.
Step 5:
Seam to tell vou the location of the muzzle.
Step 6:
Sewing of the muzzle part on your support, cut the excess fabric on the top of the muzzle.
Step 7:
Couture to tell you the location of the ears and ossicones.
Step 8:
Put your ear place against place and hold well in place, do the sewing of your ear.
Step 9:
Do the same steps for the ossicones and the other ear.
Step 10: Once the ears and ossicones are finished, take a piece of fabric of 11x11cm for the back of the head, put place against place on your project, this seam will bring together the front and back of the head.
Step 6:
THE BANDANA: You have 2 methods to do it, either in a 13x18cm frame or print the pattern that I provide you and do it with the sewing machine.
For my part I prefer to do it with the sewing machine.
Step 1:
If you want to do it with the embroidery machine, this fact on the support to tell you where to put your fabric.
Step 2:
Put your fabric and make that will fix your fabric on your support.
Step 3:
When this seam is finished, take your second piece and put it place against place on your fabric that is on your support.
Step 4: Remove from your support, cut the excess fabric and flip, make the small seam in the top to close the bandana completely and put the snaps.