The top as it is in the PDF is labeled as a basic sewing skill level. For this project, pattern drafting skills are needed to adjust the neckline of the pattern to fit the embroidery design. The basic steps are shown in this tutorial.
Step 1:
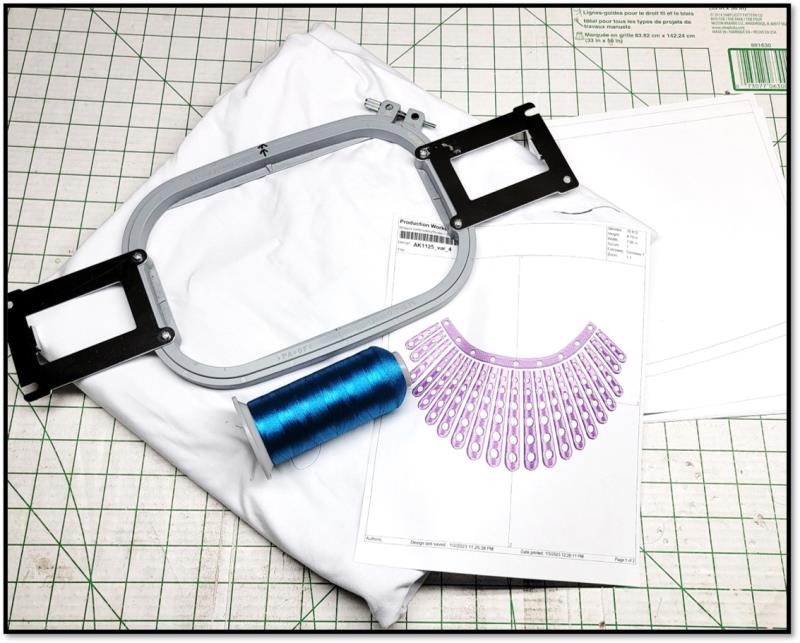
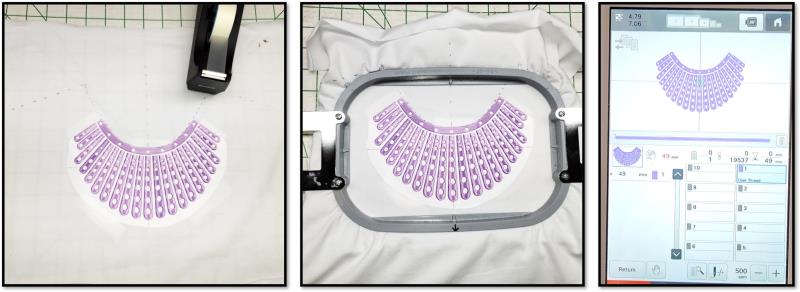
Read through the instructions thoroughly before beginning and assemble all the materials needed to complete the project. Choose the embroidery thread. This project lends itself to being very basic or adorned with hot fix crystals, beads, sequins, pearls, etc. to make it more for evening wear. Once the pattern alteration at the neckline is made, you’ll no doubt use it over and over again with the chosen embroidery design and others. Print out a paper template of the embroidery design at actual size—this is very important.
(Click Image to Enlarge)
Step 2:
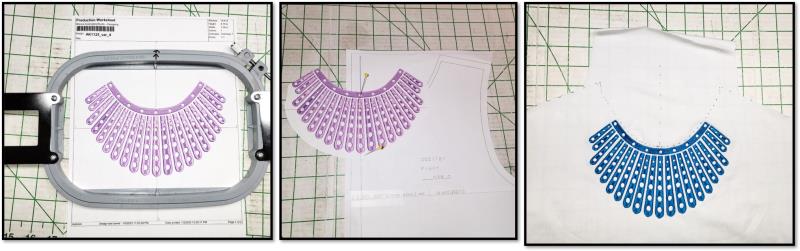
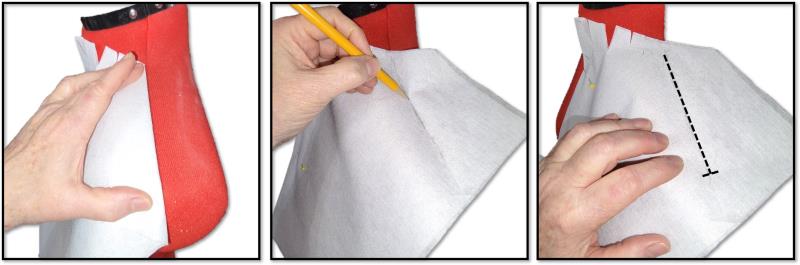
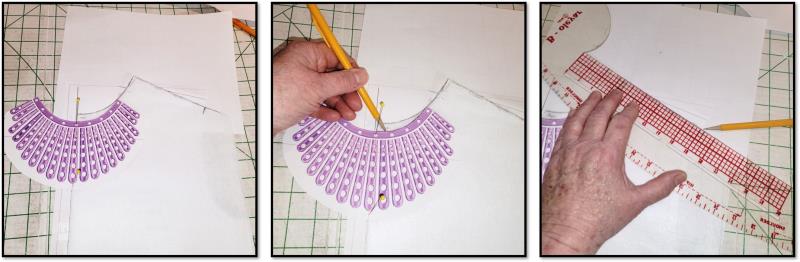
Choose the hoop for the design. You’ll want the smallest hoop possible to fit the design. Follow the PDF pattern instructions for choosing the size pattern needed and printing. Cut out the pattern front. Cut out around exactly on the top most curve of the neckline; this line will be used to create a new neckline on the pattern. What you’ll be doing is drafting a new neckline and then trace the pattern on the fabric.
(Click Image to Enlarge)
Step 3:
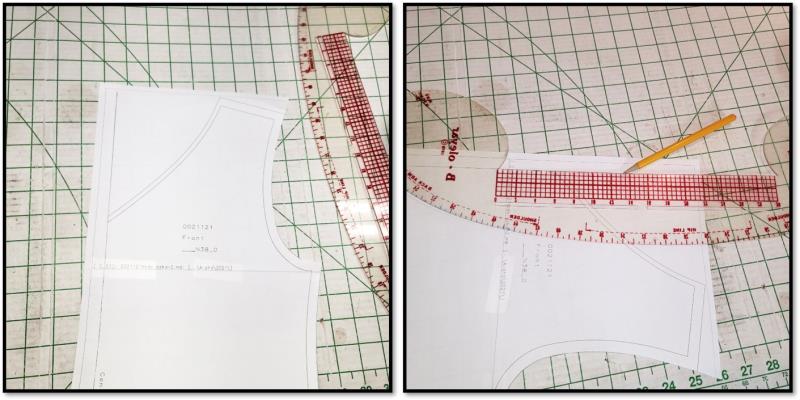
Place another piece of paper under the neckline. Draw a line straight up from the center front line. This line will be used to align the center of the embroidery to the center of the top front.
(Click Image to Enlarge)
Step 4:
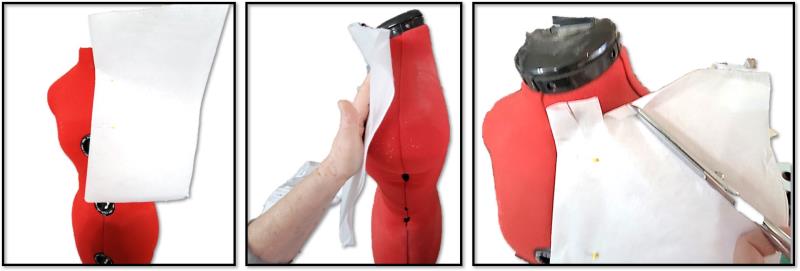
There are a couple of options at this point. If you have a pattern front with a jewel neckline, it could be placed over the pattern in this project and the neck area redrafted to fit the embroidery design. For this project, the neckline front was draped on the mannequin. Use malleable paper (embroidery cutaway stabilizer is shown in the project). Place the straight line of the paper along the center front of the mannequin and pin in place. Smooth the paper up from the center front, and mark the neck edge; clip along the neckline edge.
(Click Image to Enlarge)
Step 5:
Continue smoothing the paper toward the shoulder; fold back the paper along the shoulder and crease. Open up the paper and mark the shoulder (creased) line. Also mark the end point of the shoulder.
(Click Image to Enlarge)
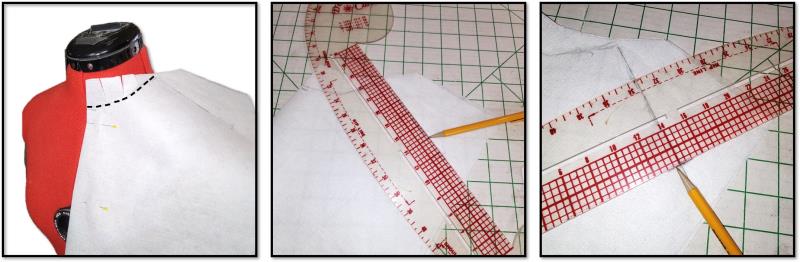
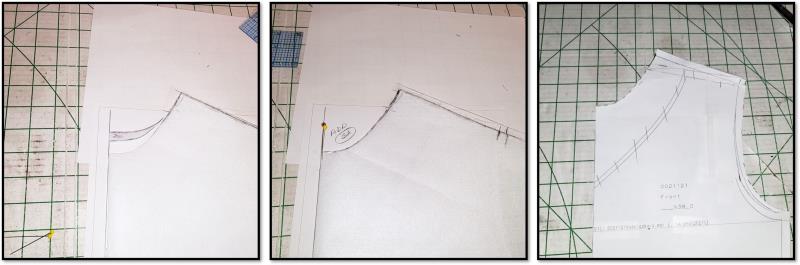
Step 6:
Mark the curve of the neckline. Remove the paper. True all lines. Mark a straight line at the shoulder. Mark the shoulder point 90 degrees to the shoulder line and neck line/shoulder point.
(Click Image to Enlarge)
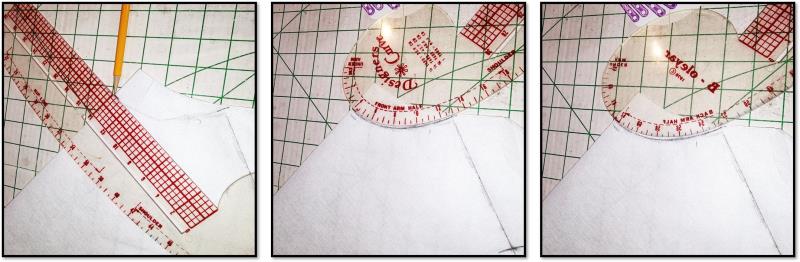
Step 7:
Mark the center front neckline at a 90 degree angle to the center front line. Using the French curve, find the area of the curve that will create a smooth neckline from center front to the shoulder line.
(Click Image to Enlarge)
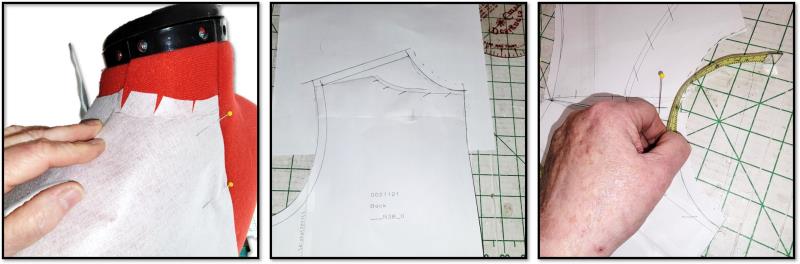
Step 8:
Cut along the lines—now at this point this does not include seam allowances! Align the new draft at the center front. You may find the shoulder lines also need to be adjusted; if you don’t know how to do this, consult a pattern drafting book.
(Click Image to Enlarge)
Step 9:
Place the center of the embroidery template along the center front line of the pattern. Draw along the top of the embroidery template. Adjust and true up the shoulder lines if needed and add the shoulder seam allowance.
(Click Image to Enlarge)
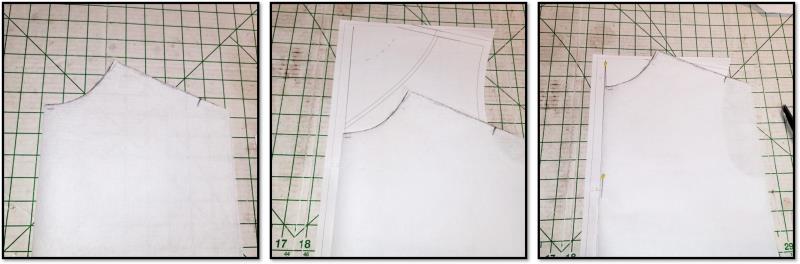
Step 10:
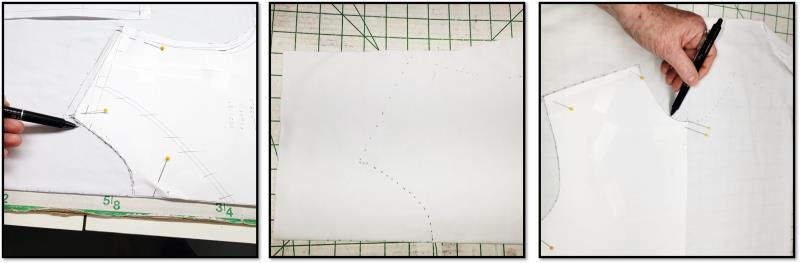
Cut along the new neckline mark. This is the new pattern front.
(Click Image to Enlarge)
Step 11:
The pattern back needs to match the front; it is basically done in the same manner by aligning the straight edge of the paper to the center back of the mannequin. Mark and cut the neckline, mark the shoulder line and lay it over the PDF pattern back. Tape more paper to the top of the pattern back piece and transfer the draft to the pattern. Because the neckline is raised significantly both front and back, measure around the neckline. Measure the size of the head of the wearer. If the fabric will not easily stretch over the head when the garment is completed, an opening has to be added. This can be a zipper at the shoulder or the center back (add a seam line at the center back), or just a slit at the center back with a button and loop as a closure which is what was done for this project.
(Click Image to Enlarge)
Step 12:
Next is to trace the pattern front onto the fabric for embroidery. Follow the pattern layout instructions. While the pattern is still pinned to the fabric, draw around the entire pattern front with the fabric pen. You won’t cut out the pattern front until after the embroidery is completed. Instead, you’ll cut about 2-3” outside of the cutting lines making a rectangle of fabric. Make a mark at the center front at the top and bottom of the traced outline. Carefully open up the fabric, flip the pattern over, align the center front marks at the top and bottom and then trace around the pattern on the other side of the fabric.
(Click Image to Enlarge)
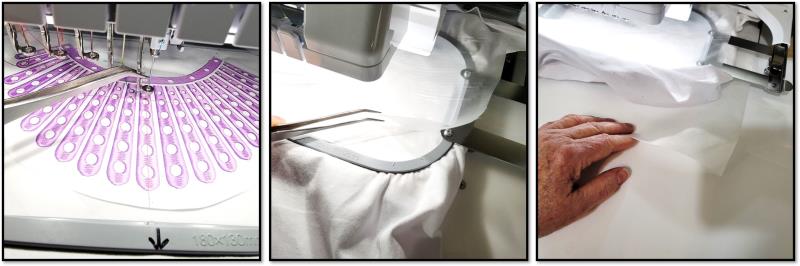
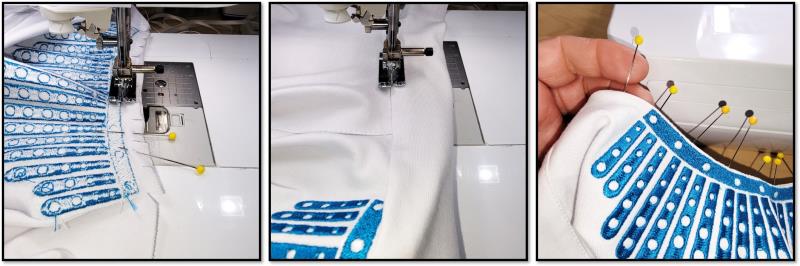
Step 13:
Align and tape the embroidery template to the neckline, matching the center front. Hoop the fabric—without stretching it at all—with a piece of poly mesh stabilizer. Load the design on the machine with the chosen thread color. Choose to stitch at about 500 spm. The stitching should be done slowly so as not to create an undo amount of push and pull on the knit fabric.
(Click Image to Enlarge)
Step 14:
Place the hoop on the machine and align the needle to the center point of the design. Remove the paper template and place a piece of water-soluble topper down. Float a piece of tearaway stabilizer under the hoop. The extra stability is needed for a high-stitch count design on a knit/lycra fabric.
(Click Image to Enlarge)
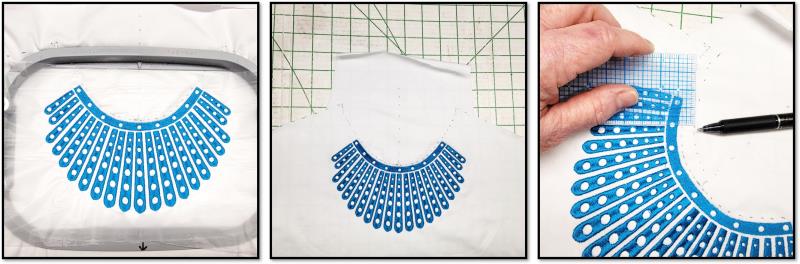
Step 15:
Stitch the design. Carefully remove the design from the hoop. Cut out the pattern as marked, except for the neckline. Remember, there are no seam allowances at the neckline. Measure and mark the seam allowances around the neckline.
(Click Image to Enlarge)
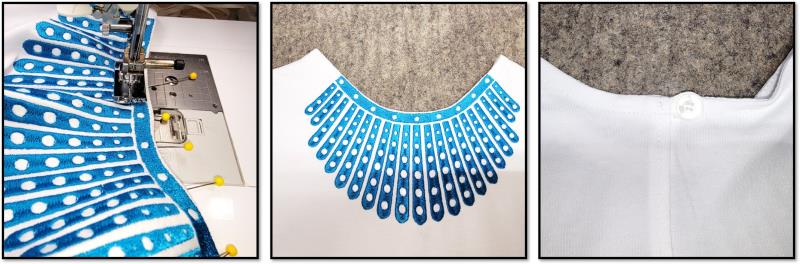
Step 16:
Cut out the neckline on the new cutting line. The photo on the left shows the new top front and the original pattern with the new neckline draft. Save this pattern for future use! Construct the garment according to the pattern instructions—insert the zipper at the center back if this was the chosen closure method, or create a slit in the back, and bind it. 12” of 5/8” ribbon was used in the project.
(Click Image to Enlarge)
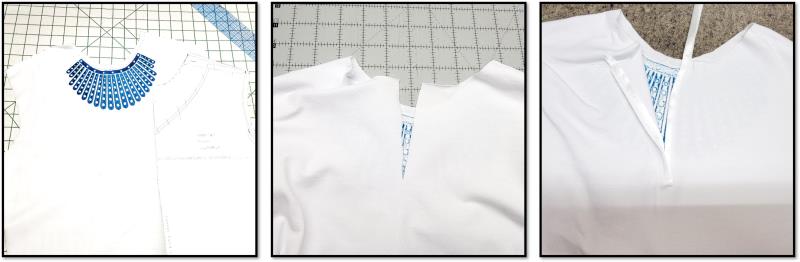
Step 17:
Cut a 2” piece of fabric as long as the neckline plus 3”. Place right sides together at the neck edge; clip the curves. Stitch the binding onto the neckline. The stitching should be about 1/8” beyond the top edge of the embroidery stitching to allow for the turn of the cloth. Press the seam allowance toward the binding and understitch. Trim the seam allowance, turn, press, and pin the binding in place. There should just be a hint of fabric showing beyond the embroidered neck edge. Trim and turn under the excess binding at the center back.
(Click Image to Enlarge)
Step 18:
Topstitch the neck edge through all layers. The topstitching should fall within the fabric area as shown in the left photo. Add a button and loop at the center back neck edge. Trim the excess binding around the inside edge.
(Click Image to Enlarge)
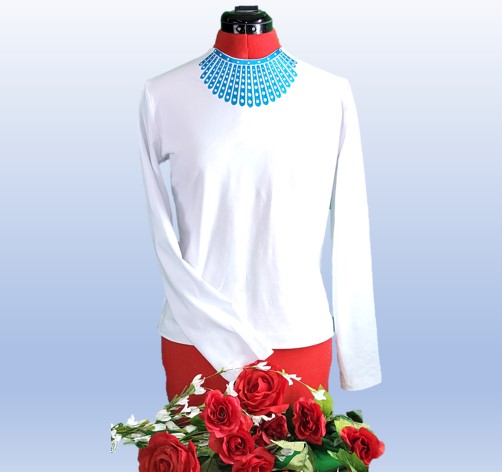
Step 19:
You are sure to enjoy this beautiful knit top. Leave the embroidery as is for daytime wear. Make more and add pearls, sequins, hot fix crystal, or beads inside all or a few of the holes as you wish for top for a party or evening out.
Ramona Baird has been in the embroidery industry for over 23 years. She and her husband owned a commercial and retail embroidery store in Arizona for many years. She is an experienced digitizer having been mentored by award-winners Pat Williams and Lindee Goodall. Ramona is a contributor to “Creative Machine Embroidery” magazine having 5 covers to her credit. Ramona has worked for Wilcom America and served many years as Education Director for the American Sewing Guild. With a degree in fashion design, she is able to design and execute patterns which Pat Williams says are “out of the box” in creativity and application. Ramona likes to challenge the boundaries of embroidery and bring new and exciting designs, ideas, and projects to EmbroideryDesigns.com. She wants embroiderers of all levels to increase their skills and enjoyment in using their embroidery machine for gift-making and personal pleasure.