This is a collaboration between ITH Boutique and Laura Workshop. The copyrights to the digitizing and some images belongs to Laura
Step 1:
Gather Materials
(Click Image to Enlarge)
Step 2:
Hoop tear away stabilizer. Run the first stitch for fabric placement.
(Click Image to Enlarge)
Step 3:
Lay one piece of fabric right side up (RSU) making sure the fabric covers all of the placement stitch by at least 1⁄4”. Run the placement stitch again. This will tack the fabric down and allow you to place the ribbon. Fold the ribbon in half, place the fold down toward the bottom of the design, staying 1⁄4” inside the stitch line. Tape the ribbon in place.
(Click Image to Enlarge)
Step 4:
Lay the second piece of fabric right side down (RSD) making sure the fabric covers all of the placement stitch by at least 1⁄4”. Use tape to secure in place.
(Click Image to Enlarge)
Step 5:
Run the second stitch to secure all layers together. Remove project from the hoop, remove tear away stabilizer, trim 1⁄4” outside the stitch lines. Make small clips in the tight corners, up to the stitch line, being careful to not clip into the stitches. This will keep those tight corners from puckering.
(Click Image to Enlarge)
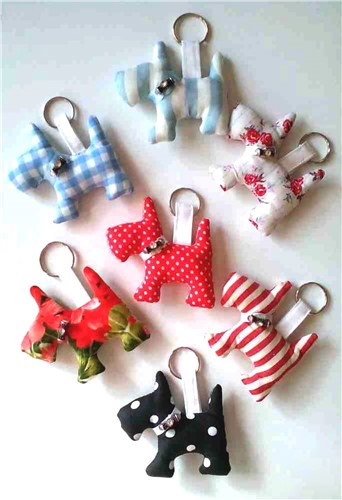
Step 6:
Turn the project, remove the tape from ribbon, add stuffing, hand stitch the opening closed, add embellishments!
(Click Image to Enlarge)
Step 7:
.
(Click Image to Enlarge)
Step 8:
.
(Click Image to Enlarge)
Step 9:
.
(Click Image to Enlarge)
Step 10:
.
(Click Image to Enlarge)
Step 11:
2.5” x 5” strip of fabric double folded and edges sewn. Press in half lengthwise, fold the outer edges to the center crease and press. Sew down each long edge. Use instead of ribbon.