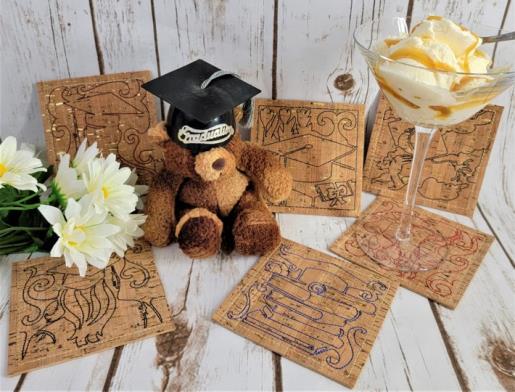
The actual stitch time for these coasters is about seven minutes each. Use school colors for the design portion, and embroidery thread to match the cork for the outline stitches. It is best to use a knit/fabric back cork from the upholstery section of the fabric store—it helps prevent the stitches from perforating the cork. Read through the instructions thoroughly before beginning and assemble all the materials needed to complete the project. There are six designs in the set—for greater savings, purchase the pack so you’ll have all six designs when you need them for future graduation gifts and celebrations.
(Click Image to Enlarge)
Step 2:
Load the chosen design on the machine and set the stops and thread colors if required on the machine. Hoop a layer of poly mesh stabilizer. Place the hoop on the machine and stitch Color 1, the placement line. Center one of the cork fabric pieces, right side up, over the placement line.
(Click Image to Enlarge)
Step 3:
Stitch Color 2, to tack down the cork fabric. Stitch Color 3, the design. Remove the fabric from the hoop. Turn the hoop over and center the second piece of cork fabric, right side up, over the back side of the design. There are two ways to hold down the cork: one is to use temporary spray adhesive
(Click Image to Enlarge)
Step 4:
the other is to use Scotch tape around all the edges, keeping it outside of the stitching line. Place the hoop back on the fabric and stitch the last color to secure the two pieces of cork fabric together.
(Click Image to Enlarge)
Step 5:
After stitching, carefully remove the piece from the hoop and remove the tape if it was used. Trim through all layers ¼” from the outer stitching line.
(Click Image to Enlarge)
Step 6:
Repeat the steps for the remaining coasters. The last stitching can be the cork color, the same color as the design, or even a different color all together.
(Click Image to Enlarge)
Step 7:
Thank you for purchasing the Graduation Coaster Designs. You’ll love how quickly they stitch out and your guests will appreciate the coaster for their drinks at the party whether a kindergarten, high school, trade school, or college graduation.
Ramona Baird has been in the embroidery industry for over 23 years. She and her husband owned a commercial and retail embroidery store in Arizona for many years. She is an experienced digitizer having been mentored by award-winners Pat Williams and Lindee Goodall. Ramona is a contributor to “Creative Machine Embroidery” magazine having 5 covers to her credit. Ramona has worked for Wilcom America and served many years as Education Director for the American Sewing Guild. With a degree in fashion design, she is able to design and execute patterns which Pat Williams says are “out of the box” in creativity and application. Ramona likes to challenge the boundaries of embroidery and bring new and exciting designs, ideas, and projects to EmbroideryDesigns.com. She wants embroiderers of all levels to increase their skills and enjoyment in using their embroidery machine for gift-making and personal pleasure.