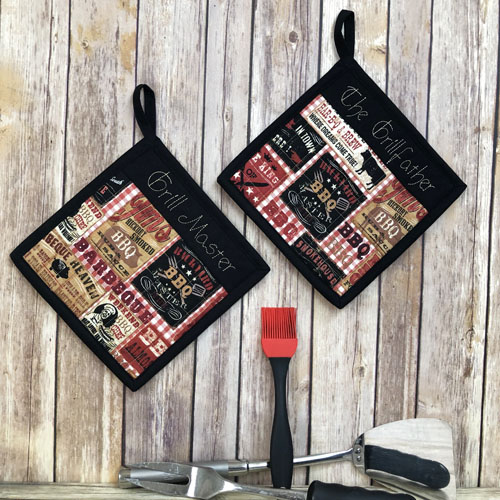
Easy to make and a great gift for Father’s Day or for all your summertime grilling adventures. The ITH BBQ Potholders are quilted in the hoop with binding added at your sewing machine as this results in a true 8” x 8” potholder.
This ITH BBQ Potholder has binding and a loop added at your sewing machine. Adding binding allows the potholder to measure a full 8” x8” when complete. Binding a potholder is different than binding a quilt block. Instructions are given in the project for how to apply that binding. There has just been a new project posted Binding Pot Holders with a Hanging Loop in which the binding is attached with a contrasting thread if that will give you additional assistance with performing those steps.
Step 1:
Cut a piece of cotton batting to fit your hoop. This batting is used as the stabilizer for this project. Cut a 9 ½” square of Insulbrite®; a 9 ½” square of your back fabric; a 9 ½” x 7” rectangle of the main fabric for the front; a 3” x 9 ½”rectangle of contrasting fabric; a 2 ½” x the width of the fabric strip for binding. Tautly hoop the cotton batting in your embroidery hoop.
Step 2:
Choose the color thread you want the lettering to be stitched with. You can use the same color thread throughout the design. Run the 1st color stop (CS) as a placement line for your fabrics.
(Click Image to Enlarge)
Step 3:
Smooth the main body fabric over the placement lines so that the top edge of the 7” depth of fabric just covers the placement line in the inside of the block. The 9 ½” width of the fabric should extend at least ½” on the sides and bottom of the block.
(Click Image to Enlarge)
Step 4:
Run CS 2 to tack down the main body fabric.
(Click Image to Enlarge)
Step 5:
Run CS 3 to quilt the main body.
(Click Image to Enlarge)
Step 6:
Lay the contract fabric over the main body fabric aligning the right-hand side edge with main body. The sides of the contrast fabric should exceed the placement lines by at least ½”.
(Click Image to Enlarge)
Step 7:
(Click Image to Enlarge)
Run CS 4 to seam the contrast fabric.
Step 8:
(Click Image to Enlarge)
Open the contrast fabric out. Finger press the seam. Tape the contrast strip to the hoop to keep it taut. Also add tape to the outside of the project in the seam allowances to prevent the embroidery foot from getting caught in the fold. Run CS 5 to embroider the lettering on the contrast fabric.
Step 9:
Remove the hoop from the machine. Do not unhoop. Lay the hoop face down on a flat surface and align the Insulbrite® over the placement lines on the back of the hoop. The Insulbrite® should exceed the placement lines by ½” on all sides.
(Click Image to Enlarge)
Step 10:
Align the 91/2” x 9 ½” fabric over the Insulbrite®. Due to the thickness of these back pieces, tape them down across the edge of the hoop that will go back into the machine and down both sides.
(Click Image to Enlarge)
Step 11:
Return the hoop to the machine and run the final seam to tack all layers together.
(Click Image to Enlarge)
Step 12:
Lay the ¼” mark of a see-through ruler along the tack down stitches and trim all sides of the potholder to a ½” seam allowance.
Step 13:
(Click Image to Enlarge)
Take your 2 ½” x width of fabric binding strip. Spray it with spray starch; fold it in half lengthwise and press. Figure out which point of the potholder where you want the loop to be. Turn the potholder face down and align the edge of the binding strip with the top of the potholder. Stitching ¼” from the side of the potholder stitch from the beginning edge to ¼” from the bottom, needle down, and pivot to sew right off the corner of the potholder. Cut the thread.
Step 14:
Fold the binding up, away from the potholder and then back down on itself to miter the corner in the usual manner. Stitch from the beginning of the new corner down to ¼” from the bottom corner.
Step 15:
(Click Image to Enlarge)
Repeat for the third corner.
Step 16:
(Click Image to Enlarge)
Before you stitch binding to the 4th side of the potholder, turn the potholder right side up. Fold the binding that is stitched to the first side and pin it in place as though you were ready to complete the binding. Pin it close to the edge and place a second pin below it. This is done to prevent this edge of the binding from rolling up while the last side and the loop are being stitched.
Step 17:
(Click Image to Enlarge)
Turn the potholder face down again, miter the corner as before and stitch down the last side, but this time stitch the binding down about 1” from that last corner. Stitch slowly as you stitch this last side and are coming over the folded edge you pinned so that you do not roll up that folded edge.
Step 18:
Cut off the excess binding strip 6” from the edge of the potholder.
(Click Image to Enlarge)
Step 19:
(Click Image to Enlarge)
Open out the end of the binding strip and press in about ¼” of the raw edges.
Step 20:
(Click Image to Enlarge)
Fold in and press ¼” along the 6” raw edges of the binding strip. Then fold the folded edge of the loop over even with the new folded edge and press.
Step 21:
(Click Image to Enlarge)
From the back of the potholder press the long edges of the binding out.
Step 22:
Fold and clip the binding over the potholder mitering the corners.
(Click Image to Enlarge)
Step 23:
(Click Image to Enlarge)
As the folded fabric at the end of the loop is thick, start sewing about halfway down the loop and edge stitch the binding into place.
Step 24:
(Click Image to Enlarge)
When you get to the end of the binding stitch right off the edge of the potholder.
Step 25:
(Click Image to Enlarge)
To finish off the loop, stitch from where you had started your previous stitching on the loop and stitch down off the end of the loop. Backstitch at the beginning and ending of your stitching.
Step 26:
(Click Image to Enlarge)
Fold the loop to the back of the potholder at a 45° angle to the corner of the potholder. Stitch over the loop, backstitch over the loop and then stitch forward over the loop again.
Step 27:
Congratulations your ITH BBQ Potholder is complete. Make them as great Father’s Day and BBQ hostess gifts and do not forget to make a set for yourself.
Award winning Digitizer, Embroidery Educator, Author and a Consultant to the Industry, Pat Williams has 30 years of experience in the embroidery industry. Pat has won multiple awards for her digitizing expertise including the 2007 Impressions Awards Grand Championship, Best of Show as well as the 1st and 2nd Place Awards. Pat’s love of digitizing has afforded her the opportunity to write numerous articles for Impressions magazine in the United States and Images Magazine in Europe. In 2001 Pat was named “Embroidery Educator of the Year.” For many years Pat taught digitizing seminars at the ISS Shows in Long Beach, CA and for Compucon software. She now resides in Tucson, AZ.