Read through the instructions thoroughly before beginning and assemble all the materials needed to complete
(Click Image to Enlarge)
Step 2:
Load the chosen design on the machine and place the hoop on the machine. Stitch Color 1, the placement line. Place the batting so it is just inside the placement line and then place the white Kona cotton on top. Place the hoop on the machine and stitch Color 2 to tack all the layers together.
(Click Image to Enlarge)
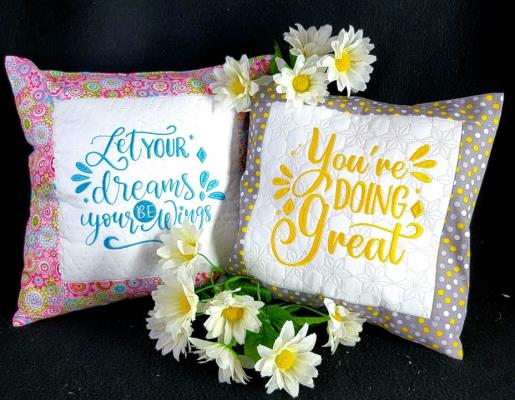
Step 3:
Color 3 stitches the background. Color 4 stitches the text.
(Click Image to Enlarge)
Step 4:
Remove the piece from the hoop. Repeat the same steps for sewing all the pillow front designs.
(Click Image to Enlarge)
Step 5:
Trim to ¼” seam allowances all around. Cut the border strips. Beginning with the right side, place one strip, right side together with the pillow front. Turn the piece over and use the outer stitching embroidered line as the stitching guide for seaming. Stitch just to the inside of the line so that when the border piece is turned and pressed, the embroidered line does not show.
(Click Image to Enlarge)
Step 6:
Trim the ends, flip the border right side up and press. Next, place a border strip, right sides together with the bottom of the pillow front; pin. Stitch as before, trim, flip, and press. Next repeat for the left side of the pillow front border.
(Click Image to Enlarge)
Step 7:
Attach the last border strip to the top of the pillow front.
(Click Image to Enlarge)
Step 8:
On the pillow back pieces, mark 1” from the inside edge of both pieces. Press along the line, and then fold over and press again; topstitch. Repeat for the other pillow back piece.
(Click Image to Enlarge)
Step 9:
Lay the back pieces right side up and overlap them so that the dimensions will match the pillow front. Pin the overlapped edges at the top and bottom and baste them in place. With right sides together, pin the pillow front to the pillow back. Sew around all edges using a ¼” seam.
(Click Image to Enlarge)
Step 10:
Turn the pillow cover right side out through the back opening; press the edges well.
(Click Image to Enlarge)
Step 11:
Stuff the pillow into the cover, forming the corners. I found with this particular pillow I had to open up one of the edges and take a bit of poly-fil out because I did not like how firm the pillow was. All the pillow forms are different, so use your best judgement on how firm the pillow should be.
(Click Image to Enlarge)
Step 12:
Thank you for purchasing the Positivity Pillow designs! You are to be congratulated on creating beautiful pillows to keep or to gift—students would especially appreciate these as gifts!
Ramona Baird has been in the embroidery industry for over 23 years. She and her husband owned a commercial and retail embroidery store in Arizona for many years. She is an experienced digitizer having been mentored by award-winners Pat Williams and Lindee Goodall. Ramona is a contributor to “Creative Machine Embroidery” magazine having 5 covers to her credit. Ramona has worked for Wilcom America and served many years as Education Director for the American Sewing Guild. With a degree in fashion design, she is able to design and execute patterns which Pat Williams says are “out of the box” in creativity and application. Ramona likes to challenge the boundaries of embroidery and bring new and exciting designs, ideas, and projects to EmbroideryDesigns.com. She wants embroiderers of all levels to increase their skills and enjoyment in using their embroidery machine for gift-making and personal pleasure.