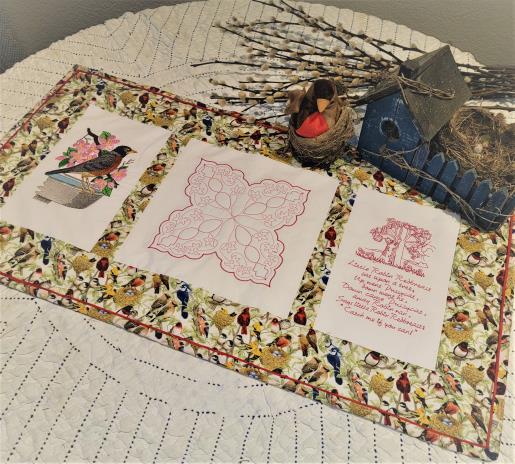
It was always a challenge between Mom and I to see who see the first Robin of spring. Happy memories are memorialized in this old-fashioned tablerunner.
Read through the instructions thoroughly before beginning and assemble all the materials needed to complete the project. Print the templates, press the fabrics, and the project is ready to start. The stitched designs will be laid out as shown. All seams are sewn ¼”.
(Click Image to Enlarge)
Step 2:
Load the poem design on the machine, rotating if necessary. Hoop a layer of poly mesh stabilizer with a piece of white Kona cotton.
(Click Image to Enlarge)
Step 3:
Stitch the design, clipping any jump stitches. Remove the design from the hoop and set aside.
(Click Image to Enlarge)
Step 4:
Load the Robin design on the machine. Hoop a layer of white Kona cotton with a piece of tearaway stabilizer. Stitch the design following the color sequence.
(Click Image to Enlarge)
Step 5:
Load the quilting design on the machine. Hoop one layer of tearaway stabilizer with a piece of poly mesh stabilizer, and a piece of Battilizer between. Stitch the design.
(Click Image to Enlarge)
Step 6:
To make it easier to square everything up, before removing the designs from the hoop, make ticks at the center marks of the X and Y axis.
(Click Image to Enlarge)
Step 7:
Square up the quilting design to 11” square. Trim away the excess stabilizer.
(Click Image to Enlarge)
Step 8:
Trim away the excess Battilizer. Cut the two sashing from the bird fabric.
(Click Image to Enlarge)
Step 9:
Sew the sashing strips to the embroidered pieces as shown. Press the seams toward the sashing.
(Click Image to Enlarge)
Step 10:
Cut the left and right border strips. Center and sew on the strips to the left and right sides of the embroidered blocks. When sewing on the borders, sew only to within ¼” of the corner and backstitch; this will allow mitering of the border corners.
(Click Image to Enlarge)
Step 11:
Cut the two top and bottom border strips. Center and sew the borders to the top and bottom. Miter all four corners.
(Click Image to Enlarge)
Step 12:
Trim the four sides to 3 ½” wide.
(Click Image to Enlarge)
Step 13:
Cut a piece of Battilizer and backing fabric larger than the top. Sandwich the top, Battilizer, and backing.
(Click Image to Enlarge)
Step 14:
Pin and then baste around the top edges to hold all the pieces together. Trim to square up the tablerunner.
(Click Image to Enlarge)
Step 15:
Cut the binding pieces, sewing strips together to make the length needed for each fabric. Sew along one small edge, press the seam toward the colored fabric, and then bring the remaining long cut edges together and baste.
(Click Image to Enlarge)
Step 16:
Stitch the binding with the bird side to the wrong side of the table runner, mitering the corners. Flip the binding to the right side.
(Click Image to Enlarge)
Step 17:
Stitch the binding down, mitering the corners.
(Click Image to Enlarge)
Step 18:
Congratulations! You’ve finished a delightful table runner just in time for spring.
Ramona Baird has been in the embroidery industry for over 23 years. She and her husband owned a commercial and retail embroidery store in Arizona for many years. She is an experienced digitizer having been mentored by award-winners Pat Williams and Lindee Goodall. Ramona is a contributor to “Creative Machine Embroidery” magazine having 5 covers to her credit. Ramona has worked for Wilcom America and served many years as Education Director for the American Sewing Guild. With a degree in fashion design, she is able to design and execute patterns which Pat Williams says are “out of the box” in creativity and application. Ramona likes to challenge the boundaries of embroidery and bring new and exciting designs, ideas, and projects to EmbroideryDesigns.com. She wants embroiderers of all levels to increase their skills and enjoyment in using their embroidery machine for gift-making and personal pleasure.