Read through the instructions thoroughly before beginning and assemble all the materials needed to complete the project. Print out the design templates on paper and cut out. Cut and press the linen fabrics with spray starch. Fold the linen lengthwise and lightly crease.
(Click Image to Enlarge)
Step 2:
Place the center mark of the paper template 7.5” up from the bottom of the cut linen. Open up the linen and pin the template in place, aligning the vertical crosshair with the fold line.
(Click Image to Enlarge)
Step 3:
Load the candy dish design on the machine, rotating to fit the hoop if necessary. Center and hoop the fabric with a layer of tearaway stabilizer.
(Click Image to Enlarge)
Step 4:
Place the hoop on the machine and stitch the design following the color sequence.
(Click Image to Enlarge)
Step 5:
Remove the fabric from the hoop and carefully remove the excess stabilizer. Next will be to sew on the green linen. In a large frame, hoop a layer of fibrous water soluble stabilizer.
(Click Image to Enlarge)
Step 6:
Align the bottom edge of the linen on the cutting board. Using a ruler, mark 5” up from the cut edge. Cut the contrast-colored linen 16” wide by 6“ high.
(Click Image to Enlarge)
Step 7:
The linen will be placed over the lower edge and embroidered on with the scallop stitch. Load the Scallop design on the machine.
(Click Image to Enlarge)
Step 8:
Place the hoop on the machine. Stitch color 1, the placement line.
(Click Image to Enlarge)
Step 9:
Align the hoop to the cutting board, with the placement line along one of the grids, and the center of the hoop marks vertically along one line as shown. The marked line drawn in the last step will be centered and aligned to the placement line stitched on the stabilizer. Place a pin ad the center mark.
(Click Image to Enlarge)
Step 10:
Carefully align the marked line along the placement line, placing pins through the cutting board.
(Click Image to Enlarge)
Step 11:
If you like you can tape or use adhesive spray instead of pins. Now fold the contrast linen in half and make a light crease vertically. Align the top edge about ½” above the placement line mark. Smooth and pin the contrast fabric in place. Be sure to keep the pins well out of the area the scallop is to be stitched.
(Click Image to Enlarge)
Step 12:
Slow the machine down and stitch the tack down line, which is the scallop shape. Remove the hoop from the machine and lay it on a flat surface. Using sharp scissors, trim the top of the contrast fabric close to the stitching line.
(Click Image to Enlarge)
Step 13:
Place the hoop back on the machine and stitch the satin stitch to finish the top. Be sure the pins are well away from the stitching area!
(Click Image to Enlarge)
Step 14:
Remove the hoop from the machine and remove the fabric. Cut the excess stabilizer from both sides of the satin stitch.
(Click Image to Enlarge)
Step 15:
Trim the contrast fabric to the white linen edges and pin the two layers together.
(Click Image to Enlarge)
Step 16:
At the sewing machine and using a ¼” seam, baste the linen layers together and then continue stitching all the way around the white linen; this gives a nice edge for turning under the edges. Double fold and press all the edges.
(Click Image to Enlarge)
Step 17:
Stitch all the edges down. Give the towel a final pressing and fold.
(Click Image to Enlarge)
Step 18:
Repeat all the steps for the Tea Pot design and band.
(Click Image to Enlarge)
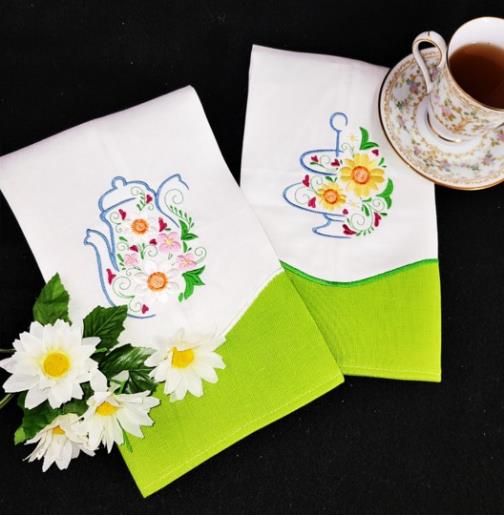
Step 19:
Thank you for purchasing these Spring Tea Towel designs. Get different looks to coordinate with table linens by changing the linen color for the band and satin stitching. The satin stitching can match the band, match the towel, or choose one of the other colors in the design.
Ramona Baird has been in the embroidery industry for over 23 years. She and her husband owned a commercial and retail embroidery store in Arizona for many years. She is an experienced digitizer having been mentored by award-winners Pat Williams and Lindee Goodall. Ramona is a contributor to “Creative Machine Embroidery” magazine having 5 covers to her credit. Ramona has worked for Wilcom America and served many years as Education Director for the American Sewing Guild. With a degree in fashion design, she is able to design and execute patterns which Pat Williams says are “out of the box” in creativity and application. Ramona likes to challenge the boundaries of embroidery and bring new and exciting designs, ideas, and projects to EmbroideryDesigns.com. She wants embroiderers of all levels to increase their skills and enjoyment in using their embroidery machine for gift-making and personal pleasure.