Read through the instructions thoroughly before beginning and assemble all the materials needed to complete the project. Choose the fabrics for the chosen pattern.
(Click Image to Enlarge)
Step 2:
Print out templates of the patterns.
(Click Image to Enlarge)
Step 3:
Locate the skirt pattern for the dress. Cut out the embroidery templates. Measure the skirt width and determine the spacing and placement for the embroidery designs.
(Click Image to Enlarge)
Step 4:
If you have one, a Simplex spacer makes it easy to space the designs evenly and mark the placement on the pattern piece.
(Click Image to Enlarge)
Step 5:
Cut the piece of linen the length of the skirt width plus extra for hooping.
(Click Image to Enlarge)
Step 6:
Fold and crease a line along the center front and the length of the linen. Place the fold of the skirt front along the center line on the linen. Place the basket design at the center. Align the line on the pattern to the fold line the length of the linen. Place pins at the spacing/placement marks.
(Click Image to Enlarge)
Step 7:
Transfer the pins to the linen along the creased line and then center and place the embroidery templates at the pins.
(Click Image to Enlarge)
Step 8:
Depending upon the hoop sizes you have, you can hoop each design individually, or gang them up in the larger hoop. If using the larger hoops, just be sure the linen fabric is cut large enough to be able to hoop the entire piece of fabric for stability while stitching.
(Click Image to Enlarge)
Step 9:
Beginning with the center basket design, load the design on the machine. If there is a camera on the machine, this is a good time to use it to aid in aligning the design to the fabric.
(Click Image to Enlarge)
Step 10:
Remove the paper template and stitch the design following the color sequence. Repeat aligning and stitching the remaining designs in the hoop.
(Click Image to Enlarge)
Step 11:
Rehoop as many times as needed to complete the left side of the skirt designs. After the left side is done, lay the linen down and then flip and align the skirt pattern piece to the basket/fold/crease lines. Place the line of the skirt along the long crease line and place the pins at the marks like before.
(Click Image to Enlarge)
Step 12:
Place the pattern templates at the pin marks like before.
(Click Image to Enlarge)
Step 13:
Stitch the designs from the center out. There are a few different ways the skirt can be trimmed with the design. An underskirt can be made with the trim piece at the bottom, and the overskirt of the printed fabric hemmed to fall over the underskirt.
(Click Image to Enlarge)
Step 14:
The embroidered fabric can be cut down, edges folded under, and stitched over the top of the skirt at the lower portion of the skirt or along the hemline.
(Click Image to Enlarge)
Step 15:
For this project, the skirt panel was cut to fit as an insert into the skirt fabric for the dress.
(Click Image to Enlarge)
Step 16:
To do this, measure and cut the fabric the width needed, plus seam allowances. For this pattern, that was 2.5” wide.
(Click Image to Enlarge)
Step 17:
After the length is cut, then cut the pattern apart. Draw a line above and below the line on the pattern, 1” above, and 1” below—this leaves the ¼” seam allowances in the pattern for sewing the embroidered panel to the skirt pieces. Cut along the lines.
(Click Image to Enlarge)
Step 18:
This is how it will look. If there is a pattern to the fabric, lay the pattern on the fabric to center any designs, like this plaid.
(Click Image to Enlarge)
Step 19:
I find it easiest to cut one side, then fold that piece over and match the print, and cut the other side.
(Click Image to Enlarge)
Step 20:
The top skirt pattern piece is aligned at center fronts, right sides together, and pinned.
(Click Image to Enlarge)
Step 21:
Sew the pieces together using a ¼” seam allowance. Now repeat cutting (matching center front designs if there are any in the fabric) the skirt bottom piece. For this project, the piece was cut twice the depth, to include a fold at the bottom instead of having to hem the dress.
(Click Image to Enlarge)
Step 22:
Press and fold the lower piece in half lengthwise. Find the center of the embroidered panel.
(Click Image to Enlarge)
Step 23:
Align the center front of the panel to the center front of the folded lower piece. With right sides together, pin the cut edges together. Stitch using a ¼” seam.
(Click Image to Enlarge)
Step 24:
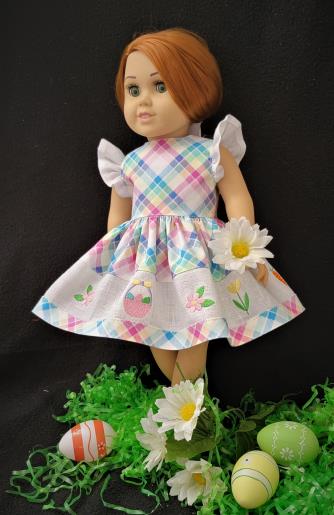
Press the seams away from the embroidered panel and edge stitch in place. The skirt is now ready to gather and stitch to the bodice. Sew the dress following the instructions in the pattern, finishing seam allowances as you’d like. This is such a beautiful way to add detail to a doll’s dress. The designs are sized for an 18” doll.
(Click Image to Enlarge)
Step 25:
(Click Image to Enlarge)
Thank you for purchasing the designs for this project. I think you’ll have a good time designing a dress for an 18” doll.
Ramona Baird has been in the embroidery industry for over 23 years. She and her husband owned a commercial and retail embroidery store in Arizona for many years. She is an experienced digitizer having been mentored by award-winners Pat Williams and Lindee Goodall. Ramona is a contributor to “Creative Machine Embroidery” magazine having 5 covers to her credit. Ramona has worked for Wilcom America and served many years as Education Director for the American Sewing Guild. With a degree in fashion design, she is able to design and execute patterns which Pat Williams says are “out of the box” in creativity and application. Ramona likes to challenge the boundaries of embroidery and bring new and exciting designs, ideas, and projects to EmbroideryDesigns.com. She wants embroiderers of all levels to increase their skills and enjoyment in using their embroidery machine for gift-making and personal pleasure.