This is a collaboration between ITH Boutique and Kate Gallery. The copyrights to the digitizing and some images belongs to Kate Gallery
Step 1:
Put the tear-off stabilizer in the hoop.
(Click Image to Enlarge)
Step 2:
Put the hoop in the machine and embroider the first color. This line shows the place of embroidery.
(Click Image to Enlarge)
Step 3:
Put 1 piece of felt over the basting stitch, leaving at least 0.2 inches of allowance. Pin it around the perimeter with pins or use temporary adhesive spray. Be careful! The needle must not hit the pins!
(Click Image to Enlarge)
Step 4:
Now repeat color 1 again.
(Click Image to Enlarge)
Step 5:
(Click Image to Enlarge)
Embroider color 2 - ear and nose.
Step 6:
(Click Image to Enlarge)
Embroider color 3 - teeth.
Step 7:
(Click Image to Enlarge)
Embroider color 4 - all parts black color.
Step 8:
Remove the hoop from the machine. Turn the hoop to the back. Put the second piece of felt over the basting stitch, leaving at least 0.2 inches of allowance. Pin it around the perimeter with pins (on the front side) or use temporary adhesive spray.
Now is the time to change the bobbin thread to the color you will be embroidering the outline of the bunny with.
(Click Image to Enlarge)
Step 9:
Embroider color 5 - outline of the bunny.
(Click Image to Enlarge)
Step 10:
Now change the color of the bottom thread again. Set the color of the paws (pink).
(Click Image to Enlarge)
Step 11:
Embroider color 6 - paws. And color 7 - line around the bunny to help you cut the figurine neatly. If you are sure you can cut without it, you don't need to embroider it.
Front:
(Click Image to Enlarge)
Step 12:
Back:
(Click Image to Enlarge)
Step 13:
(Click Image to Enlarge)
Next, carefully cut off all excess threads with scissors.
Step 14:
(Click Image to Enlarge)
.
Step 15:
(Click Image to Enlarge)
Remove the hoop from the machine and take out the embroidery from the hoop. Remove the excess stabilizer.
Step 16:
(Click Image to Enlarge)
.
Step 17:
(Click Image to Enlarge)
Take scissors and cut out the bunny on the basting line. Remove all remaining threads.
Step 18:
Front:
(Click Image to Enlarge)
Step 19:
Back:
(Click Image to Enlarge)
Step 20:
Then fold the figure as shown in the picture. Sew neatly where the pins are sticking out.
(Click Image to Enlarge)
Step 21:
(Click Image to Enlarge)
Now you need to give the desired shape to the bunny.
Just press down with your fingers where the pins are sticking out.
Step 22:
Check it out. Correct if necessary.
(Click Image to Enlarge)
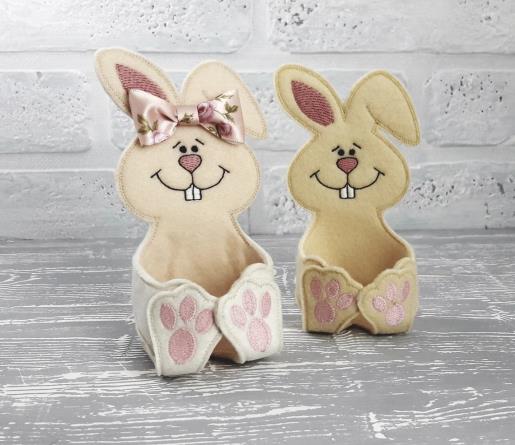
Step 23:
That's all! Now you can decorate your home for Easter. Or to make such a small pleasant gift to your family and friends!
(Click Image to Enlarge)
Step 24:
Project Idea, Instructions and photo credit: Kate Embroidery