An elegant table runner for Easter or any time of year. The designs are offered as single designs or grouped together to accommodate various hoop sizes.
The table runner used in this sample was purchased through Amazon. It is the Grelucgo Solid Natural Color Lined Fringe Table Runner. It is 14” wide and comes any many lengths to fit your table.
Step 2:
Tautly hoop one layer of fibrous water-soluble stabilizer in your hoop. With the Frixion® pen mark across the center line of the hoop. The hoop used to sew the sample is an 8” x 14” hoop.
(Click Image to Enlarge)
Step 3:
Use sample sew outs or print the designs and cut out the eggs to determine how far you want the centers of the designs above the fringe of the table runner. I decided 3” above the fringe was the placement desired for these eggs. Fold your table in half lengthwise and slightly press and crease for the center of the designs. Mark a line with the Frixion® at 3” above the fringe.
(Click Image to Enlarge)
Step 4:
If working with 4” hoops mark the center of the table runner and make vertical marks 3 7/8th “ each side of the center mark.
(Click Image to Enlarge)
Step 5:
For the larger hoops spray the back of the table runner embroidery area with adhesive. Lay the table runner over the hoop aligning the horizonal mark drawn on the table runner with the horizontal mark drawn on the stabilizer. Align the center crease at the same time with the center marks on the hoop. Use long quilter’s straight pins around the perimeter of the table runner to assist the table runner in laying tautly against the stabilizer.
(Click Image to Enlarge)
Step 6:
(Click Image to Enlarge)
For the 4” hoop you will be able to hoop the table runner with the stabilizer so you will not need to use the spray adhesive, just line up the marks on the table runner with the drawn horizontal line with the marks on the sides of the hoop.
Step 7:
(Click Image to Enlarge)
To have only the fringed ends of the table runner going towards the back of the machine, turn the designs upside down at your machine.
Step 8:
Stitch the one-color designs.
(Click Image to Enlarge)
Step 9:
Trim the stabilizer around each egg individually. The remainder of the water-soluble stabilizer will disappear the first time the table runner is washed.
(Click Image to Enlarge)
Step 10:
Press the table runner to remove the Frixion® pen markings.
(Click Image to Enlarge)
Step 11:
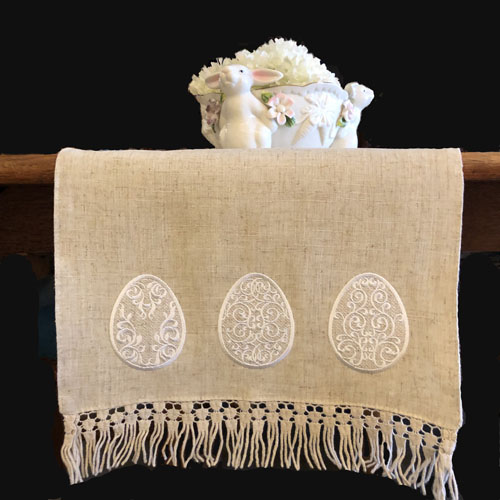
Congratulations your Scrolled Easter Eggs Table Runner is complete. It will make a great hostess gift or addition to your own Easter décor.
Award winning Digitizer, Embroidery Educator, Author and a Consultant to the Industry, Pat Williams has 30 years of experience in the embroidery industry. Pat has won multiple awards for her digitizing expertise including the 2007 Impressions Awards Grand Championship, Best of Show as well as the 1st and 2nd Place Awards. Pat’s love of digitizing has afforded her the opportunity to write numerous articles for Impressions magazine in the United States and Images Magazine in Europe. In 2001 Pat was named “Embroidery Educator of the Year.” For many years Pat taught digitizing seminars at the ISS Shows in Long Beach, CA and for Compucon software. She now resides in Tucson, AZ.