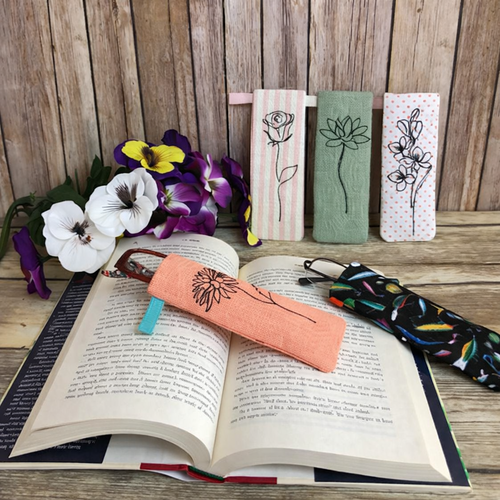
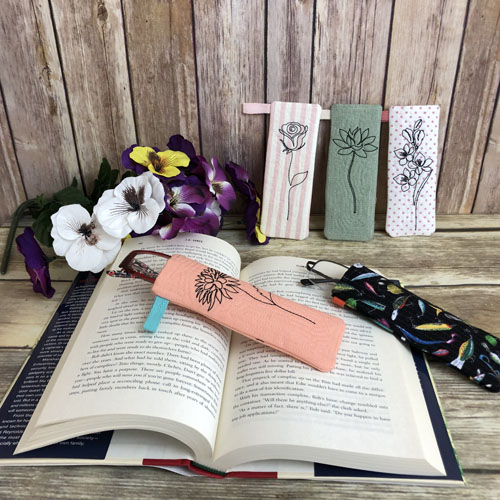
Create a slim ITH floral reader eyeglass case completely in the hoop. This quick embroidery project is perfect for protecting reading glasses, gifting, or selling at craft fairs. Ideal for scrap fabric and machine embroidery lovers.
Tautly hoop poly-mesh stabilizer in your hoop. Cut:
2 4” x 8” rectangles of cotton fabric
1 4” x 16” rectangle of cotton fabric
2 4” x 8” rectangles of batting
1 4” strip of 3/8” twill
Step 2:
Stitch the first color stop (CS) as a placement line for the eyeglass case.
(Click Image to Enlarge)
Step 3:
Spray adhesive on a rectangle of batting and position over the placement line so that the batting exceeds the placement line by ½” on all sides.
(Click Image to Enlarge)
Step 4:
Spray adhesive on the back side of a fabric rectangle and align over the batting.
(Click Image to Enlarge)
Step 5:
CS 2 will tack down and quilt the eyeglass case front. Use a thread color of your choice.
(Click Image to Enlarge)
Step 6:
Run CS 3 in black to stitch the floral. Skip this step for RDEGC05 which does not have a floral design.
(Click Image to Enlarge)
Step 7:
The next color-stop stitches two placement lines for aligning the back of the eyeglass case. Stitch this in a contrasting color so that will be easy for you to see.
(Click Image to Enlarge)
Step 8:
Fold the 3/8” twill tape in half. Tape it to the project in your desired location and outside of the quilting stitches. The loop of the tape faces the inside of the eyeglass case. Position the twill tape about 1/8th to ¼” down from the back placement stitches.
(Click Image to Enlarge)
Step 9:
Lay the 16” fabric strip face down. Spray adhesive on the remaining batting and align it with one end of the 16” strip. Spray the batting exposed side with adhesive and fold the other end of the 16” strip over the batting.
(Click Image to Enlarge)
Step 10:
Lay the folded edge of the back fabric just below the two placement lines (blue arrows.) Tape down both sides of the fabrics.
(Click Image to Enlarge)
Step 11:
Run the next to last CS to tack down the case back. Remove all tape from the project.
(Click Image to Enlarge)
Step 12:
Place the remaining 8” fabric over the project face down aligning the fabric at the top of the hoop. Tape down on all sides.
(Click Image to Enlarge)
Step 13:
Run the final color-stop to stitch the lining to the project.
(Click Image to Enlarge)
Step 14:
Remove the project from the hoop. Make angled cuts from the edge to the end of the stitching lines that are used to leave an opening for turning the project.
(Click Image to Enlarge)
Step 15:
Trim a ¼” seam allowance around the project, clipping straight across the corners and leaving the excess fabric across the opening.
(Click Image to Enlarge)
Step 16:
Fold back the top two fabrics and trim the excess stabilizer, batting and fabrics to ¼”. You will not need to pin those two top fabrics, they are pinned in the photo just to show them out of your way.
Step 17:
(Click Image to Enlarge)
Turn the eyeglass case lining side out through the opening. Use a wooden dowel or point turn to turn out the corners. Your eyeglass case is now lining side out.
Step 18:
(Click Image to Enlarge)
Trim the fabric over the opening down to about ½” if yours is wider. Tuck it into the opening and hand stitch closed.
Step 19:
(Click Image to Enlarge)
Turn the project right side out through the top of the case and press with a steam iron to flatten the edges.
Step 20:
Congratulations your ITH Reader Eyeglass Case is complete. Make the whole set!
Award winning Digitizer, Embroidery Educator, Author and a Consultant to the Industry, Pat Williams has 30 years of experience in the embroidery industry. Pat has won multiple awards for her digitizing expertise including the 2007 Impressions Awards Grand Championship, Best of Show as well as the 1st and 2nd Place Awards. Pat’s love of digitizing has afforded her the opportunity to write numerous articles for Impressions magazine in the United States and Images Magazine in Europe. In 2001 Pat was named “Embroidery Educator of the Year.” For many years Pat taught digitizing seminars at the ISS Shows in Long Beach, CA and for Compucon software. She now resides in Tucson, AZ.