Cute and about as easy as it gets for an embroidery project! This ITH Crumb Coaster uses “crumbs” of fabric, laid in a collage, backed with a stiff stabilizer and stitched. Save all those scraps and make these for gifts!
Read through the instructions thoroughly before beginning and assemble all the materials needed to complete the project. The scraps of fabric don’t need to be very big. If you’ve got a “focal” point type fabric, as you’ll see in the final photo, it can be used for the center and then other scraps laid around it to fill up the coaster front.
(Click Image to Enlarge)
Step 2:
Cut the heavy craft stabilizer. For the square coaster, mark the stabilizer with a 4.5” square, and then cut just inside the line so that the piece is slightly smaller.
(Click Image to Enlarge)
Step 3:
For the round coaster, use a compass to mark the stabilizer with a 4.5” diameter and cut just inside the marked line to make that piece just slightly smaller.
(Click Image to Enlarge)
Step 4:
Press the fabric back piece and all the small pieces. Arrange the pieces on the adhesive side of the craft stabilizer.
(Click Image to Enlarge)
Step 5:
Use a pressing sheet with a hot iron to affix the fabric to the stabilizer.
(Click Image to Enlarge)
Step 6:
This is what it looks like from the back. Now hoop two layers of fibrous type water-soluble stabilizer.
(Click Image to Enlarge)
Step 7:
Stitch color 1, the placement line. The non-adhesive side of the craft stabilizer will be placed within the stitched line. Spray the back side of the craft stabilizer lightly with temporary spray adhesive.
(Click Image to Enlarge)
Step 8:
Make sure the stabilizer is within the stitching line on all edges
(Click Image to Enlarge)
Step 9:
and then press it into place. Place the hoop on the machine and stitch color 2, to tack down the fabric edges.
(Click Image to Enlarge)
Step 10:
Stitch color 3, the maze stitching for the square coaster, and circular stitching for the round coaster. Note: the maze stitching was tightened up in the final coaster and represented accurately in the final photos with the pink fabrics.
(Click Image to Enlarge)
Step 11:
Remove the hoop from the machine, but do not remove the fabric from the hoop. Lightly spray the back of the fabric square with temporary spray adhesive and place it right side up over the back side of the hoop, centering it over the stitching line.
(Click Image to Enlarge)
Step 12:
Place the hoop back on the machine and stitch color 4 to tack all the layers together. Remove the hoop from the machine but do not remove the fabric from the hoop. Beginning with the back, use applique scissors to trim the back fabric right next to the stitching line. Flip the hoop to the front and trim the edges of the top fabrics right next to the stitching line.
(Click Image to Enlarge)
Step 13:
For the round coasters it should look like this.
(Click Image to Enlarge)
Step 14:
Stitch the remaining two colors. The last two colors are digitized separately so that if you’d like to have the last color different than the satin, the machine stops allowing a thread change.
(Click Image to Enlarge)
Step 15:
Remove the piece from the hoop and trim the stabilizer close to the stitching line. Dissolve the remaining stabilizer along the edge with a wet sponge.
(Click Image to Enlarge)
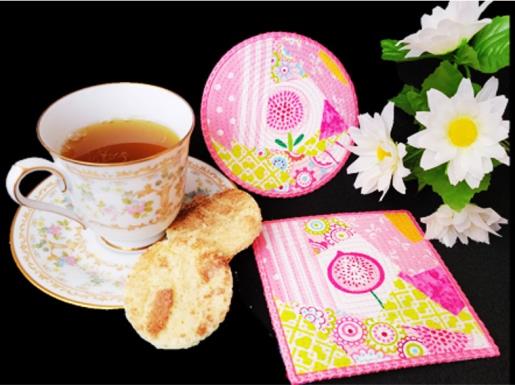
Step 16:
Here are the finished coasters. Having a small print fabric with a focal point really adds interest to the coasters. Also note the closer stitching lines on the square coaster, in the final design.
(Click Image to Enlarge)
Step 17:
Thank you for purchasing these coasters which are fast and fun to stitch—all in the hoop!
Ramona Baird has been in the embroidery industry for over 23 years. She and her husband owned a commercial and retail embroidery store in Arizona for many years. She is an experienced digitizer having been mentored by award-winners Pat Williams and Lindee Goodall. Ramona is a contributor to “Creative Machine Embroidery” magazine having 5 covers to her credit. Ramona has worked for Wilcom America and served many years as Education Director for the American Sewing Guild. With a degree in fashion design, she is able to design and execute patterns which Pat Williams says are “out of the box” in creativity and application. Ramona likes to challenge the boundaries of embroidery and bring new and exciting designs, ideas, and projects to EmbroideryDesigns.com. She wants embroiderers of all levels to increase their skills and enjoyment in using their embroidery machine for gift-making and personal pleasure.