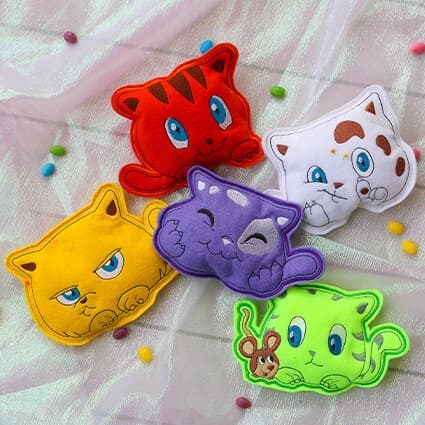
These kitties are sure to make you smile! Depending on how they are filled, they can be pin cushions, fabric weights, or a soft friend for your sewing room.
Read through the instructions thoroughly before beginning and assemble all the materials needed to complete the project. Decide on what you’d like to fill each kitty with: pellets to use for fabric weight, crushed walnuts for a pincushion, or poly-fil for a softie.
(Click Image to Enlarge)
Step 2:
Load the design on the machine. Hoop one layer of poly mesh stabilizer.
(Click Image to Enlarge)
Step 3:
The first color to stitch is a placement line for the felt. Place the first piece of felt over the line. The second color to stitch will tack the felt to the stabilizer. Continue stitching the design following the color sequence.
(Click Image to Enlarge)
Step 4:
Before the last color stitches, remove the hoop from the machine but do not remove the fabric from the hoop. Flip the hoop over and position the second piece of felt on the back.
(Click Image to Enlarge)
Step 5:
Tape down the edges of the felt if needed. Return the hoop to the machine and continue stitching to tack down the back felt and sew the satin outline. Note: if desired, load a bobbin with the last thread color so the outline color will be the same on the front and back.
(Click Image to Enlarge)
Step 6:
Remove the piece from the hoop. Using sharp scissors, trim outside the satin outline about 1/8”.
(Click Image to Enlarge)
Step 7:
Find a spot in the lower edge of the kitty and cut the smallest slit possible in which the funnel will fit. For this kitty, it took about ¾ c. of poly pellets to softly fill.
(Click Image to Enlarge)
Step 8:
Use the needle and thread to close the slit.
(Click Image to Enlarge)
Step 9:
Fill the kitty with poly-fil for a soft kitty, the poly pellets when the kitties are to be used for fabric weights, or crushed walnuts which will sharpen needles and pins in a pincushion.
(Click Image to Enlarge)
Step 10:
These will make wonderful accessories for your sewing room and as quick gifts for sewing friends—which is your favorite? I’m partial to the cute yellow grumpy kitty.
(Click Image to Enlarge)
Step 11:
Thank you for purchasing the Chubby Kitty—look for the set of five in a pack at a reduced price! Also, look for the fat quarter organizer box which is sitting behind the grumpy kitty—another fun ITH project for the sewing room!
Ramona Baird has been in the embroidery industry for over 23 years. She and her husband owned a commercial and retail embroidery store in Arizona for many years. She is an experienced digitizer having been mentored by award-winners Pat Williams and Lindee Goodall. Ramona is a contributor to “Creative Machine Embroidery” magazine having 5 covers to her credit. Ramona has worked for Wilcom America and served many years as Education Director for the American Sewing Guild. With a degree in fashion design, she is able to design and execute patterns which Pat Williams says are “out of the box” in creativity and application. Ramona likes to challenge the boundaries of embroidery and bring new and exciting designs, ideas, and projects to EmbroideryDesigns.com. She wants embroiderers of all levels to increase their skills and enjoyment in using their embroidery machine for gift-making and personal pleasure.