Read all directions before beginning the project. Gather the materials for the project. Prepare the fabric. Iron the fabric.
A design template is a printout of the design from an embroidery software program. The template is the actual size of the design which makes a great visual tool. The vertical and horizontal axis on the template provides perfect placement of the embroidery designs. Embrilliance 'Essentials' embroidery software program was used to make the design template. Print a design template.
Step 2:
Use the design template as a placement tool on the 10"x10" piece of fabric. Match the center points on the design template and fabric. Use the vertical and horizontal axis as guide points. Pin the template in place on the fabric.
Step 3:
Hoop one piece of cut away stabilizer. Float the 10"x10" piece of fabric on the stabilizer. Use a light mist of 505 Temporary spray to hold the fabric in place on the stabilizer. Use pins or wonder pins to secure the fabric onto the stabilizer.
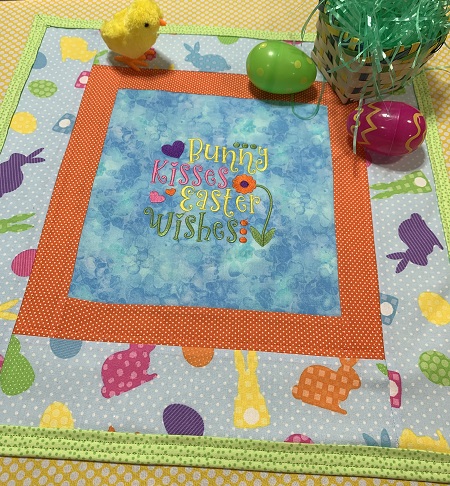
Step 4:
Load the design onto the machine. Attach the embroidery hoop. Check the needle and bobbin. If using a design template for placement, carefully remove the template from the top of the fabric. Embroider the design.
Step 5:
Remove the project from the hoop. Carefully trim excess fabric from around the design. Trim any long threads if needed.
Step 6:
Pin a 2"x10" strip to the top and bottom side of the centerpiece. Sew a 1/4" seam along the edge of each strip.
Step 7:
Press the seams with an iron.
Step 8:
Pin the 2"x14" strips to each side of the block. Sew a 1/4" seam along the edges of the sides. Press the seams with an iron.
Step 9:
Pin the 4"x14" strips of border fabric 2 to the top and bottom sides of the block. Sew a 1/4" seam along the edges. Press the seams with an iron.
Step 10:
Pin the 4"x18" strips of border fabric 2 on each side of the block. Sew a 1/4" seam along the edges. Press the seam with an iron.
Step 11:
Follow the package directions to bond the fusible fleece to the back of the block.
Step 12:
Lay the 24"x24" piece of backing fabric wrong side up on a flat surface. Center the stitched block on the backing fabric. There should be a 2" overlap of the backing fabric. Trim the overlap to 2" if needed. Use a light mist of temporary adhesive spray on the backing fabric. Smooth out any wrinkles on the stitched block.
(Click Image to Enlarge)
Step 13:
Fold the overlap in half. Press along the folded edge.
(Click Image to Enlarge)
Step 14:
Fold the binding fabric again. Pin the binding in place. Topstitch along the edges.
Step 15:
Congrats! You have completed an Easter table topper. Enjoy!
Marisa Littleton is a retired educator with a love for teaching and learning. Interests include machine embroidery, hand embroidery, quilting, cooking, and antiques.