Live Chat
Embroidery Designs
Welcome, Embroiderer
Login
Project: Quilted Patchwork Placemats
{{mainImageAlt || (productInfo._source && productInfo._source.name) || ''}}

Project: Quilted Patchwork Placemats Embroidery Project

By   Brother Educational Department   on   November 01, 2005
  • SKILL LEVELSome Experience
  • TIME REQUIRED02:00
Description

Easy-to-make placements: great as gifts or to bring a festive touch to your own table!

Step of

Materials

Project Preview Video

Materials
  • Three different cotton fabrics:
  • Color #1 Red for patchwork, 3/8 yd. of 44”/45” wide fabric. (This can be a solid, small print, or a batik style fabric like the one used in this project).
  • Color #2 Green for patchwork, ½ yd. of 44”/45” wide fabric. (This can be a solid, small print, or a batik style fabric like the one used in this project).
  • Color #3 Gold star print for patchwork and placemat lining, 1 ¼ yds. of 44”/45” fabric.
  • Warm & Natural brand cotton batting, four pieces, each measuring 14” x 18” (used for filler inside place mat)
  • Sixteen, size 5/8” star shaped buttons with two center holes.
  • All-purpose sewing thread to match or blend with fabrics for sewing patchwork together and constructing placemats. (Note: Medium grey is a shade of thread commonly used by quilters because it blends with many different colors and saves you the trouble of changing threads to match each fabric color).
  • Gold metallic decorative thread (used for decoratively quilting the placemat)
  • Sewing needle for hand sewing
  • Dressmaker’s chalk or pencil
  • Long quilting pins
  • Sewing machine with built in decorative stitches


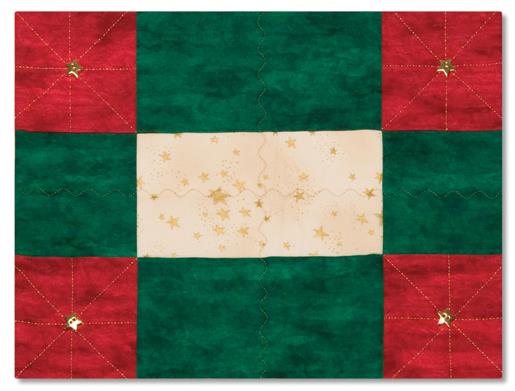
  • Final Product: What You Will Create

    Preface:

    Cutting and Sewing Instructions:

    Note: All fabrics that require laundering should be pre-washed and dried. Do not include the selvedge edges in any of the pieces that are cut.

    For each placemat cut the following pieces:

    • Color #1 red fabric for patchwork: Cut four squares 4 ½” x 4 ½”
    • Color #2 green fabrics for patchwork: Cut two squares 4 ½” x 4 ½” and cut two rectangles 4 ½” x 8 ½”
    • Color # 3 gold star print for patchwork: Cut one rectangle 4 ½” x 8 ½”
    • Gold star print for lining placemats: Cut one rectangle 12 ½” x 16 ½”


    Step 1:
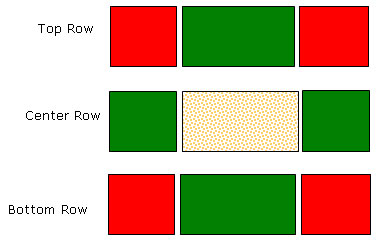
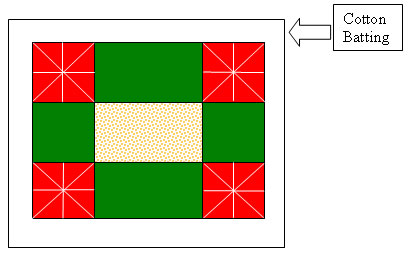
    Using a ¼” seam allowance, sew one 4 ½” x 4 ½” red square to each side of one green rectangle. Repeat again to form the top and bottom row of the patchwork. (Figure 1)


    Step 2:
    (Click Image to Enlarge)
    Using a ¼” seam allowance, sew one green 4 ½” x 4 ½” square to each side of one gold star print rectangle 4 ½” x 8 ½”. This will form the center row of the patchwork. (Figure 1)


    Step 3:
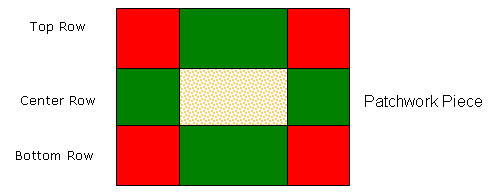
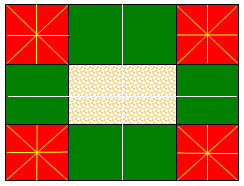
    Using a ¼’ seam allowance, sew all three rows together to make the patchwork piece. (Figure 2)


    Step 4:
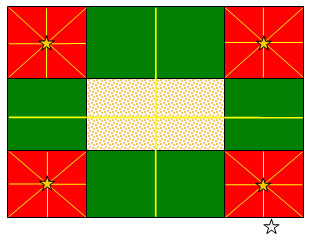
    Press patchwork piece. Place patchwork piece on top of a 14” x 18” piece of cotton batting. Pin the layers together all around the outside edges. There will be extra batting all around the patchwork. (Figure 3)


    Step 5:
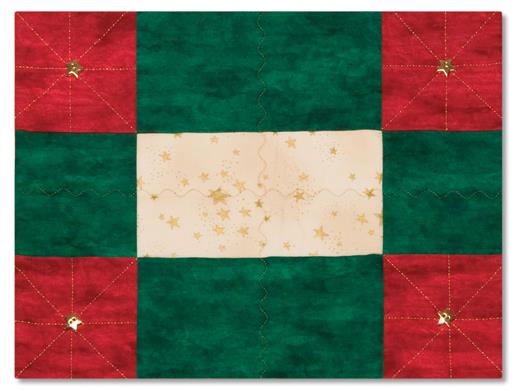
    Use the chalk pencil to draw a star pattern in each red square, using Figure 3 as a guide. Thread machine with metallic thread and select a straight stitch suitable for quilting. Stitch along each line using the metallic thread. Be sure to back stitch, or tie off threads at the beginning and the end of each stitching line.


    Step 6:
    Trim away excess batting so that it is even with the patchwork piece. Place a piece of lining fabric on top of patchwork, having the right sides of fabric facing together. Trim lining to fit patchwork if necessary. Thread machine with grey thread. Stitch all around the placemat using a ¼” seam allowance, leaving a 4 inch opening along one edge for turning. Reach inside the placemat and turn placemat right side out. Press placemat, turning under the raw edges where you left the opening. Close the opening with small hand stitches using thread that matches the fabric.


    Step 7:
    (Click Image to Enlarge)
    Use the chalk pencil to mark the center of the placemat from top to bottom, and side to side using Figure 4 as a guide. Thread the machine with metallic decorative thread and select a decorative stitch such as the Serpentine stitch. Stitch along these lines through all of the layers of the placemat, taking care to back stitch, or tie off threads at the beginning and the end of each stitching line.


    Step 8:
    (Click Image to Enlarge)
    Hand sew a star shaped button in the center of each RED square, securing the buttons through all of the layers. This completes the placemat. (Figure 5)


    Step 9:
    Follow the same cutting and sewing directions to complete three additional placemats.
    Brother Educational Department
    Brother Educational Department
    More From This Author
    Link is Broken, Please check the URL
    Exclusive Embroidery Offers!
    Copyright © {{ currentDate | date:'yyyy'}} - EmbroideryDesigns.com
    GET 50% OFF! ×