Read through the instructions thoroughly before beginning and assemble all the materials needed to complete the project. For the batik, chose a color you like for the borders which will be top stitched with the matching embroidery thread color. The bright pink was chosen for the project. Chose vibrant embroidery thread colors.
(Click Image to Enlarge)
Step 2:
Hoop a layer of white Kona cotton with a layer of poly mesh stabilizer. Load the design and embroidery thread(s) on the machine.
(Click Image to Enlarge)
Step 3:
Stitch the design following the color sequence. Stop before stitching the last color.
(Click Image to Enlarge)
Step 4:
Remove the hoop from the machine, but do not un-hoop the fabric. Spray the batting on one side and lay it over the white Kona cotton backing fabric. Quarter fold the fabric and batting to center it over the back of the embroidery. In quarter sections, spray the batting and smooth it over the back of the embroidery.
(Click Image to Enlarge)
Step 5:
Place the hoop back on the machine. Make sure the backing fabric and batting remain smooth. Stitch the last color which will be the quilting.
(Click Image to Enlarge)
Step 6:
The finished embroidery will look like this.
(Click Image to Enlarge)
Step 7:
Remove the embroidery from the hoop. Separate the batting from the fabric. Place the fabric face down on the cutting mat. Fold back the backing fabric and batting, exposing only the excess front fabric to be cut. Align the ruler so the 1/4” mark is right at the stitching line of the front fabric seam.
(Click Image to Enlarge)
Step 8:
Trim the front fabric all the way around, leaving ¼” beyond the outer most stitching line.
(Click Image to Enlarge)
Step 9:
This is how it should look. Now the batting and backing fabric will be trimmed. Trim the batting 4 ½” beyond the outermost stitching line on all sides.
(Click Image to Enlarge)
Step 10:
Measure the height and width of the embroidered piece, plus the ¼” seam allowances. You’ll need these measurements to cut the batik fabric.
(Click Image to Enlarge)
Step 11:
Chose your batik color to match one of the bright embroidery thread colors. There are so many pretty ones on the market. This was a set of fat quarters from the local quilt store.
(Click Image to Enlarge)
Step 12:
Cut the batik fabric strips. The shorter ones will be sewn to the sides, and the longer ones on the top and bottom.
(Click Image to Enlarge)
Step 13:
Center the shorter ones on each side. Place the strips right sides together and pin them in place.
(Click Image to Enlarge)
Step 14:
For accuracy in stitching, sew the strips on from the wrong side, stitching right on top of the outer most line of stitching. Fold the strips back.
(Click Image to Enlarge)
Step 15:
To accurately place on the top and bottom strips, use a ruler and draw a line straight across the top and bottom on which to align the top and bottom batik borders.
(Click Image to Enlarge)
Step 16:
Center and align the top and bottom borders in place and pin them.
(Click Image to Enlarge)
Step 17:
To aid in sewing on these border strips, flip the fabric over and use a herra marker to extend the sewing line all the way across the top and bottom from the outer most stitching line.
(Click Image to Enlarge)
Step 18:
Sew on the top and bottom strips using the crease line made with the herra marker and the outer most stitching line as a guide.
(Click Image to Enlarge)
Step 19:
Trim the side strips at the top and bottom even with the fabric borders just sewn on.
(Click Image to Enlarge)
Step 20:
Trim the borders 1” beyond the batting on all sides.
(Click Image to Enlarge)
Step 21:
Fold the cut edge of the border to the batting (scant ½”) and then fold again over the batting edge ½”, mitering the corners.
(Click Image to Enlarge)
Step 22:
Use your favorite method for mitering the corners and holding the border in place (I like the glue method).
(Click Image to Enlarge)
Step 23:
Find the thread color from the embroidery design that matches the fabric color and load a bobbin. Using a 3.0mm stitch, sew down the edge scant ½” away from the edge on all sides.
(Click Image to Enlarge)
Step 24:
Sew a second line. Measure and mark whatever distance you would like—I chose 1 ¼” from the inside sewing edges. Mark the distance on all four sides.
(Click Image to Enlarge)
Step 25:
Stitch along the drawn line. The mat is completed.
(Click Image to Enlarge)
Step 26:
The mat from the back and front the front.
(Click Image to Enlarge)
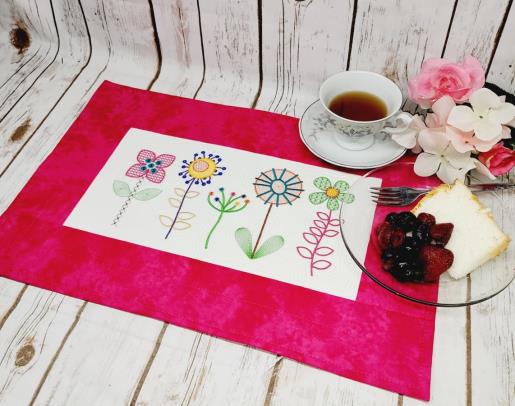
Step 27:
Congratulations! You’ve got a mat to adorn a table, set out tea, or even use as a placemat. Have fun stitching these wonky, fun flowers in bright colors to get ready for spring!
Ramona Baird has been in the embroidery industry for over 23 years. She and her husband owned a commercial and retail embroidery store in Arizona for many years. She is an experienced digitizer having been mentored by award-winners Pat Williams and Lindee Goodall. Ramona is a contributor to “Creative Machine Embroidery” magazine having 5 covers to her credit. Ramona has worked for Wilcom America and served many years as Education Director for the American Sewing Guild. With a degree in fashion design, she is able to design and execute patterns which Pat Williams says are “out of the box” in creativity and application. Ramona likes to challenge the boundaries of embroidery and bring new and exciting designs, ideas, and projects to EmbroideryDesigns.com. She wants embroiderers of all levels to increase their skills and enjoyment in using their embroidery machine for gift-making and personal pleasure.