Read the directions before beginning the project. Gather the materials needed for the project. A flag can be made if a blank commercial one is not available.
Step 2:
Cut two pieces of ribbon 20" long. You need the ribbon to overlap 1" on each side of the flag.
Step 3:
Pin one of the ribbons along the lower edge of the flag.
Step 4:
Flip the flag over to the back. The ribbon should overlap on each side by 1". Fold the overlap in half. Fold the overlap over again. Pin the end of the ribbon in place. Repeat for the other end of the ribbon.
Step 5:
Pin the second ribbon just below the hanging sleeve on the flag. The ribbon should overlap 1" on each end. Tuck the overlap in half and fold again. Pin the ends in place.
Step 6:
Topstitch around all sides of the ribbons.
Step 7:
An essential tool for embroidery position and placement is a design template. A design template is a printout of the actual size of the design. It has the center of the design identified, as well as the horizontal and vertical axis lines. An embroidery program can print a template of any design. (Embrilliance Essentials embroidery software program was used to print the design template). Use the design template to guide placement on the flag. You may also use a ruler and fabric pen to mark the spot for the design placement.
Step 8:
Hoop one piece of cutaway stabilizer. The flag will be 'floated' on top of the stabilizer. Mark the center point on the stabilizer. Match the center and axis points on the hoop and the design template. Use pins to secure the flag onto the stabilizer.
Step 9:
Attach the hoop to the machine. Load the embroidery design onto the machine. Place one piece of water soluble topping over the stitching field. The water soluble topping will keep the stitches from sinking into the coarse burlap fabric. Follow the color guide to stitch the design. Stitch color 1 (blue).
Step 10:
Stitch color 2 (green).
Step 11:
Stitch color 3 (black).
Step 12:
Follow the color guide to finish stitching the design.
Step 13:
After the design has completed stitching, remove the project from the hoop. Gently tear away the water soluble topping from the front of the flag.
Step 14:
Trim the excess stabilizer from around the design leaving about a 1/2" margin.
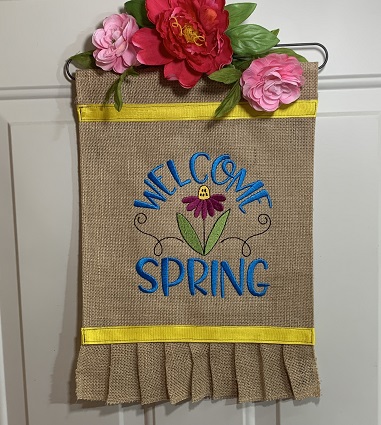
Step 15:
You have completed a 'Welcome Spring Flag' project. Yay! Great job!
Marisa Littleton is a retired educator with a love for teaching and learning. Interests include machine embroidery, hand embroidery, quilting, cooking, and antiques.