Read through the instructions thoroughly before beginning and assemble all the materials needed to complete the project. Starch and press the fabrics well. As stated in the preface, the amount of fabric you need will vary depending on the number of letters which are needed for the name, and the pillow size you’ll be using. I first did all the letters, then measured the height for the side border pieces, cut those, and then sewed them on and trimmed. Then I measured the length from the left side border to the right-side border, cut those fabrics, and then sewed them on and trimmed. From there I figured out how much fabric I would need to quilt to finish up the pillow front; the pillow back fabric was quilted and then cut to size. Originally all the fabrics were cut larger than needed and then cut down during assembly.
(Click Image to Enlarge)
Step 2:
Download the letters needed, and put them on the machine. Load the first letter. Hoop one layer of poly mesh stabilizer. Color 1 will stitch the placement line.
(Click Image to Enlarge)
Step 3:
Quarter fold the batting. Use the guide tick marks on the placement line to align the folded batting as shown.
(Click Image to Enlarge)
Step 4:
Flip up half the batting so the fold aligns with the top and bottom tick marks. Open up the batting and it will cover the placement line.
(Click Image to Enlarge)
Step 5:
Place a piece of white Kona cotton over the batting. Stitch color 2 which will tack the layers together.
(Click Image to Enlarge)
Step 6:
Color 3 stitches the background fill. Change to the chosen thread color for the letter, and stitch the letter.
(Click Image to Enlarge)
Step 7:
Repeat steps 2-6 to stitch the remaining letters needed.
(Click Image to Enlarge)
Step 8:
After all the letters are stitched, fold back the fabric and carefully trim the batting away from the seam allowance area.
(Click Image to Enlarge)
Step 9:
Next will be to stitch the letters together to form the name. Begin with the first letter. Place the second letter, right side over the top of the first, aligning the stitching lines as shown. Use a pin in the corners to make sure the outer stitching lines are aligned.
(Click Image to Enlarge)
Step 10:
Use the embroidered outer stitching line as a guide and sew the letters together. The stitching should be just to the inside of the embroidered stitching line.
(Click Image to Enlarge)
Step 11:
Repeat the steps of aligning each letter and sewing them together in sequence. Press the seams open.
(Click Image to Enlarge)
Step 12:
Be sure all the letters are placed in the correct order and orientation. If one is out of order, remove the stitching and resew. For this name, I had the second N oriented incorrectly and had to restitch it.
(Click Image to Enlarge)
Step 13:
Trim the seam allowances down to about ¼” to reduce the bulk.
(Click Image to Enlarge)
Step 14:
Now trim all the sides of the letters/name to ¼” seam allowances.
(Click Image to Enlarge)
Step 15:
Measure the left and right sides of the borders. Cut the fabric 2” wide by the height, plus some extra. Repeat measuring and cutting fabric for the top and bottom borders.
(Click Image to Enlarge)
Step 16:
Sew the side borders on using a ¼” seam allowance.
(Click Image to Enlarge)
Step 17:
Trim the side borders even with the top and bottom as shown. Sew on the top and bottom borders using a ¼” seam allowance; trim evenly with the side borders.
(Click Image to Enlarge)
Step 18:
The piece should now look like this.
(Click Image to Enlarge)
Step 19:
Next will be to do a little math to figure out how to cut and piece the remaining top fabric to fit the pillow front. My math will vary from yours; this is a long name and I am also using directional fabric for the pillow front that matches the Diva quilt that was done. Begin by measuring the length and width of the name/borders. I find it easier to do the math with finished measurements and then add ¼” seam allowances.
(Click Image to Enlarge)
Step 20:
Be sure to double check the measurements of the pillow. Because I like a big firmer pillow, I do not add any extra except for seam allowances. That way the pillow fills out the fabric making it firmer.
(Click Image to Enlarge)
Step 21:
Quilting needs to be done for the back and front pillow pieces. Use one or more of the listed quilting designs. If you have larger hoops for your machine, you can increase the size and gang up several rows in one hooping. All the designs do fit in a 5” x 7” hoop; it will just take more time to quilt the fabric.
(Click Image to Enlarge)
Step 22:
There are different ways to finish the front of the pillow. One way is to write down the pillow measurement and the name (no seam allowances—F=finished measurement). Now take the length of the pillow and subtract the name/border length to find out the difference and divide by 2, to get the measurement for each side. After that, take the height of the pillow, minus the finished height of the name/border, and divide the difference by 2 to get how much fabric is needed for the top and bottom sections. OR—another way to do it is to just to cut a fabric for the front and one for the back larger than the pillow measurement, quilt it with batting, and cut them to the size of the pillow plus seam allowances. If you have a longarm machine, convert the design(s) to the format needed for the machine and create an edge-to-edge design. Quilt with a chosen thread color.
(Click Image to Enlarge)
Step 23:
For the pillow front, the border edges on the name panel could be turned back ¼” and the name/border panel centered and stitched onto the pillow front. You may also have to stitch in the ditch between the letters and around the inner border seams to further secure the piece. This might be the easiest way instead of doing all of the figuring—it’s up to you.
(Click Image to Enlarge)
Step 24:
Or—cut the fabric by using the measurements above
(Click Image to Enlarge)
Step 25:
cut the fabric to size, and stitch it around the name panel.
(Click Image to Enlarge)
Step 26:
Sandwich batting and backing and quilt. Again, use hoops with the embroidery machine. If you have a longarm machine, choose the design, create an edge-to-edge design and then mask out the name panel.
(Click Image to Enlarge)
Step 27:
After the stitching is done for the front and back pillow pieces, then it is time to create a pleated ruffle. Measure around the edges of the pillow, and multiply it by 2.5 to get the total length of fabric needed for the ruffle. I chose to do a pleated ruffle for this edge using up the scraps of fabric—it took just over 300” of fabric strips. Cut one strip which will be for the back and top of the ruffle 2.5” wide and the inset (dot) fabric 1.5”. With right sides together, sew the strips together at the top using a ¼” seam allowance.
(Click Image to Enlarge)
Step 28:
Press the seam toward the wider fabric and then fold the strip lengthwise meeting the lower cut edges; baste along the lower edge. Set the ruffler for pleating every 6th stitch. Test, but for the ruffler for my machine the length of the stitches was 4.0mm and the screw at the front was turned in almost all the way to pleat the double layer of fabric. Pleat the entire strip and then press in the pleats with the iron.
(Click Image to Enlarge)
Step 29:
Slightly round the corners on the pillow front. With right sides together and cut edges meeting, pin the ruffle all the way around the pillow.
(Click Image to Enlarge)
Step 30:
Add more ruffled fabric into the corners. Continue pinning the ruffle all the way around the pillow front. Baste the ruffle in place using a ¼” seam.
(Click Image to Enlarge)
Step 31:
With right sides together, place the pillow back over the pillow front, matching cut edges; leave an opening at the bottom for inserting the pillow form. Pin or clip the front and back pieces together. Stitch the pillow front to the back, leaving the opening unstitched. Because the quilting creates thicker fabric, stitch around the entire pillow a second time.
(Click Image to Enlarge)
Step 32:
Turn the pillow cover right side out through the opening. Pull the ruffle along the seam to pull it out and form the corners.
(Click Image to Enlarge)
Step 33:
With a pillow this long, it took a bit of wrestling to get it into the cover through the opening. Push the pillow form well into the corners of the cover. Turn back the seam allowance at the opening, pin, and hand stitch the opening closed using a heavier thread.
(Click Image to Enlarge)
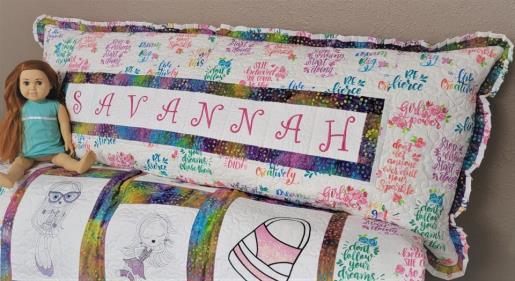
Step 34:
Congratulations! Won’t the child in your life just love this pillow!
(Click Image to Enlarge)
Step 35:
Please be sure to check out the coordinate Mylar Sunglasses Pillow and ITH Mylar Divas Quilt, too.
Ramona Baird has been in the embroidery industry for over 23 years. She and her husband owned a commercial and retail embroidery store in Arizona for many years. She is an experienced digitizer having been mentored by award-winners Pat Williams and Lindee Goodall. Ramona is a contributor to “Creative Machine Embroidery” magazine having 5 covers to her credit. Ramona has worked for Wilcom America and served many years as Education Director for the American Sewing Guild. With a degree in fashion design, she is able to design and execute patterns which Pat Williams says are “out of the box” in creativity and application. Ramona likes to challenge the boundaries of embroidery and bring new and exciting designs, ideas, and projects to EmbroideryDesigns.com. She wants embroiderers of all levels to increase their skills and enjoyment in using their embroidery machine for gift-making and personal pleasure.