Border OptionsHugging border, circle, square, or rectangle — with a 3mm satin stitch.
Backing OptionsAvailable with iron-on, sew-on, or velcro backing.
Fast ShippingShipped quickly from the USA.
Free Online Tools
Powerful embroidery utilities that save time and prevent costly mistakes.
Stitch AssistantRECOMMENDED
Get the exact stabilizer, machine settings, needle, and thread color sequence for every embroidery design you purchase — based on that design's stitch density, dimensions, and color count.
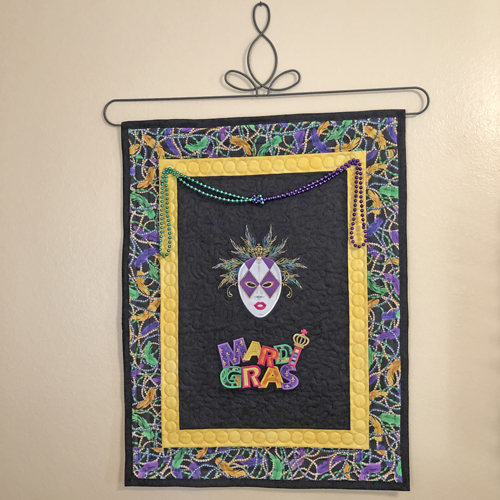
Expand your skill set by using free motion and ruler work quilting around these fantastic Mardi Gras applique designs. The final size of this wall hanging depending on the layout and designs that you use.
Print out the design templates for the masque you would like to use as well as for the lettering design. Place them together so that you can determine how large of a center panel that you will want to cut. For this sample the center panel was cut to 14 ½” x 20 ¾”. The 2 gold strips were cut 2 ½” wide by the width of the fabric and the 4 print borders were cut 3 ½” wide by the width of the fabric.
Step 2:
(Click Image to Enlarge)
Stitch a 2.5” strip of the gold fabric down the long sides of the center panel leaving about ½” of gold beyond the top and bottom of the center panel with a ¼” seam.
Step 3:
(Click Image to Enlarge)
Press the seams towards the border.
Step 4:
(Click Image to Enlarge)
Trim the excess of the borders flush with the center panel.
Step 5:
(Click Image to Enlarge)
Add borders to the top and bottom of the center panel in the same manner.
Step 6:
(Click Image to Enlarge)
Trim the top and bottom borders flush with the side borders. Press the seam towards the borders.
Step 7:
(Click Image to Enlarge)
Add the 3 ½” print borders in as the inner border using Steps 2 through Step 6.
Step 8:
(Click Image to Enlarge)
Use the printed templates to determine where you want the center of each design to be and mark with a white fabric marker.
Step 9:
(Click Image to Enlarge)
Cut a piece of cut-away stabilizer the size of your quilt top. Place it in your hoop aligning the center of design mark with the center marks on the hoop for the masque design.
Step 10:
Fabric is more likely to slip in the large 14” x 8” hoop so be sure to use the screw drive to tighten the screws on both sides of the hoop.
(Click Image to Enlarge)
Step 11:
(Click Image to Enlarge)
Fuse Heat N Bond Lite® to the white fabric for the masque applique.
Step 12:
The first color-stop (CS) is for half of the feathers in the head dress. These can be stitched in regular embroidery thread but are designed for 50 weight metallic thread.
(Click Image to Enlarge)
Step 13:
The 2nd color stop can be stitched in a single-colored thread but are great in a variegated blue/green/gold thread.
(Click Image to Enlarge)
Step 14:
(Click Image to Enlarge)
The 3rd CS is the placement line for the face applique, stitch it in white so that it shows up on the black fabric.
Step 15:
(Click Image to Enlarge)
Peel the paper backing from the white applique fabric, spray it with adhesive and align over the placement line so the fabric exceeds the placement line by 1” on all sides. Run CS 2 to tack down the applique.
Step 16:
(Click Image to Enlarge)
Trim the applique right up next to the tack down lines and press the applique.
Step 17:
Follow the color chart to complete the embroidery of this design. Unhoop the project.
(Click Image to Enlarge)
Step 18:
Rehoop the quilt top centering the white mark you made on the fabric for the lettering design.
(Click Image to Enlarge)
Step 19:
(Click Image to Enlarge)
Cut 9 3.5” square of fabric for the letters and fuse Heat N Bond Lite to the back of each square.
Step 20:
(Click Image to Enlarge)
Due to the overlapping and angles of the letters, the letters do not sew out sequentially. For example, the G in Gras sews first. Take some time figuring out what piece of material is going to stitch on each letter, then as you put the color sequence in the design you can select the color thread you want for each letter. Put in the same color number for the placement line, tack down and border of each letter. In the sample 50 wt metallic gold is used for the crown on the i.
Step 21:
(Click Image to Enlarge)
For the A in GRAS and the R’s and the D you will want to cut out the holes in the letters. If you lift the applique fabric with the tip of a seam ripper, then use small scissors to cut out the hole.
Step 22:
(Click Image to Enlarge)
For the small A in Mardi you do not need to trim out the hole in the middle as the inside border will completely cover that portion of the letter.
Step 23:
(Click Image to Enlarge)
When the lettering appliques are completed remove the project from the hoop and trim the backing away from each of the designs.
Step 24:
(Click Image to Enlarge)
Press the quilt top to remove any wrinkles from the hooping.
Step 25:
(Click Image to Enlarge)
Measure you quilt top and cut backing about 4” larger in both width and height. Place it face down on your work surface. Cut quilt batting the same size and place it over the back fabric.
Step 26:
(Click Image to Enlarge)
Use basting spray, hand baste, or pin your quilt sandwich together. Usually this is the point where we say “Quilt as desired.” But this is where I want to encourage you to try out some new quilting techniques. The black center of this project was free motion quilted in black thread. Black thread was used for the free motion quilting so any goofs in the quilting are well hidden. There are many videos on Youtube® on free motion quilting and your sewing machine will most likely have a free motion embroidery foot that came with your machine or one that is readily available.
Step 27:
(Click Image to Enlarge)
The circles quilted around the inside border were stitched using a ½” circle ruler.
Step 28:
(Click Image to Enlarge)
The outside borders were quilted with the straight edge ruler stitching around the whole border with the 1st row of stitch ¼” from the yellow border; ½” away from the ¼” stitching and 1” away from the 2nd row of stitching. There are also many Youtube® videos on ruler quilting. There is some expense in doing ruler quilting, but as you can use the rulers over and over I think you will find it really useful in project sewing.
Step 29:
(Click Image to Enlarge)
Square up your quilt top trimming away the excess fabric and batting 3” away from the outside edge of the inner border.
Step 30:
(Click Image to Enlarge)
Use 4 strips of 2 ½” black Kona Cloth to bind your quilt.
Step 31:
Cut a hanging sleeve from any quilting cotton fabric 3 ½” wide and the width of the quilt. If you do not know how to make a hanging sleeve please see our article Attaching a hanging sleeve to a Mini Quilt. Hand stitch the hanging sleeve ½” below the top of the quilt.
(Click Image to Enlarge)
Step 32:
What’s Mardi Gras without beads? Loop to Mardi Gras necklaces together and position them so that you have the same number of beads hanging down each side. Let the necklaces droop to the center of the quilt. Hand stitch to the quilt in the corners with just a couple of loose stitches over two of the beads. You want just enough to hold them to the quilt, but with stitches easy enough to remove if you ever want to wash the quilt.
(Click Image to Enlarge)
Step 33:
Feed the wall hanging on a 24” Ackfeld Wire Company quilt holder and announce the Mari Gras party is at your house this year! Congratulations your Mardi Gras Wall Hanging is complete.
Award winning Digitizer, Embroidery Educator, Author and a Consultant to the Industry, Pat Williams has 30 years of experience in the embroidery industry. Pat has won multiple awards for her digitizing expertise including the 2007 Impressions Awards Grand Championship, Best of Show as well as the 1st and 2nd Place Awards. Pat’s love of digitizing has afforded her the opportunity to write numerous articles for Impressions magazine in the United States and Images Magazine in Europe. In 2001 Pat was named “Embroidery Educator of the Year.” For many years Pat taught digitizing seminars at the ISS Shows in Long Beach, CA and for Compucon software. She now resides in Tucson, AZ.