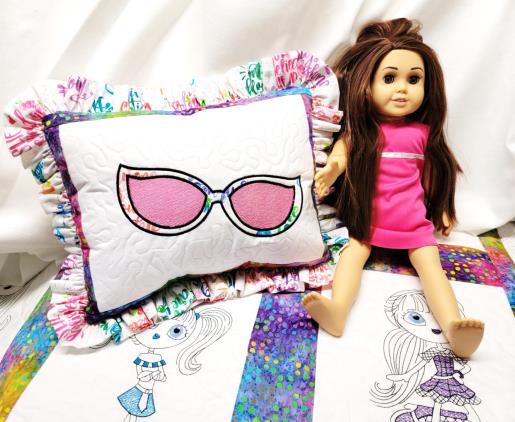
This design is for a large hoop. Check to be sure you have a hoop large enough for this design which measures 9” x 12”. Read through the instructions thoroughly before beginning and assemble all the materials needed to complete the project. Print out the color sequence sheet. If you did the Diva quilt, use the scraps of fabric from it as the applique and back pieces for this pillow.
(Click Image to Enlarge)
Step 2:
Load the sunglasses design on the machine. Stitch color 1 which will stitch the placement line. The machine stops allow placement of the white Kona cotton. Stitch the next color which will tack down the Kona cotton. Stitch color 3, the placement line for the sunglasses. Place down the Mylar and stitch colors 4 and 5, the light density fill for the lenses.
(Click Image to Enlarge)
Step 3:
Remove the excess Mylar and place down the fabric for the frame of the glasses.
(Click Image to Enlarge)
Step 4:
Stitch color 6, which tacks down the fabric.
(Click Image to Enlarge)
Step 5:
Trim away the excess fabric from around the outer edge of the frame outline and the fabric over the inside of the frame. Be very careful not to cut into any of the stitching over the Mylar. I used a thin blade seam ripper to carefully lift up the fabric
(Click Image to Enlarge)
Step 6:
and create a slit to get the tip of the scissors into the area to trim the fabric.
(Click Image to Enlarge)
Step 7:
Stitch color 7, but after the underlay for the satin outer edge stitches, stop the machine and if there are any little fibers sticking outside of the stitching line, trim them away. If you don’t do it at after the underlay, then it is harder to trim away after the satin edge is stitched.
(Click Image to Enlarge)
Step 8:
Do the same for the inside stitching.
(Click Image to Enlarge)
Step 9:
Remove the hoop from the machine. On the back, carefully layer the back of the embroidery with one layer of cotton batting and then place a back fabric over that. Return the hoop to the machine and make sure the batting and fabric remain smooth. Stitch color 8 to tack all the layers together. Stitch color 9, the quilting.
(Click Image to Enlarge)
Step 10:
Remove the fabric from the hoop. Trim away the excess fabric and batting by cutting ½” beyond the outer most stitching line. This leaves a ½” seam allowance for stitching on the borders.
(Click Image to Enlarge)
Step 11:
Sew on the left and right borders with the 2- 1 ½” x 10” strips of fabric using a ½” seam allowance; trim the borders even with the top and bottom of the embroidered piece.
(Click Image to Enlarge)
Step 12:
Repeat sewing and trimming the top and bottom border pieces using the 2- 1 ½” x 15” strips of fabric. Now measure around the piece to determine how much fabric will be needed for the ruffle.
(Click Image to Enlarge)
Step 13:
Cut the 4- 4” x 44” strips of fabric for the ruffle.
(Click Image to Enlarge)
Step 14:
Sew the strips together to form one long length of fabric. Fold the strip in half lengthwise and baste the bottom cut edges together close to the edge. Using a ruffling foot, feed the strip under the foot setting it for a fairly full ruffle.
(Click Image to Enlarge)
Step 15:
Beginning at the bottom middle, double fold the edge of the ruffle and then pin the ruffle with cut edges together to the outer edge of the embroidered piece, rounding the edges and pushing a little extra ruffle into the corners.
(Click Image to Enlarge)
Step 16:
At the end, overlap the ruffle over the beginning edge and down as shown; trim away the excess ruffle.
(Click Image to Enlarge)
Step 17:
Baste the ruffle in place. Place the fabric back, right side down, over the ruffled embroidered piece.
(Click Image to Enlarge)
Step 18:
Pin the pillow back fabric in place.
(Click Image to Enlarge)
Step 19:
Using the previous stitching line as a guide, stitch the back fabric to the pillow front leaving an opening for turning at the pillow bottom edge. Trim the corners.
(Click Image to Enlarge)
Step 20:
Turn the pillow right side out through the opening, pulling out the ruffle to form the corners well.
(Click Image to Enlarge)
Step 21:
Fold back the lower edge of the back pillow fabric seam allowance and press.
(Click Image to Enlarge)
Step 22:
Stuff the pillow through the opening. Stuff the corners first, then the edges, then the middles. Pin the opening closed and then hand sew the opening closed.
(Click Image to Enlarge)
Step 23:
The Mylar in the sunglasses provides a fun sparkle.
(Click Image to Enlarge)
Step 24:
Here is the pillow from the front and from the back.
(Click Image to Enlarge)
Step 25:
Congratulations on creating a fun pillow with Mylar sparkles that goes with the name pillow and Diva quilt!
Ramona Baird has been in the embroidery industry for over 23 years. She and her husband owned a commercial and retail embroidery store in Arizona for many years. She is an experienced digitizer having been mentored by award-winners Pat Williams and Lindee Goodall. Ramona is a contributor to “Creative Machine Embroidery” magazine having 5 covers to her credit. Ramona has worked for Wilcom America and served many years as Education Director for the American Sewing Guild. With a degree in fashion design, she is able to design and execute patterns which Pat Williams says are “out of the box” in creativity and application. Ramona likes to challenge the boundaries of embroidery and bring new and exciting designs, ideas, and projects to EmbroideryDesigns.com. She wants embroiderers of all levels to increase their skills and enjoyment in using their embroidery machine for gift-making and personal pleasure.