1- wooden tag which will be used as a base (HOVEOX Unfinished Wooden Gift, 4.6” Long x 1.2” wide (available on amazon with this link: https://amzn.to/3IcnZGA)
1- small red check cotton fabric for stitching
1- heat ‘n bond lite cut the same size as the fabric
Read through the instructions thoroughly before beginning and assemble all the materials needed to complete the project. Press the fabric.
(Click Image to Enlarge)
Step 2:
Hoop one layer of tearaway stabilizer. Cut the piece of fabric about 3/8” larger all the way around than the wooden tag.
(Click Image to Enlarge)
Step 3:
Load the chosen design on the machine. Stitch the first color which is the placement line for the fabric. Spray the back side of the fabric with KK200.
(Click Image to Enlarge)
Step 4:
Place the fabric, right side up, over the placement line; stitch the text. Trim any jump stitches if needed.
(Click Image to Enlarge)
Step 5:
Remove the fabric from the hoop and carefully tear away the excess stabilizer; press.
(Click Image to Enlarge)
Step 6:
Cut a piece of Heat ‘n Bond Lite slightly larger than the embroidered fabric. Lay the fabric right side down on the press sheet and place the adhesive side of the Heat ‘n Bond over it. Press following the manufacturers’ directions.
(Click Image to Enlarge)
Step 7:
To aid in aligning the text to the center of the wooden ornament, measure and mark the center length of the wooden tag.
(Click Image to Enlarge)
Step 8:
This shows the fabric without the bonding material—after bonding, you’ll align the word centering it on the tag.
(Click Image to Enlarge)
Step 9:
Peel the paper off the bonding material.
(Click Image to Enlarge)
Step 10:
Align the text along the drawn line, centering the text on the tag. Place a press cloth over the fabric/tag and press as directed.
(Click Image to Enlarge)
Step 11:
Let the piece cool and then using sharp scissors, trim the fabric next to the tag following the shape.
(Click Image to Enlarge)
Step 12:
To seal the edges of the fabric that was jut cut, press again. Use an awl to poke the hole through the fabric.
(Click Image to Enlarge)
Step 13:
Cut a length of twine (included in package of tags when purchased) and insert it through the hole.
(Click Image to Enlarge)
Step 14:
Knot the end of the twine. On the reverse side of the tag, add any message you would like—a fine Sharpie pen works well for this.
(Click Image to Enlarge)
Step 15:
(Click Image to Enlarge)
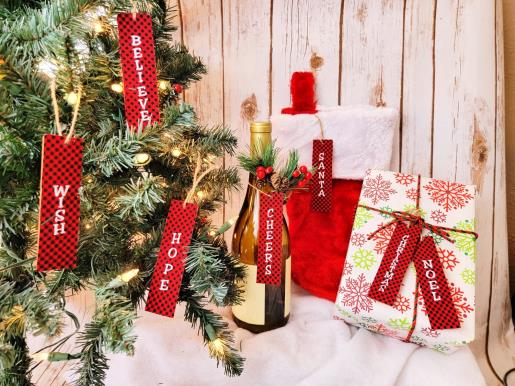
The tags have many uses—like hanging them on a tree.
Step 16:
I experimented and using a very large hoop, loading several designs, color sorting them, and stitching row by row, worked very well. Just hoop the stabilizer, load the designs and move them into position leaving about ½” between designs. Color sort the designs so that the placement lines will all stitch first. Then spray the back of the first row of fabrics and place them down over the placement lines and secure with embroidery or painter’s tape. Stitch the first row of words then stop the machine. Repeat for the second and remaining rows, until all the rows are complete.
(Click Image to Enlarge)
Step 17:
The stitching of the text takes less than two minutes per tag, so a whole set can be done in just a couple of hours! Talk about a fast and easy project.
(Click Image to Enlarge)
Step 18:
There are many uses for these tags: decorate the tree, use on gifts, hang them on a stocking, and add them to holiday libations! I’m sure you’ll think of many more uses. Have fun with your holiday stitching—and don’t forget—these would be great for craft fairs and church bazaars--and the design pack is discounted.
Ramona Baird has been in the embroidery industry for over 23 years. She and her husband owned a commercial and retail embroidery store in Arizona for many years. She is an experienced digitizer having been mentored by award-winners Pat Williams and Lindee Goodall. Ramona is a contributor to “Creative Machine Embroidery” magazine having 5 covers to her credit. Ramona has worked for Wilcom America and served many years as Education Director for the American Sewing Guild. With a degree in fashion design, she is able to design and execute patterns which Pat Williams says are “out of the box” in creativity and application. Ramona likes to challenge the boundaries of embroidery and bring new and exciting designs, ideas, and projects to EmbroideryDesigns.com. She wants embroiderers of all levels to increase their skills and enjoyment in using their embroidery machine for gift-making and personal pleasure.