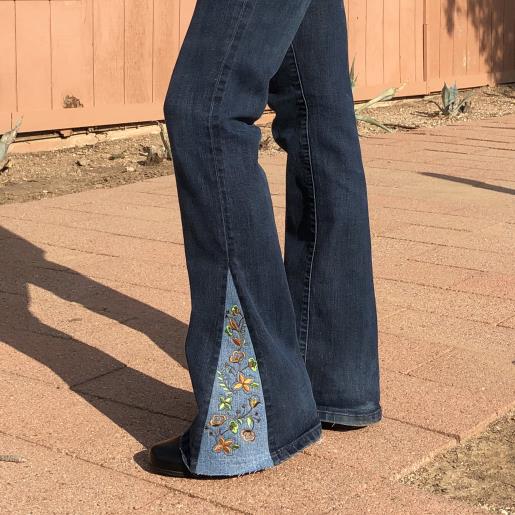
Bell Bottoms are in style! Create your own from old straight or boot cut jeans in less than three hours. This is surprisingly simple to do with amazing results. These jeans will eventually have frayed bottoms.
This project is designed for jeans that already touch the floor or are longer. If yours do not search thrift stores for jeans that do. Buy one pair to wear and a contrasting pair to be the donor for the inserts. Bands can be added to the bottom of pants that do not reach the floor, but those instructions will be left for another project. See Step 12 for information about the color sequence.
Step 1:
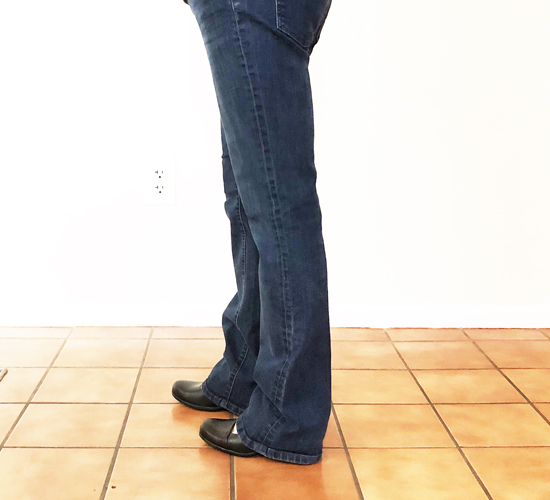
Start with a pair of old jeans that already hit the floor while wearing the shoes that will be worn with the jeans. If the jeans are within one inch of hitting the floor you can get by with those by just unpicking the hem and leaving it attached to the pants when the instructions below mention trimming the hem. If the pants are too short to reach the floor a band can be added to the bottom, but I will leave that for another project.
(Click Image to Enlarge)
Step 2:
(Click Image to Enlarge)
If your pants are longer than necessary, try on and mark where the pants touch the floor. Simply cut off the pants at the correct length.
Step 3:
(Click Image to Enlarge)
For the pants that we are working with that are the correct length, unpick the hem and then trim off the unpicked hem at the level where they originally touched the ground.
Step 4:
(Click Image to Enlarge)
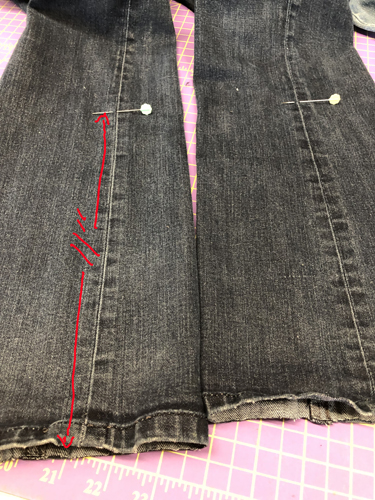
Measure up 11” on the outside seam of both legs and mark with a pin.
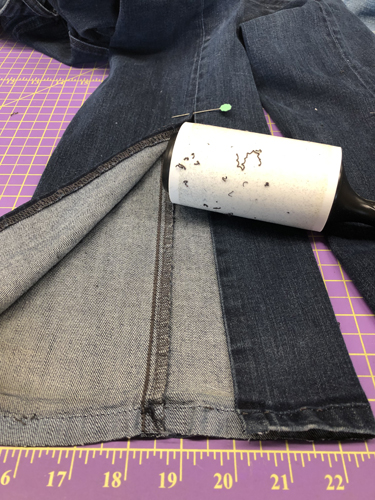
Step 5:
(Click Image to Enlarge)
Unpick the seam from the bottom of the pants to the pin on both sides. There may be one or two rows of stitching to unpick. A lint roller is useful to remove the debris from the stitch removal.
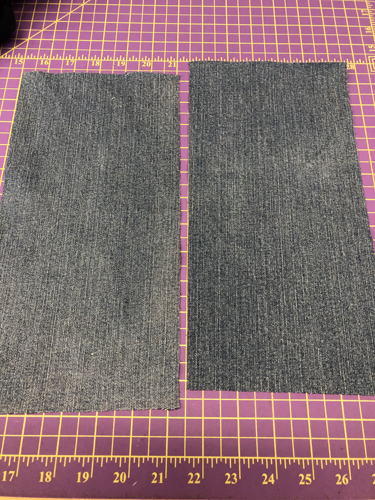
Step 6:
(Click Image to Enlarge)
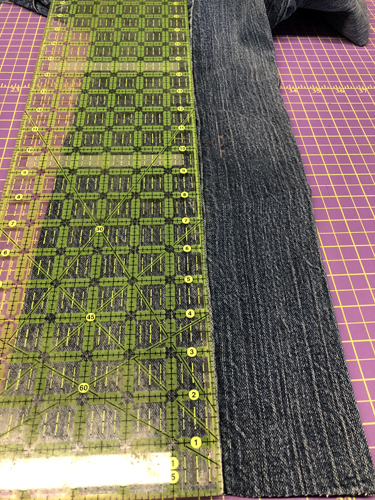
Cut 2 12” x 6” rectangles from the legs of your donor jeans. Have the lengthwise grain of the fabric run down the 12” side.
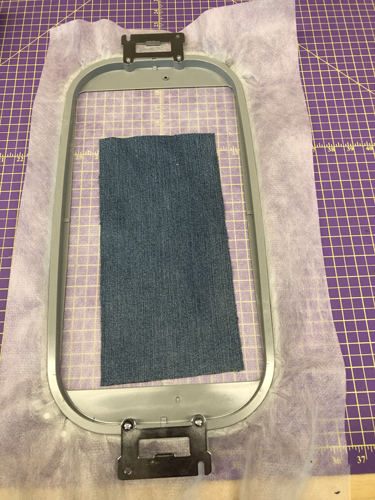
Step 7:
(Click Image to Enlarge)
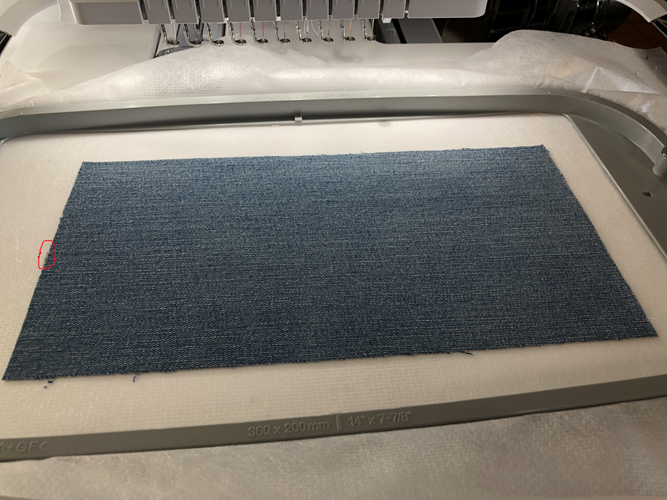
Tautly hoop poly-mesh stabilizer in your hoop and take to the machine with one piece of the donor fabric.
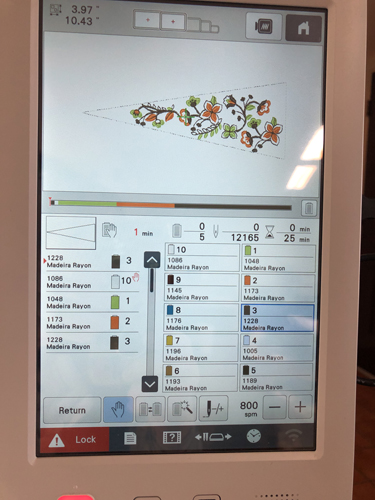
Step 8:
(Click Image to Enlarge)
Open the design in your machine. If using a multi-needle machine, you will need to rotate the pattern. You may rotate it in either direction, but I preferred having it rotated to the left. If you are using a single needle machine it will not need to be rotated.
Step 9:
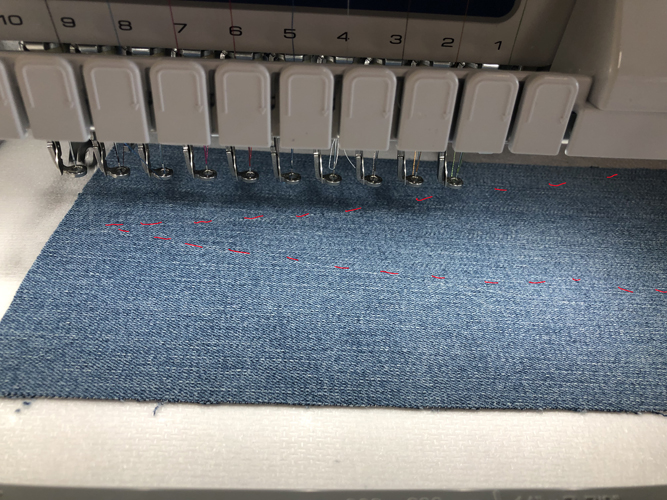
Run the 1st color stop (CS) in any color thread as it is a placement line. We need exact placement of the fabric, so make a mark on your stabilizer ½” above the placement line.
(Click Image to Enlarge)
Step 10:
Spray adhesive on the wrong side of the denim. Place the top of the denim on the mark you made ½” above the tip of the design and have the fabric centered over the triangle so that the fabric exceeds the placement lines by 1” on each side of the widest point. The fabric at the bottom of the triangle will exceed the placement line by 1”.
(Click Image to Enlarge)
Step 11:
Run the CS 2 in water-soluble thread. Do use water soluble thread as we will want to remove the bottom off the stitching when the project is completed. Those stitches are long stitches, so if you do not have access to water-soluble thread they should be easy to remove with a seam ripper.
(Click Image to Enlarge)
Step 12:
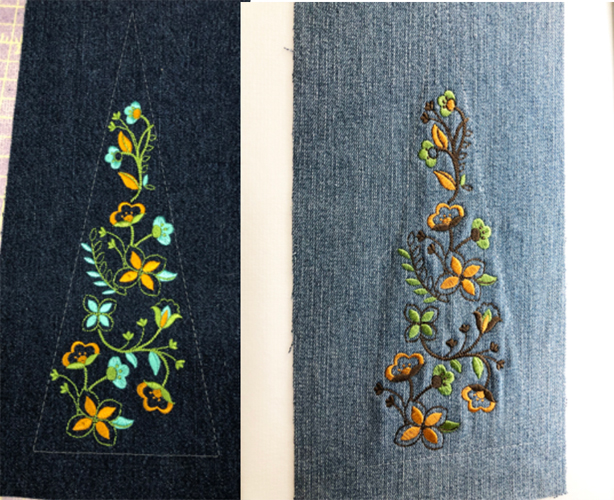
The design on the left is stitched in the color sequence as given with the design and stitched on dark denim.
1. Placement Line Neutral 2. Water-soluble thread 3. Green Turquoise (1299) 4. Autumn Gold (1173) 5. Lime Green (1049)
When I switched to a lighter denim insert for making the actual project, I thought that color sequence would not show up well on the lighter fabric. Therefore, the colors used were
1. Placement Line Neutral 2. Water-soluble thread 3. Lime Green (1049) 4. Autumn Gold (1173) 5. Root Beer (1230)
Use earth tone colors to stay with the 70’s vibe of the project. Stitch the design with your preferred colors.
(Click Image to Enlarge)
Step 13:
(Click Image to Enlarge)
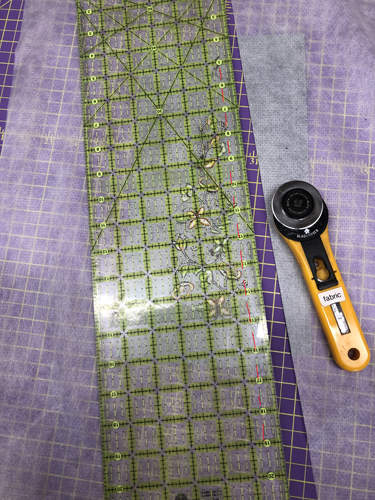
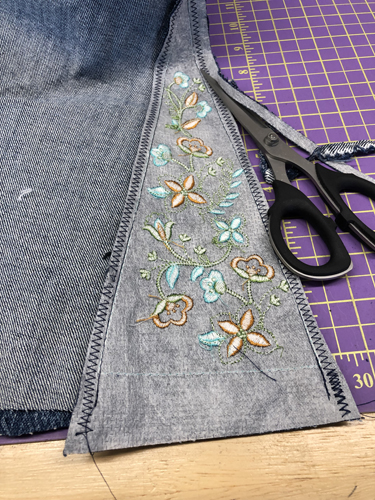
Remove the project from the hoop. Lay the ½” mark of a see-through ruler along the side water-soluble placement lines and trim each side to ½”. Note: If you can’t see the placement lines on light denim, turn the project over and trim from the back side. Trim the stabilizer just even with the fabric at the top and the bottom of the fabrics as they lay over the project. Do not trim to ½” at the bottom of the triangle. Repeat Steps 9 through 13 to make the insert for the 2nd leg.
Step 14:
(Click Image to Enlarge)
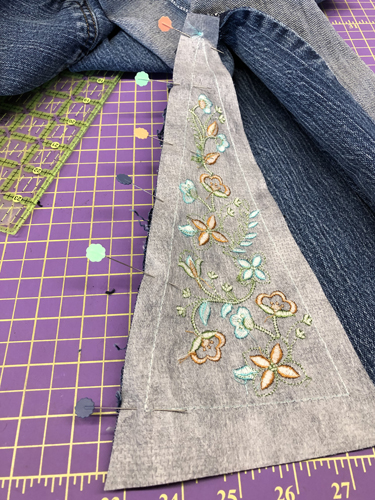
To stitch the inserts to the jeans, turn the jeans inside out. Place the insert face down on the opening in the jeans. Pin the top of the placement line point to the exact position where you stopped removing the stitches on the side of the leg. Pin the insert to the seam allowance of the jeans starting at that top point and working down. The insert will be a little longer than the jeans at this time. That is fine, it allows us to trim it later. Pin only the one side of the insert first.
Step 15:
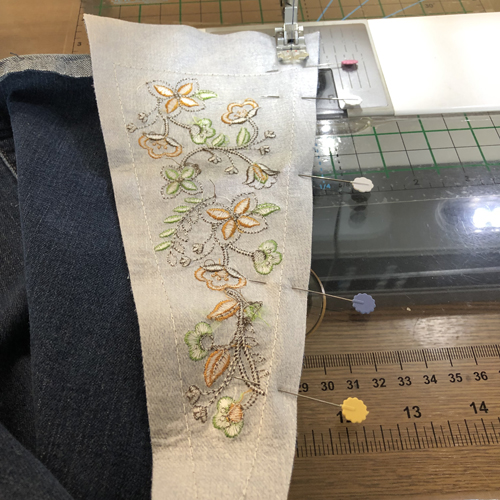
Stitch with a straight stitch from the bottom of insert to the point with a ½” seam allowance, backstitching at bottom and top of the seam. This means you can stitch right along the top of the water-soluble placement line. Stitch with regular navy sewing machine thread and a regular size 11 needle.
Step 16:
(Click Image to Enlarge)
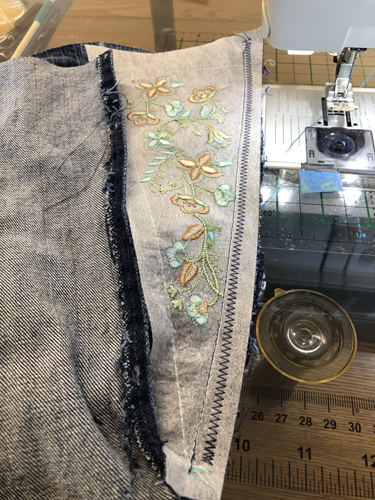
Switch to a zig-zag stitch and run a zigzag stitch close to the straight seam.
Step 17:
(Click Image to Enlarge)
Pin the second side of the insert to the other seam allowance working from the point to the bottom of the pants. Switch back to the straight stitch and sew the insert to the jeans with a ½” seam allowance. Stitch this seam from the top of the point to the bottom of the insert. Stitch a zigzag stitch close to this seam.
Step 18:
(Click Image to Enlarge)
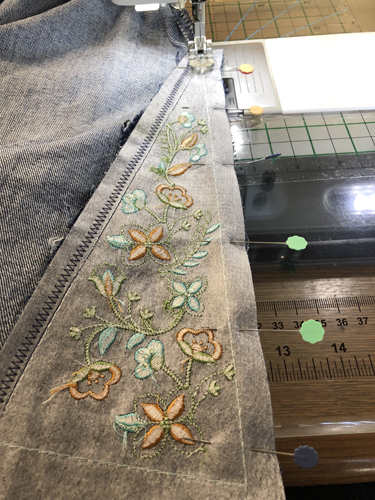
Trim both seams close to the zigzag stitches.
Step 19:
(Click Image to Enlarge)
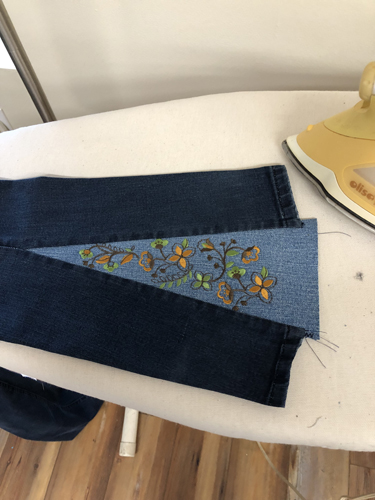
Press the insert seams flat the seams should be pointing out towards the jeans.
Step 20:
(Click Image to Enlarge)
Trim the excess insert fabric to be even with the bottom of the jeans.
Step 21:
(Click Image to Enlarge)
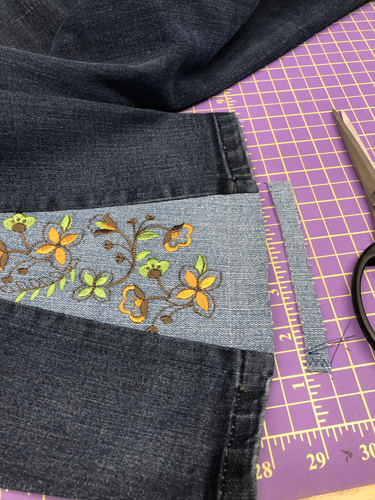
As we want these jeans to eventually fray, we need to trim the stabilizer across the back of the insert up to about the water-soluble placements lines that are still there.
Step 22:
(Click Image to Enlarge)
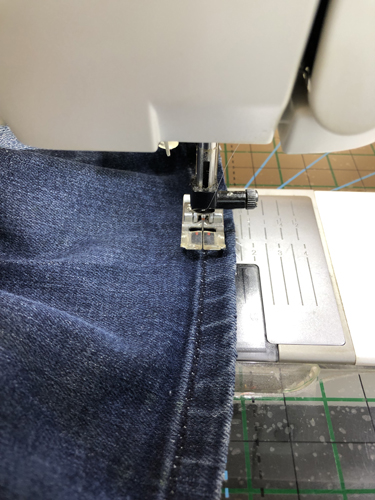
We want these pants to fray, but not too much. Using invisible thread in the bobbin and top of your machine, stitch all around the pant leg ½” above the bottom.
Step 23:
(Click Image to Enlarge)
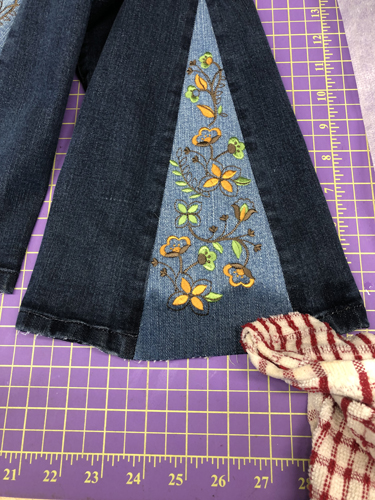
Remove the water-soluble thread stitches at the bottom of the insert with a wet rag.
Step 24:
Congratulations your first Bell Bottom pants are complete! Be prepared to make many. I made these for a daughter-in-law, now a daughter, two granddaughters and a sister-in-law all want some. I think I will do a few pair for myself too.
Award winning Digitizer, Embroidery Educator, Author and a Consultant to the Industry, Pat Williams has 30 years of experience in the embroidery industry. Pat has won multiple awards for her digitizing expertise including the 2007 Impressions Awards Grand Championship, Best of Show as well as the 1st and 2nd Place Awards. Pat’s love of digitizing has afforded her the opportunity to write numerous articles for Impressions magazine in the United States and Images Magazine in Europe. In 2001 Pat was named “Embroidery Educator of the Year.” For many years Pat taught digitizing seminars at the ISS Shows in Long Beach, CA and for Compucon software. She now resides in Tucson, AZ.